Making a terrarium became my weekend project after stumbling upon an intriguing DIY terrarium video online. Through trial, error, and a bit of greenery magic, I developed a thriving miniature ecosystem right on my windowsill. I'd love to walk you through the process step-by-step, demystifying the art of terrarium making for beginners.
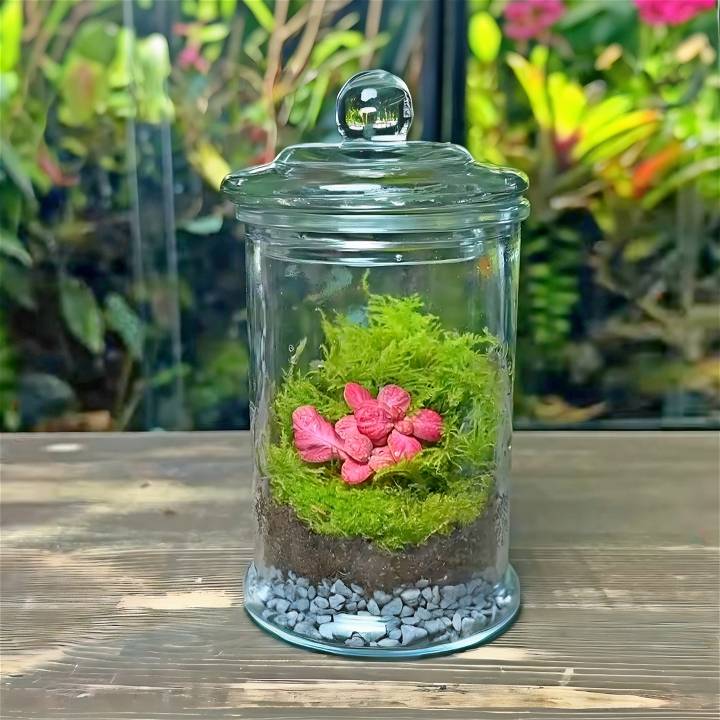
Materials You Need
Before we dive into the creation process, let's talk about the essentials you'll need. Each component plays a vital role in the success of your terrarium.
- Glass Jar: Ensure it's clear and clean. If possible, choose one with a wide opening to make assembling your terrarium easier.
- Drainage Layer Materials: Options include leca, pea gravel, or decorative aquarium gravel. These materials prevent water from stagnating at the bottom.
- Substrate Barrier (Optional): This could be a mesh or fine screen, necessary only if your drainage layer has large gaps.
- Terrarium Substrate: A mix of coco coir, sphagnum moss, orchid bark, pot charcoal, and worm castings. This combination retains moisture, resists compression, and nourishes your plants.
- Hardscape Materials (Optional): Rocks and driftwood to enhance aesthetics.
- Plants and Moss: Choose small plants and various types of moss that thrive in the terrarium environment.
- Tools: Long tweezers, a mini shovel, and a terrarium stick or a simple chopstick can be very handy.
- Watering Can or Spray Bottle: For lightly watering your terrarium.
- Cloth or Brush: To clean the interior walls of your glass jar if any soil gets on them.
Step by Step Instructions
Make a stunning DIY terrarium with our step-by-step guide: from preparing the jar to adding plants and moss, we've got you covered!
Step 1: Preparing Your Glass Jar
First, select the front view of your jar to avoid any seams from disrupting your view. If your jar has a lid, set it aside for now; we'll return to it later.
Step 2: Setting Up the Drainage Layer
Pour your chosen drainage materials into the base of the jar to a depth of about an inch or two. This layer catches excess water, preventing root rot. Smoothen it out to avoid any unevenness, ensuring your foundation is solid.
Step 3: Optional Substrate Barrier
If you used larger materials like leca, now's the time to cut and place a mesh screen over your drainage layer. This keeps your next layer, the soil, from mixing into the drainage and negating its purpose.
Step 4: Adding the Terrarium Substrate
Mix your substrate materials beforehand in a separate container. Once ready, gently pour the mix over your drainage layer or substrate barrier, shaping it to make depth; shallower at the front and deeper towards the back. This illusion of depth will make your terrarium more visually appealing.
Step 5: Introducing Plants and Moss
Your plants and moss are the stars of this mini ecosystem. Start with the moss as your ground cover, ensuring it's hydrated but not sopping wet. Layout your hardscape if you're using any, before planting. Use your long tweezers to plant the moss and any small plants you have chosen, positioning them in a pleasing arrangement. Remember, it's this layer that truly brings your terrarium to life.
Step 6: Watering
With your plants in place, it's time to lightly water your terrarium. Aim for a damp substrate, not a soggy one. This initial watering is crucial to help your plants and moss settle in their new home.
Step 7: Cleanup and Final Touches
Take a moment to clean any soil off the glass using your cloth or brush. This step is about ensuring your DIY terrarium looks neat and is ready for display.
Step 8: Cover and Place
If your terrarium has a lid, now's the time to put it on. Your terrarium will largely self-maintain through its mini water cycle, requiring only occasional watering. Place your terrarium in a spot with indirect sunlight; direct sun can overheat your terrarium and harm the plants.
Maintenance Tips
- Monitor Water Levels: Avoid overwatering; if condensation heavily covers the glass daily, air out your terrarium a bit.
- Trim and Tidy: Snip any overgrown plants to keep your terrarium looking its best.
- Watch for Pests: Deal with any unwelcome guests promptly to avoid infestations.
Selecting Terrarium Plants
Making a thriving terrarium begins with selecting the right plants. Whether you're a seasoned gardener or a beginner, choosing the perfect green companions for your closed terrarium is essential. Let's dive into the world of terrarium plants and discover how to make thoughtful selections.
1. Understanding Terrarium Ecosystems
Before we delve into specific plant choices, let's grasp the essence of a terrarium ecosystem. Closed terrariums are like tiny self-sustaining worlds. They mimic natural processes, recycling water and nutrients. Here's what you need to know:
- Humidity Lovers: Closed terrariums thrive in high humidity. The enclosed glass container traps moisture, making a mini rainforest. Think of it as a botanical spa for your plants.
- Low-Maintenance: These ecosystems require minimal care. Once set up, they can go weeks without watering. Perfect for busy plant enthusiasts!
2. Plant Criteria for Terrarium Success
When selecting plants, consider the following factors:
a. Size Matters
- Compact Growth: Opt for plants that won't outgrow your container. Look for species with slow growth rates and compact habits. Mini ferns, mosses, and small succulents fit the bill.
- Proportions: Imagine your terrarium as a miniature landscape. Choose plants that complement each other in size and shape. A variety of heights and textures make visual interest.
b. Light Requirements
- Indirect Sunlight: Closed terrariums prefer indirect light. Place them near a bright window but avoid direct sun. Too much sun can lead to overheating and scorched leaves.
- Shade-Tolerant: Ferns, fittonias, and peperomias thrive in low-light conditions. They'll happily bask in the gentle glow filtering through your curtains.
c. Soil and Drainage
- Well-Draining Soil: Use a well-draining potting mix. Regular garden soil retains too much moisture, which can lead to root rot.
- Activated Charcoal: Layer a thin bed of activated charcoal at the bottom of your container. It acts as a natural filter, preventing odors and maintaining soil health.
d. Plant Selection Ideas
Here are some delightful terrarium plants to consider:
- Miniature Ferns: These ancient beauties add a touch of prehistoric charm. Look for varieties like Maidenhair Fern or Button Fern.
- Fittonias (Nerve Plants): Their vibrant, veined leaves come in shades of green, pink, and red. Perfect for adding a pop of color.
- Baby Tears (Soleirolia soleirolii): These delicate, cascading plants make a lush carpet. They love the humid environment of closed terrariums.
- Miniature Orchids: Yes, you can have orchids in a tiny ecosystem! Choose miniature varieties like Phalaenopsis or Dendrobium.
- Mosses: Mosses are the unsung heroes of terrariums. They provide texture, retain moisture, and make a magical forest floor.
3. Arranging Your Terrarium
- Layering: Start with a base layer of gravel or small pebbles for drainage. Add the activated charcoal, followed by the potting mix.
- Plant Placement: Arrange your chosen plants, considering their growth habits. Taller plants at the back, shorter ones in front.
- Finishing Touches: Add decorative elements like tiny figurines, pebbles, or driftwood. These enhance the terrarium's charm.
Remember, each terrarium is unique. Experiment, observe, and enjoy the miniature world you've maked.
DIY Terrarium Maintenance Tips
Maintaining a closed terrarium is like tending to a tiny, green universe. These miniature ecosystems require care, but fear not! With a few simple guidelines, you'll keep your terrarium thriving. Let's dive into the world of terrarium maintenance:
1. Watering Wisely
- Less Is More: Closed terrariums are water-efficient. Their sealed environment recycles moisture, reducing the need for frequent watering.
- Watch and Wait: Observe your terrarium. When condensation forms on the glass, it's a sign of sufficient moisture. Water only when the soil feels dry.
- Use a Spray Bottle: For targeted watering, use a spray bottle to mist the soil and plants. Avoid over-saturating.
2. Light and Location
- Indirect Sunlight: Place your terrarium near a bright window, but avoid direct sun. Harsh rays can overheat the glass and harm your plants.
- Rotate Regularly: Turn your terrarium every few weeks to ensure even light exposure. This prevents one side from growing faster than the other.
3. Pruning with Purpose
- Trim Excess Growth: As your plants flourish, they may outgrow their space. Use small scissors or pruning shears to trim any unruly leaves.
- Remove Yellowing Leaves: Yellow leaves indicate stress. Snip them off to maintain a healthy appearance.
4. Cleaning and Grooming
- Wipe the Glass: Dust and fingerprints can accumulate on the glass. Gently wipe it with a soft cloth to keep your terrarium crystal clear.
- Combat Algae: If algae appear, don't panic. Remove it using a cotton swab or a small brush. Algae thrive in excess moisture, so adjust your watering if needed.
5. Troubleshooting Common Issues
- Foggy Glass: If condensation persists, leave the lid slightly ajar for a day to allow excess moisture to escape.
- Wilting Plants: Wilting may indicate overwatering. Let the soil dry out before watering again.
- Yellowing or Browning Leaves: Adjust the light exposure. Too much sun can scorch leaves, while too little light leads to pale foliage.
Remember, each terrarium has its unique needs. Observe, adapt, and enjoy the serene beauty of your little green world.
DIY Terrarium FAQs
Discover the ultimate guide to DIY Terrariums! Get answers to all your questions in this comprehensive FAQ resource. Make your own stunning indoor garden today.
What is a DIY Terrarium?
A DIY terrarium is a mini ecosystem created inside a glass container. It’s a decorative and natural art piece that can bring a bit of greenery into your home. Essentially, it’s a self-sustaining environment where plants can thrive with minimal care.
How Do I Start Making My Own Terrarium?
To start, choose a clear glass container with a wide opening for easy access. Gather small plants that are suitable for terrariums, like mosses, ferns, or air plants. You’ll also need rocks, charcoal, soil, and decorative elements. Layer these materials in your container, with rocks at the bottom for drainage, followed by charcoal to keep the water fresh, and soil for your plants to grow in.
What Plants Are Best for Terrariums?
Select plants that thrive in high humidity and have similar light and water needs. Ferns, mosses, and air plants are great choices. Avoid plants that grow quickly or are too large for your container.
How Do I Maintain My Terrarium?
Terrariums require minimal maintenance. Ensure they get indirect sunlight and monitor the moisture level inside. If it looks dry, lightly mist the plants with water. If there’s too much condensation, open the container to let some air in.
Can I Use Any Glass Container for a Terrarium?
Yes, you can use various glass containers like jars, vases, or even fish tanks, as long as they have a sealable lid. The lid helps maintain the humidity levels that are crucial for a terrarium’s ecosystem.
Remember, creating a terrarium is a personal and creative process. There’s no single right way to do it, so feel free to experiment and make it your own!
Conclusion:
Making a terrarium can be a fulfilling project that introduces a slice of nature into your living space. It's a tangible reminder of growth, resilience, and beauty. As you nurture your terrarium, you might find it nurturing you right back, bringing a sense of peace and accomplishment into your daily life. Remember, the key to a thriving terrarium is balance; too much of anything, be it water, sunlight, or neglect, can tip your miniature ecosystem off its course.


