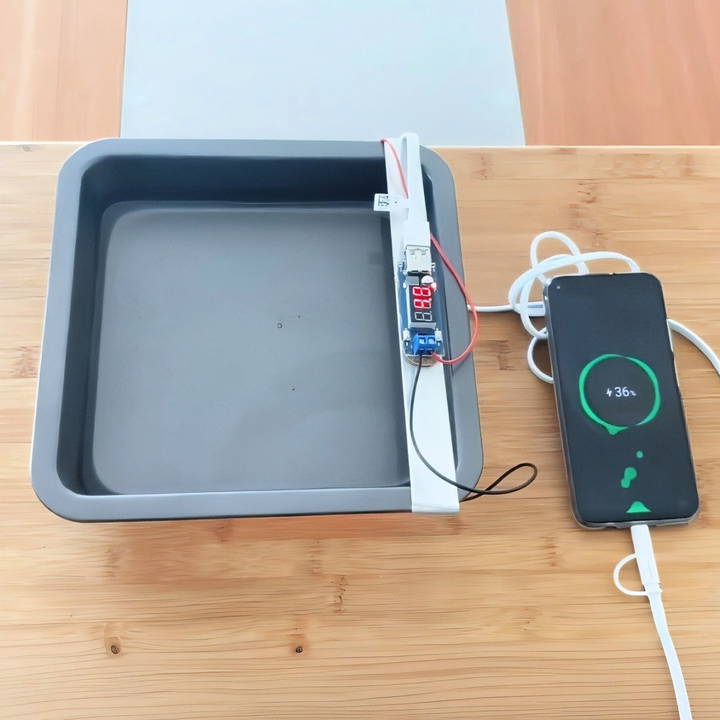
If you're interested in renewable energy or just enjoy DIY electronics, building a DIY thermoelectric generator (TEC) is a rewarding project. Thermoelectric generators utilize the Seebeck effect, which generates electricity from a temperature difference. With this guide, you'll learn every step, beginning with the basics of thermoelectric coolers (TECs) and culminating in a working device capable of charging small electronics, like your phone or a power bank.
What Is a Thermoelectric Generator?
A thermoelectric generator harnesses the Peltier effect, where heat moves from one side of a thermoelectric cooler (TEC) plate to the other. This movement of heat makes a temperature difference between the two sides of the plate. When you reverse this process, known as the Seebeck effect, you can generate electricity by maintaining a temperature difference.
In a typical DIY setup, one side of the TEC is heated while the other side is cooled. The heat source can be as simple as candles, while the cooling can be achieved using water or even ice cubes. When this temperature difference is maintained, the TEC generates a voltage, which can be regulated to charge small devices.
Basic Components
To build your own thermoelectric generator, you'll need the following components:
- TEC 12706: This is the specific thermoelectric cooler you'll use.
- Voltage Regulator: To regulate the voltage generated (important to prevent damage to devices).
- Thermal Paste: Ensures proper heat transfer between components.
- Loctite Glue: For securing the TEC plates and ensuring a solid bond.
- Insulation Tape: Prevents shorts by insulating wires and connections.
- Soldering Iron and Solder Wire: For making the necessary electrical connections.
- Aluminum Tray: Acts as a base for mounting the TEC plates and a medium for heat distribution.
- Candles: The heat source for your generator.
- Water or Ice: Used to cool one side of the TEC plates.
How Thermoelectric Coolers Work
Thermoelectric coolers (TECs), also known as Peltier devices, are capable of both heating and cooling, depending on how you use them. By applying electricity, one side of the TEC cools while the other heats up. However, in a thermoelectric generator, the process is reversed. By heating one side of the TEC while cooling the other, a voltage is generated through the Seebeck effect.
Step by Step Instructions
Learn how to build a DIY thermoelectric generator with step-by-step instructions, from gathering materials to generating electricity and troubleshooting.
1. Gather Your Materials
Before starting, make sure you have all the required materials:
- TEC 12706 (quantity: 8-10 for maximum efficiency).
- Voltage regulator (to control output voltage).
- Thermal paste (to facilitate heat transfer).
- Aluminum tray (to act as the base and heat conductor).
- Loctite glue (for securing components).
- Insulation tape (to prevent shorts).
- Soldering iron and solder wire (to make connections).
- Candles (your heat source).
- Water or ice cubes (for cooling).
2. Preparing the Aluminum Tray and TEC Plates
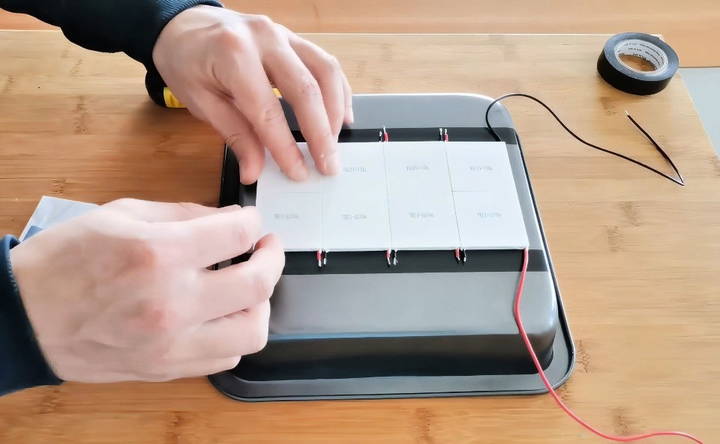
Start by preparing your aluminum tray. It should be large enough to accommodate multiple TEC plates (8-10 plates are ideal). The aluminum tray serves two purposes: it holds the TECs in place and helps conduct heat evenly across the plates.
- Lay out the TEC plates in the tray with the text side facing up. Make sure there's enough space between each plate so that they aren't touching.
- Apply a generous amount of thermal paste to the base of each TEC plate before placing it in the tray. This ensures efficient heat transfer between the TEC and the tray.
- Use Loctite glue to secure each TEC plate in place. Let the glue dry for about 12 hours to ensure a solid bond.
3. Wiring the TEC Plates
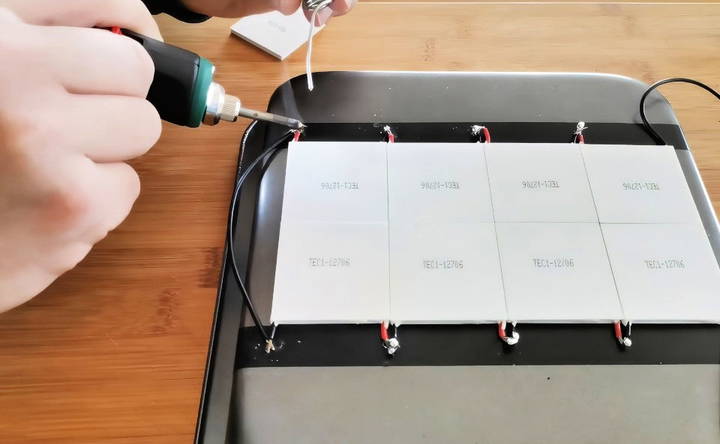
The next step is wiring the TEC plates together. TEC plates have two wires: one black (negative) and one red (positive). To make an effective circuit:
- Use insulation tape to cover areas where the wires could potentially touch the tray, preventing shorts.
- Solder the wires from one TEC to the next. Connect the red wire of one TEC plate to the black wire of the next in series. Continue doing this until all the plates are connected.
- At the end of the wiring, you'll have one red and one black wire free. These will be connected to the voltage regulator.
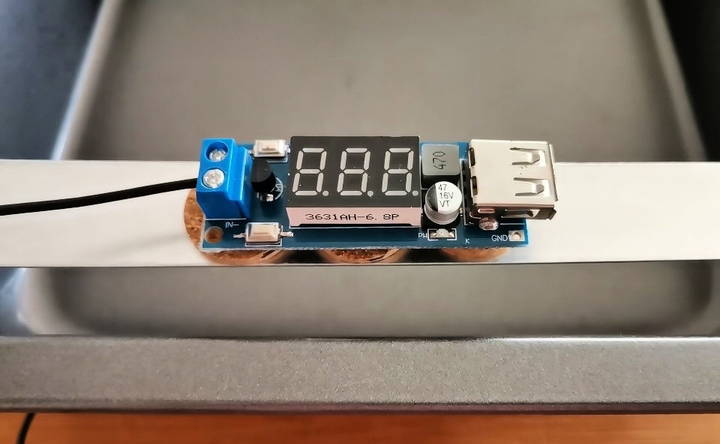
4. Installing the Voltage Regulator
The voltage generated by your thermoelectric generator can vary greatly depending on the heat and cooling conditions. It could reach up to 15 volts, which is too high for many small devices like phones. This is where the voltage regulator comes in.
- Install the voltage regulator in a secure position, using insulation tape or cork to keep it separate from the heat of the tray.
- Connect the red (positive) wire from your TEC array to the negative terminal of the voltage regulator, and the black (negative) wire to the positive terminal. This seems counterintuitive but is necessary due to the polarity of the thermoelectric plates.
- Set the voltage regulator to output 5 volts. This is the optimal charging voltage for most USB-powered devices.
5. Building the Stand
For the thermoelectric generator to work, you'll need to place it over the heat source (candles). The tray needs to be positioned in such a way that it can heat up the TEC plates from below while allowing you to cool the top side.
- Use aluminum to build a simple stand. The stand should be sturdy enough to support the tray and high enough to allow the candles to sit underneath.
- Cut another piece of aluminum and glue it to the top of the TEC plates. This will help distribute the heat evenly across all the plates.
6. Generating Electricity
Once everything is assembled, it's time to generate some electricity.
- Place candles under the tray. The number of candles you need depends on the size of your tray and TEC array. The more candles, the faster the TEC plates will heat up.
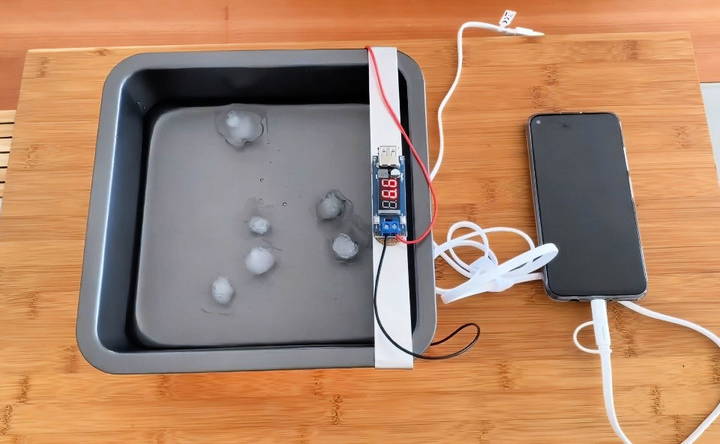
- Light the candles and pour water or add ice cubes on top of the aluminum tray. This will cool the top side of the TEC plates, making a temperature difference between the top and bottom sides.
- As the temperature difference increases, you'll notice the voltage rising. The voltage regulator will help stabilize the output, and soon you'll have enough power to charge your phone or power bank.
7. Testing and Troubleshooting
Once your thermoelectric generator is running, test the voltage output using a multimeter. Adjust the candle placement or add more candles if needed to maintain the temperature difference.
If the voltage output seems low:
- Ensure that the TEC plates are properly aligned and the thermal paste is applied evenly.
- Check for any loose solder connections or shorts caused by wire contact with the tray.
- Adjust the cooling by adding more water or ice.
Conclusion:
Building a thermoelectric generator using TECs is a fun and educational project that also provides a practical use for renewable energy. By understanding the Seebeck effect and following these steps, you can generate electricity with basic materials like candles, water, and TEC plates. Whether you're charging a phone or simply experimenting with alternative energy, this DIY project is a great introduction to thermoelectric technology.
With careful assembly and setup, your homemade generator can reliably produce enough power to charge small devices using just heat and cooling—a truly fascinating application of science!
FAQs About DIY Thermoelectric Generator
Discover answers to common questions about DIY thermoelectric generators, including construction tips and efficiency insights.
The lifespan of TECs is generally quite long. However, it depends on how frequently they are heated and cooled. Frequent thermal cycling may shorten their lifespan. It's important to refer to the specific TEC model's datasheet for detailed information on durability.
TECs are electronic components and should be treated as such when it comes to recycling. They contain materials like semiconductors and metals that can often be recycled through appropriate electronic recycling programs.
First, check all your electrical connections using a multimeter. Ensure there are no shorts and that each TEC plate is properly wired. Also, try increasing the temperature difference by bringing the heat source closer or adding ice cubes to improve cooling.
While aluminum is recommended due to its excellent thermal conductivity, other materials like steel could work. However, aluminum is generally preferred because it transfers heat more efficiently, which is crucial for optimizing the generator's performance.
The power output depends on the number of TECs and the temperature difference achieved. With 8 TEC plates in series, you can expect around 5V and approximately 1A, which results in about 5 watts of power, enough to charge small devices like phones.
Yes, it is possible to achieve 12V by using more TEC plates in series. For example, using 10 TEC plates can potentially generate more than 12V, depending on the heat and cooling efficiency.
The thermoelectric paste should be applied between the TEC plates and the aluminum tray. This ensures good thermal contact and maximizes heat transfer efficiency between the heat source and the TEC plates.
A zero current reading might indicate an incomplete or incorrect circuit. Recheck all connections and ensure that both heat and cooling are sufficient. You may need to increase the heat source or improve cooling to get a noticeable current flow.
Yes, the system uses heat, which can be generated from renewable sources like solar thermal or biomass. The cooling side could also be optimized using natural water sources or wind cooling, making it an eco-friendly energy generator.
Thermoelectric generators produce DC (direct current) power. The output voltage and current can be regulated to suit different devices, such as charging a phone via a USB port.


