As an avid gardener, I found myself continuously disappointed by the standard tomato cages available in garden centers. You know, the ones - who promise to support your tomato plants but inevitably fall short, literally and figuratively, as the season progresses. After realizing that my tomatoes were destined for greater heights, I embarked on a mission to construct a tomato cage that was not only indestructible but also collapsable for easy off-season storage. This quest led me to discover the perfect materials and tools for the job, ultimately allowing me to make what I firmly believe to be the best DIY tomato cage.
Why Opt for a Homemade Tomato Cage?
The primary issue with store-bought tomato cages is their lack of durability and size. Most are too frail to support a fully-grown tomato plant and too small to accommodate its potential growth. These limitations can stifle the plant's development and make garden maintenance a hassle. Seeking a solution, I envisioned a heavy-duty tomato cage capable of supporting robust growth and with the added convenience of folding flat for storage.
Materials and Tools: A Selection Guide
Learn how to construct the ultimate tomato cage with this selection guide on materials and tools, including cattle panels, bolt cutters, hog rings, and pliers.
Cattle Panel: The Backbone of Our Tomato Cage
- Why It's Needed: The cattle panel is strong enough to withstand the weight of mature tomato plants and flexible enough to be shaped into our desired cage design. Its robustness is key to achieving an indestructible structure.
Bolt Cutters: For Precision and Safety
- Why It's Needed: When working with the cattle panel, a reliable cutting tool is essential. Bolt cutters offer a safer alternative to angle grinders, reducing the risk of flying debris and ensuring precise cuts without much effort.
Hog Rings and Pliers: Securing the Structure
- Why It's Needed: To assemble our cage, we need something to securely fasten each panel corner. Hog rings, coupled with pliers, provide a strong connection between the panels, ensuring the integrity of our cage.
Constructing the Ultimate Tomato Cage
Now, let's dive into the construction process, which is simpler than you might think, thanks to the easy-to-handle materials and tools selected.
Cutting the Cattle Panel
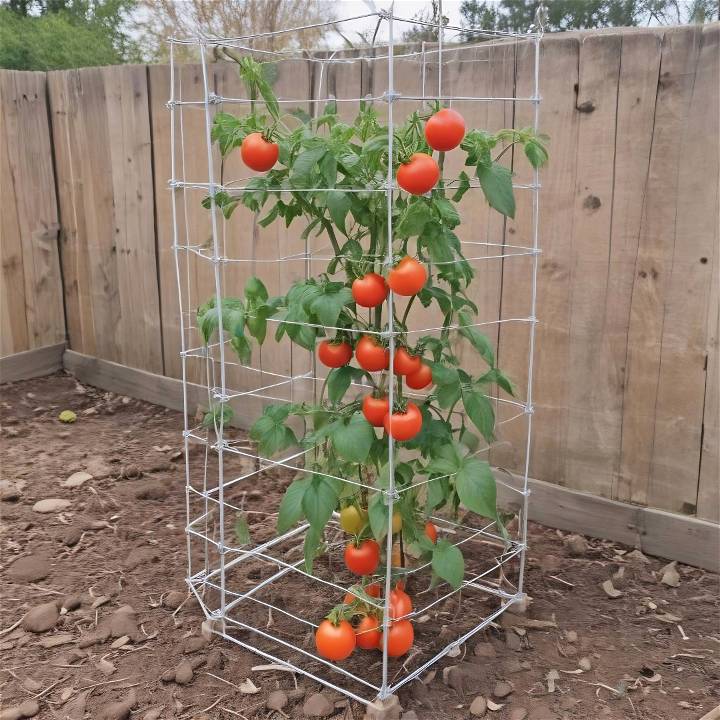
Firstly, we need to reshape the cattle panel into workable sections. Cutting the panel into pieces two feet wide and 50 inches tall allows for a manageable size that's perfect for tomatoes to thrive. It's crucial to remember that accuracy in cutting ensures a uniform final product. My earlier mishap with miscounting squares was a testament to the importance of paying close attention during this stage!
Assembling the Panels
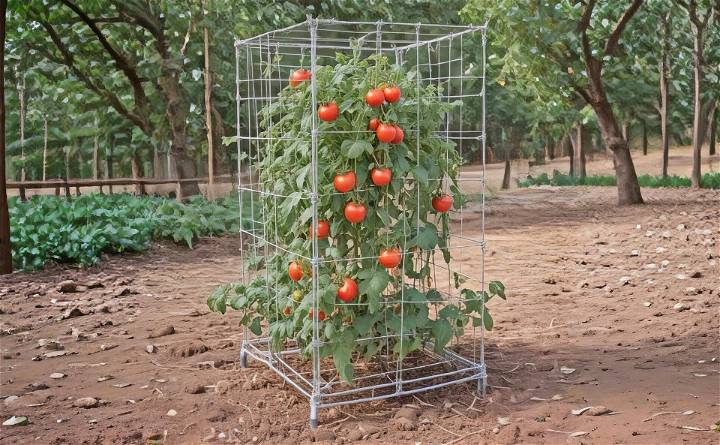
Once we have our pieces cut, it's time to connect them into a square shape using hog rings. At each corner, attach three hog rings to ensure the panels are securely fastened. This step is where the vision starts to come together, and we begin to see the framework of our heavy-duty, foldable tomato cage.
Adding Stability with Stakes
Considering the full-grown weight of tomato plants, the next concern is anchoring our cage to prevent it from toppling over. Instead of cutting stakes from the cage's height (which would reduce its overall tallness), opting for separate heavy-duty stakes planted into the ground at the base of each panel provides stability without sacrificing height. This approach ensures our cage remains upright and secure throughout the growing season.
The Folding Feature: A Storage Solution
One of my primary goals was to make a tomato cage that wouldn't be a hassle to store during the off-season. The flexibility of the cattle panel and the strategic placement of hog rings allow the completed cage to fold flat effortlessly. This design facilitates easy storage against a garage wall or in a garden shed, significantly reducing the space needed to house them when not in use.
The Moment of Truth
With bated breath, I unfolded my creation and positioned it around a young tomato plant. Not only did it stand firm, but it also promised ample space for the plant to grow, both in height and breadth. The true test of time and weather was yet pending, but confidence was high.
As the season progressed, the DIY tomato cage exceeded my expectations. It withstood the elements, supported the vigorous growth of my tomatoes, and, most importantly, folded away with ease as the gardening season drew to a close.
Why This Journey Matters
Sharing this journey isn't just about flaunting a successful DIY project. It's about encouraging fellow gardeners to look beyond the limitations of what's available commercially and to recognize the potential of building solutions tailored to their specific needs. The process taught me the importance of resilience, precision, and innovation - qualities that are invaluable in gardening and beyond.
Making the ultimate DIY Tomato Cage brought joy and prepared me for more challenges ahead with a DIY mindset. Following my guide or making adjustments, the goal is to make something lasting and fulfilling.
Understanding the Importance of Tomato Cages
Tomato cages are essential for successful tomato cultivation. Whether you're a seasoned gardener or a beginner, providing proper support to your tomato plants ensures healthier growth, higher yields, and easier maintenance. Let's dive into why tomato cages matter:
1. Why Use a Tomato Cage?
- Stability: Tomato plants have a tendency to sprawl and spread out as they grow. Without support, their stems may bend, break, or touch the ground. A sturdy cage keeps them upright, preventing damage and ensuring better air circulation.
- Fruit Protection: As tomatoes develop, their fruit becomes heavier. Without support, the branches may sag, causing the fruit to touch the soil. This contact increases the risk of rot, pests, and diseases. A cage lifts the branches, keeping the fruit clean and healthy.
- Sun Exposure: Properly spaced tomato cages allow sunlight to reach all parts of the plant. Sunlight is crucial for photosynthesis, which directly impacts fruit production. Caged plants receive consistent light, leading to better ripening and tastier tomatoes.
- Space Optimization: Tomato cages keep plants compact and organized. In small gardens or raised beds, this is especially beneficial. Neatly caged plants maximize space and make harvesting easier.
2. When to Use Tomato Cages
- Indeterminate Varieties: Indeterminate tomatoes (such as cherry tomatoes and heirlooms) continue growing and producing fruit throughout the season. These vigorous plants benefit greatly from cages. As they reach impressive heights, cages provide the necessary support.
- Determinate Varieties: Determinate tomatoes (like Roma or paste tomatoes) have a predetermined growth pattern. They produce fruit within a specific timeframe. Even though they are more compact, cages still help keep their branches organized and prevent sprawling.
Remember, tomato cages are not just about functionality; they also contribute to an aesthetically pleasing garden. By supporting your tomato plants with well-designed cages, you'll enjoy healthier harvests and a tidier garden space.
Creative Variations for Tomato Cages
When it comes to tomato cages, don't limit yourself to the standard wire mesh cylinders. Get creative and explore variations that not only provide support but also add flair to your garden. Here are some innovative ideas:
1. Decorative Tomato Cages
- Painted Cages: Transform plain wire cages into eye-catching garden art. Use weather-resistant paint to add color and patterns. Opt for vibrant reds, greens, or even whimsical designs like polka dots or stripes. Your tomato plants will stand out, and your garden will look delightful.
- Stenciled Designs: If you're artistically inclined, consider stenciling designs onto your tomato cages. Think sunflowers, butterflies, or geometric shapes. Stencils are an easy way to personalize your cages and make them unique.
2. Multi-Functional Cages
- Pepper Partners: Tomato cages aren't exclusive to tomatoes! Use them for other climbing plants like peppers. Peppers appreciate the same sturdy support. Plus, having uniform cages throughout your garden makes a cohesive look.
- Bean Towers: Extend the use of your tomato cages to pole beans. As bean plants grow, they need vertical support. Tomato cages work beautifully for this purpose. Just guide the bean vines onto the cage, and watch them climb.
3. Bamboo Alternatives
- Bamboo Teepees: Instead of traditional wire cages, make teepees using bamboo stakes. Gather several bamboo poles, tie them at the top, and spread the bottoms apart to form a cone. Plant your tomatoes inside the teepee. It's a rustic and eco-friendly option.
- Bamboo Ladders: Arrange bamboo stakes horizontally and vertically to form ladder-like structures. These ladders provide ample space for tomato branches to weave through. They're visually appealing and functional.
4. Repurposed Materials
- Old Fencing: Salvage sections of old wooden or metal fencing. Cut them into appropriate lengths and make rectangular cages. These rustic cages lend character to your garden while supporting your tomatoes.
- Wire Baskets: Those wire baskets lying around? Turn them into tomato cages! Remove the bottom, and you have an instant cage. The open design allows air circulation and easy access to your plants.
Balance creativity and functionality for tomato cages that improve plant health and garden aesthetics. Reflect your personality through experimentation and enjoyment.
FAQs About DIY Tomato Cages
Find answers to all your burning questions about DIY tomato cages. Learn how to make your own sturdy, cost-effective tomato supports at home.
1. What Are Tomato Cages, and Why Do I Need Them?
Tomato cages are supportive structures designed to keep your tomato plants upright as they grow. They prevent sprawling, protect fruit from touching the ground, and ensure proper sun exposure. Using tomato cages leads to healthier plants and better yields.
2. When Should I Install Tomato Cages?
Install tomato cages shortly after planting your tomato seedlings or young plants. As the plants grow, the cages provide essential support. Don't wait until the branches start bending or fruit forms; early installation is key.
3. How Do I Make DIY Tomato Cages?
Making your own tomato cages is simple:
- Materials: Gather sturdy wire mesh, wooden stakes, or other durable materials.
- Shape: Bend the mesh or stakes into a cylindrical shape.
- Size: Customize the dimensions based on your tomato variety and garden space.
- Placement: Position the cage around the plant, ensuring it's stable and centered.
4. Can I Decorate My Tomato Cages?
Absolutely! Get creative:
- Painted Cages: Use weather-resistant paint to add color and patterns.
- Stenciled Designs: Stencil sunflowers, butterflies, or geometric shapes for a personalized touch.
5. What Other Plants Can I Use Tomato Cages For?
Expand beyond tomatoes:
- Peppers: Pepper plants benefit from the same sturdy support.
- Beans: Use tomato cages for pole beans—they'll climb beautifully.
6. How Do I Store Tomato Cages After the Growing Season?
- Disassembly: Take apart the cages carefully.
- Storage: Store them flat or stack them to save space.
- Reuse: Clean and reuse the cages next season.
Remember, tomato cages aren't just functional; they can also be visually appealing. Experiment with different designs and enjoy a well-supported and beautiful garden!
Conclusion:
In conclusion, DIY tomato cages are a versatile and practical addition to any garden. By making your own, you can customize the size and design to suit your needs while saving money in the process.


