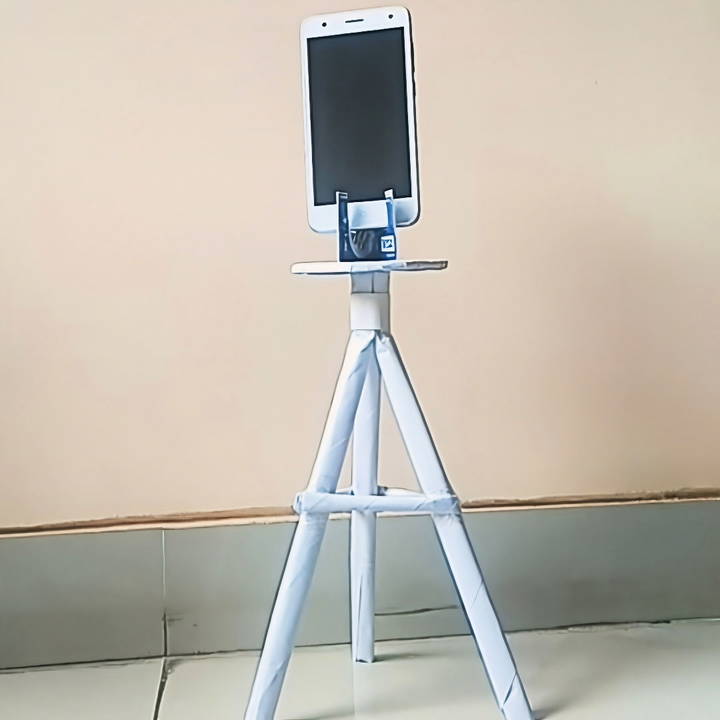
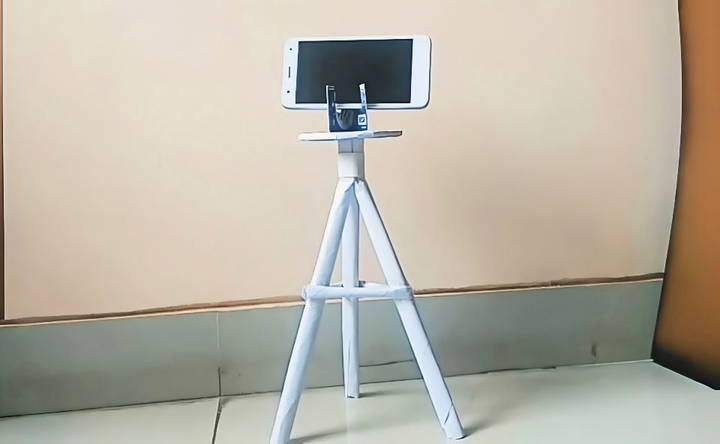
Starting with the right tools can make any project easier. I remember when I wanted to take steady photos but didn't have a tripod. Instead of buying one, I decided to make my own DIY tripod. It was surprisingly simple and required only basic materials I had at home. With a little time and patience, I was able to build something functional and sturdy.

If you're like me, trying to save money or just enjoy working with your hands, this guide will be helpful. I've included all the steps you need to build your own tripod from scratch. I'm confident this will give you the tools to capture great photos without spending a lot.
Step by Step Instructions
Learn how to build a sturdy DIY tripod step by step with easy instructions. Perfect for making your own mobile mount and testing its stability.
Step 1: Gathering the Materials
Gathering essential materials for projects: learn the necessary items you need in step 1 effortlessly. Get detailed guidance on what materials you require.
Materials You'll Need:
- Paper/newspaper
- Glue
- Tape
- Cardboard
- An old card or more cardboard
Each material plays a critical role in the fabrication process. Paper or newspaper serves as the primary structure for the tripod, providing lightweight yet sturdy support once rolled and secured. Glue and tape are essential for reinforcing the structure, ensuring it remains intact and stable. Cardboard adds a base to the tripod, offering a flat surface for your mobile to rest upon, and an old card or cardboard cutout is crucial for the mobile mount that keeps your phone in place.
Step 2: Building the Structure
Building the structure for making paper rolls and joining the legs. Easy DIY tips for sturdy paper crafts. Perfect for beginners!
Making Paper Rolls:
First, take your paper or newspaper and roll three lengthy strips. These rolls will become the legs of your tripod, providing the necessary height and stability for your mobile. Ensure they are tightly rolled to enhance their strength. After rolling, secure each with tape so they don't unravel.
Joining the Legs:
Once you have your three rolls, it's time to stick them together. Begin by applying glue on the sides you intend to stick together, then secure them further with tape for additional strength. Position them in a triangular manner for optimal balance and spread them slightly apart to prepare for the next step.
Step 3: Securing the Top
After you've buildd the legs and ensured they're firmly attached, cut any extra edges to make the top as flat as possible. Following that, take a piece of tape and wrap it around the top section where the legs meet. This consolidates the structure, making it ready to support the platform for your mobile.
Step 4: Constructing the Mobile Mount
Constructing the mobile mount - build a sturdy mount for your mobile. Learn crafting tips and finishing touches for a perfect fit.
Crafting the Mount:
Utilizing the old card or a piece of cardboard, cut it into a shape that can hold your mobile. You might want to customize the size based on your phone's dimensions, ensuring it fits snugly. I used an old loyalty card, which was perfect for the task. Glue or tape this to the top center of your tripod structure.
Finishing Touches:
To fortify the mount, I wrapped tape around the card and the paper rolls, making a secure platform for my mobile phone. Make sure it's tight and aligned correctly to keep your phone balanced when mounted.
Step 5: Testing and Usage
With the construction complete, it was time to test out my new DIY tripod. I placed my phone into the mount, adjusting its position to ensure stability and balance. To my delight, the tripod held firm, providing a perfect angle for filming. Not only did it serve well for video creation, but it also proved helpful during online classes and as a stationary stand for watching content, marking a significant upgrade to my content creation toolkit without any cost.
Customization Ideas for Your DIY Tripod
Customization is key when it comes to making a DIY tripod. It allows you to tailor your tripod to your specific needs and preferences. Here are some ideas to inspire you:
Adjustable Legs for Versatility
- Why It's Useful: Adjustable legs can help you stabilize the tripod on uneven surfaces and adjust the height as needed.
- How to Implement: Use telescopic tubes or threaded pipe sections that can be locked at various lengths with wing nuts or cam levers.
Swivel Head for Flexible Angles
- Why It's Useful: A swivel head allows for smooth panning and tilting, giving you more control over camera movement.
- How to Implement: Attach a ball head or a fluid head to the top of your tripod. You can repurpose old tripod heads or purchase new ones designed for DIY projects.
Quick-Release Mechanism for Convenience
- Why It's Useful: Quick-release plates make it easy to attach and detach your camera, saving you time and hassle.
- How to Implement: Incorporate a pre-made quick-release system or build your own using a sliding plate with a secure locking mechanism.
Smartphone Adapter for Mobile Photography
- Why It's Useful: With the rise of smartphone photography, having an adapter can turn your tripod into a versatile tool for both cameras and phones.
- How to Implement: Use a spring-loaded clamp or a bracket with an adjustable screw to hold the phone securely.
Counterweight Hook for Stability
- Why It's Useful: A counterweight hook can help balance the tripod, especially with heavier cameras or in windy conditions.
- How to Implement: Fix a hook to the bottom of the central column where you can hang weights or a bag of sand.
Spirit Level for Precision
- Why It's Useful: A spirit level ensures your camera is perfectly horizontal, which is crucial for landscape photography.
- How to Implement: Attach a small bubble level to the tripod head or legs.
Foam Grips for Comfort
- Why It's Useful: Foam grips provide comfort when carrying the tripod and protect your hands in cold weather.
- How to Implement: Add foam tubing around the upper sections of the tripod legs.
The goal of customization is to enhance the functionality and user experience of your DIY tripod. Keep your modifications simple, effective, and tailored to your needs.

Common Mistakes to Avoid When Building Your DIY Tripod
Building a DIY tripod can be a rewarding project, but it's essential to avoid common pitfalls that can affect stability, usability, and overall performance. Let's explore some mistakes to steer clear of:
Weak Materials Selection:
- Mistake: Using flimsy or inadequate materials for your tripod legs and central column.
- Why It Matters: Weak materials compromise stability and durability. Your tripod may wobble or fail under the weight of your camera.
- Solution: Opt for sturdy materials like aluminum, hardwood, or PVC pipes. Consider the weight of your camera when choosing materials.
Improper Weight Distribution:
- Mistake: Uneven weight distribution across the tripod legs.
- Why It Matters: Uneven weight can lead to instability and tipping over.
- Solution: Ensure equal weight distribution by positioning the camera's center of gravity directly above the tripod's center column. Use a spirit level to check alignment.
Neglecting Stability Features:
- Mistake: Ignoring stability-enhancing features.
- Why It Matters: A shaky tripod affects photo and video quality.
- Solution: Add features like adjustable leg locks, rubber feet, and a hook for counterweights. These enhance stability on various surfaces.
Inadequate Height Adjustment:
- Mistake: Building a fixed-height tripod.
- Why It Matters: You'll miss out on versatile shooting angles.
- Solution: Design adjustable legs with multiple height settings. Incorporate telescopic sections or extendable legs.
Ignoring Vibration Dampening:
- Mistake: Neglecting vibration reduction.
- Why It Matters: Vibrations from wind or camera movement can blur photos.
- Solution: Use dampening materials like foam or rubber between joints and contact points.
Lack of Locking Mechanisms:
- Mistake: Failing to secure moving parts.
- Why It Matters: Loose joints lead to instability during use.
- Solution: Include reliable locking mechanisms for leg extensions, swivel heads, and quick-release plates.
Overlooking Compatibility:
- Mistake: Not considering camera compatibility.
- Why It Matters: Your tripod may not fit all your devices.
- Solution: Design a universal mount or build interchangeable adapters for different cameras and smartphones.
Ignoring Weather Resistance:
- Mistake: Building a tripod without weather protection.
- Why It Matters: Exposure to rain, sand, or extreme temperatures can damage your equipment.
- Solution: Seal joints, use rust-resistant materials, and add protective coatings.
A well-constructed DIY tripod enhances your photography and videography experience. Avoid these mistakes, and you'll have a reliable tool for capturing stunning moments!
Maintenance and Troubleshooting for Your DIY Tripod
Keeping your DIY tripod in top condition is crucial for ensuring it remains stable and functional for years to come. Here's a straightforward guide to maintaining your tripod and solving common problems:
Regular Cleaning
- Why It's Important: Dust, dirt, and grime can build up, causing mechanisms to stick or wear out.
- How to Do It: Wipe down your tripod with a soft, dry cloth after each use. For tougher grime, use a slightly damp cloth with mild soap, then dry thoroughly.
Tightening Screws and Bolts
- Why It's Important: Loose screws can lead to wobbly tripod legs or heads.
- How to Do It: Periodically check and tighten all screws and bolts. Keep a small screwdriver or wrench in your camera bag for on-the-go adjustments.
Storage Tips
- Why It's Important: Proper storage protects your tripod from damage and warping.
- How to Do It: Store your tripod in a cool, dry place. If possible, use a tripod bag to prevent scratches and dents.
Troubleshooting Common Issues
- Problem: Legs won't extend or retract smoothly.
- Solution: Clean the leg locks and apply a light lubricant if necessary. Make sure not to over-tighten the locks.
- Problem: The tripod head is stiff or jerky.
- Solution: Loosen the head's tension controls and clean any debris. Lubricate the moving parts with a silicone-based lubricant.
- Problem: Tripod is unstable.
- Solution: Check that all feet are touching the ground and adjust leg lengths as needed. Ensure the head is properly balanced with the camera's weight.
Preventive Measures
- Tip: Regularly inspect your tripod for signs of wear or damage.
- Tip: Avoid exposing your tripod to extreme temperatures or moisture, which can cause materials to expand, contract, or corrode.
By following these maintenance and troubleshooting tips, you'll keep your DIY tripod functioning smoothly, ensuring it's always ready for your next photo adventure.
FAQs About DIY Tripod
Discover essential FAQs about DIY Tripods. Learn how to build, customize, and troubleshoot your own camera support system easily at home.
Stability is key for a good tripod. To ensure your DIY tripod is stable, you can add weight to its base, like sand or rocks. Make sure all connections, like bolts and tape, are secure. Test the tripod’s stability by gently pushing it to see if it wobbles or tips over. Adjust as necessary until it stands firm.
Yes, many DIY tripod designs focus on portability. Using lightweight materials and a collapsible design can make your tripod easy to transport. Consider using materials like aluminum rods or plastic pipes that can be disassembled and fit into a backpack or bag.
When crafting a DIY tripod, always prioritize safety. Ensure that all parts are securely attached and that the tripod can support the weight of your camera without risk of collapsing. Be mindful of sharp edges or small parts that could pose a hazard, and smooth out or secure these as needed.
Most cameras have a standard tripod mounting hole at the bottom. You can create a compatible attachment point on your DIY tripod using a screw that fits this hole. Secure the screw with a nut or strong adhesive to ensure your camera can be safely attached and detached from the tripod.
Adjusting the height of your DIY tripod can be achieved by designing it with telescoping legs or using adjustable clamps. For a simple solution, you can use slip joints on PVC pipes or build notches on wooden dowels to set different heights. Ensure that the mechanism you choose is secure and can lock in place to prevent your tripod from collapsing while in use.
Wrapping Up
With these clear steps, you can easily build your DIY tripod and start taking steady shots in no time!


