Building a homemade DIY truck bed bike rack can be a fulfilling and practical project. Building your own bike rack offers a cost-effective solution to transport bicycles securely and efficiently. With some basic materials and tools, you can tailor the rack to suit your specific needs. This DIY approach not only saves money but also provides a custom fit that can be more reliable than commercial options.
For those interested in a DIY truck bed bike rack, the process is straightforward. Start by gathering the necessary materials like wood, PVC pipes, or metal. Follow step-by-step instructions to construct a stable and sturdy bike rack. With clear guidance, even those handy around the house can complete this project.
Discover how to build a homemade DIY truck bed bike rack easily. Secure your bikes for travel with this step-by-step guide.
Step by Step Instructions
Learn how to build a DIY bike rack with our step-by-step instructions. Simplify design, gather materials, construct, and customize for perfect storage.
Step 1: Simplify the Design
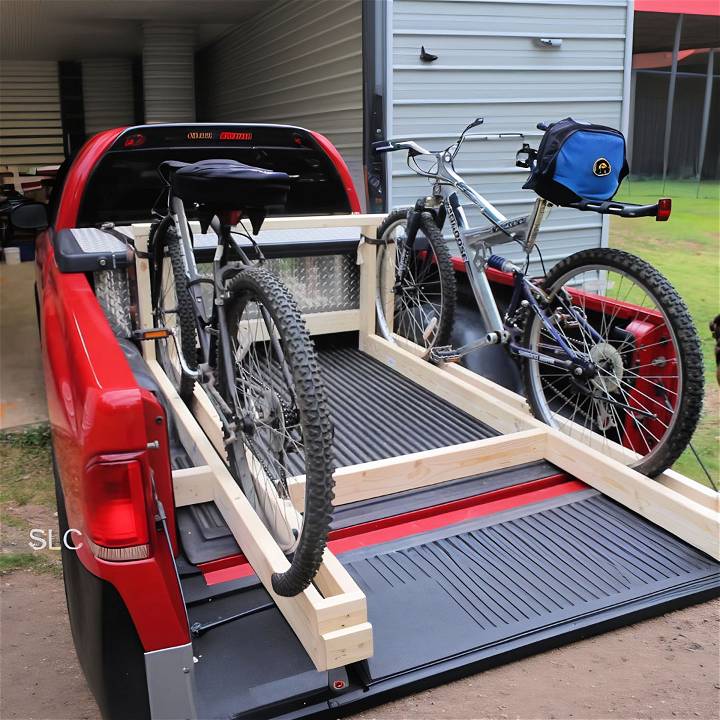
First, I embraced simplicity. I measured the bike's length within the truck bed to determine the size of the rack. A manageable six-foot length seemed ideal, and it would fit within the bed even with the toolbox. For materials, I chose two-by-fours for their affordability and durability.
Materials Needed:
- Two-by-fours (length determined by your bike and truck bed size)
- Screws
- Pocket hole screws
- Five-inch pieces for support
Why Each Material is Needed:
- Two-by-fours serve as the structure's backbone, providing a sturdy framework.
- Screws would hold the structure together.
- Pocket hole screws are for attaching parts where traditional screws might not suffice.
- Five-inch pieces are intended for additional support and securing the bike.
Step 2: Construction
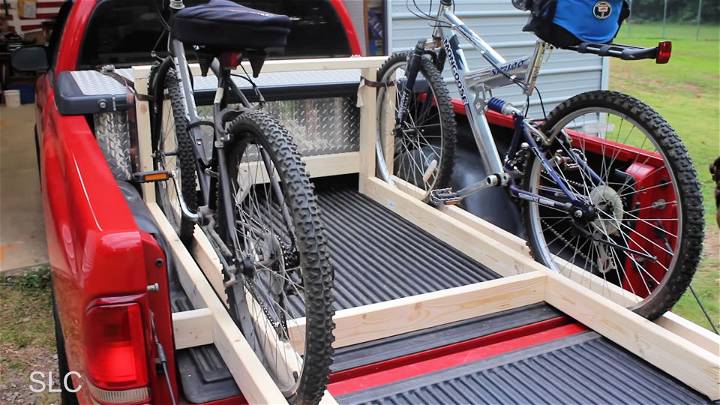
I started by laying the two-by-fours on the ground, mimicking the bike's tire width. Approximately a two-inch gap between the boards would cradle the tires. Using the five-inch pieces, I joined the boards at their ends and midway for added stability, making a simple yet effective bike slot. This setup was duplicated for both the front and rear tires, considering their differing sizes.
Key Steps:
- Secure boards with five-inch supports at ends and midway.
- Test fit with bikes to ensure a snug fit.
- For additional stability, add braces across the top and bottom.
Step 3: Additional Storage Design
Realizing the value of extra space, especially for longer trips involving camping gear, I added a crossbeam across the back. This not only offered more rigidity to the structure but also a ledge against which to secure belongings. The design tweak provided a dual purpose: bike transportation and gear storage.
Step 4: Securing the Rack and Bikes
Securing the rack to the truck bed was crucial for safety and stability. I opted for a ratchet strap linking the rack to the front of the bed, ensuring it wouldn't shift during transport. For the bikes, I used long eye bolts that could be easily tightened and loosened, providing both a secure fastening and quick access.
Step 5: Customizations and Final Touches
Considering trucks vary in size and design, I recommend adapting the structure to fit. For my setup, additional leg bracing was necessary to minimize movement. Furthermore, installing heavy-duty hooks or eye bolts on the crossbeams allowed for hanging items or securing gear with straps, adding versatility to the setup.
The project ended with a strong bike rack and extra storage for my truck bed, fitting both my toolbox and camping gear securely.
Customization Tips for Your DIY Truck Bed Bike Rack
Building a DIY truck bed bike rack is not only a practical project but also an opportunity to add a personal touch to your vehicle. Here are some tips to customize your bike rack:
- Choose the Right Materials: Depending on your truck’s bed and the number of bikes you want to carry, select materials that are both sturdy and lightweight. Aluminum and PVC pipes are popular choices due to their durability and ease of handling.
- Adjustable Sizing: Design your rack with adjustable width and length to accommodate different bike sizes and numbers. Use telescoping tubes or modular components that can be easily reconfigured.
- Padding for Protection: To prevent scratches and dings on both your bikes and truck, add padding to the rack’s frame. Foam pipe insulation works well and is readily available at hardware stores.
- Color Customization: Paint your bike rack to match or complement your truck’s color scheme. Use spray paint meant for outdoor use to ensure it withstands the elements.
- Security Features: Incorporate lockable features to secure the bikes to the rack and the rack to the truck bed. This can be as simple as adding eyelets for padlocks or built-in cable locks.
- Tool-Free Assembly: Aim for a design that requires minimal tools for assembly and disassembly. Quick-release clamps and wingnuts can be very handy for this purpose.
- Foldable Design: If storage space is a concern, make a foldable design that can be compacted when not in use.
- Enhanced Accessibility: Consider a design that allows easy access to the truck bed without removing the bikes. Swivel mounts or sliding tracks can be beneficial.
- Reflective Elements: For added safety, especially during night-time transport, attach reflective tape or paint to the rack.
- Personalization: Add a personal touch with decals, stickers, or even a custom nameplate.
Use these tips to make a functional, stylish bike rack that meets your needs. Balance creativity with practicality for a fun and useful DIY project.
Troubleshooting Common Issues
When building and using a DIY truck bed bike rack, you might encounter some challenges. Here’s how to troubleshoot common issues:
- Bike Size Miscalculations: It’s crucial to measure your bikes accurately. Ensure the rack can accommodate the full length and width of your bikes.
- Insufficient Rack Bracing: Your rack must be sturdy. If it wobbles, reinforce it with additional bracing to hold the bike firmly in all driving conditions.
- Storage Space Oversight: Design your rack to not only carry bikes but also consider extra storage for gear or tools.
- Difficulty Securing Bikes: If bikes are moving during transit, use additional straps or a stabilizing bar for extra security.
- Damage to Bikes or Trucks: To prevent damage, ensure bikes are not packed too tightly. Use padding between bikes and the truck bed.
- Incompatibility with Bike Types: Some racks may not work well with road or gravel bikes due to less clearance. Adjust the rack design to fit these bikes.
- Long-Distance Transport Issues: For long trips, ensure your rack and bikes are secure. Check all connections before starting your journey.
- Weather Protection: If your rack is not covered, consider using weather-resistant materials or adding a cover to protect your bikes from the elements.
By addressing these common issues, you can ensure a safer and more reliable DIY truck bed bike rack.
Maintenance and Care
Keeping your DIY truck bed bike rack in top condition is essential for ensuring it lasts for many trips and keeps your bikes secure. Here’s how to maintain and care for your bike rack:
- Regular Inspections: Before and after each use, check your rack for any signs of wear or damage. Look for cracks, rust, or loose components.
- Cleaning: Keep the rack clean from dirt, mud, and grime. A simple wipe-down with soapy water will do. Avoid harsh chemicals that can corrode the materials.
- Lubrication: If your rack has moving parts, such as pivots or locks, keep them lubricated with a suitable product to ensure smooth operation.
- Tightening Fittings: Bolts and screws can loosen over time, especially with road vibrations. Periodically tighten all fittings to maintain the rack’s stability.
- Rust Prevention: If you’ve used metal parts, protect them from rust. Regularly apply a rust inhibitor or use galvanized materials to prevent corrosion.
- Storage: When not in use, store your rack in a dry, covered area to protect it from the elements. If space is limited, consider a foldable design or disassemble it for compact storage.
- Replacement Parts: Keep an eye on the condition of straps, pads, and other components that might wear out faster. Have replacements on hand to avoid any downtime.
- Weight Checks: Ensure you’re not overloading the rack beyond its capacity. This can cause structural damage and compromise safety.
- Weather Adaptation: For those living in areas with extreme weather, consider additional protection like waterproof covers or UV-resistant materials.
- User Manual: Build a simple user manual for your rack, detailing assembly, use, maintenance, and safety tips. This can be a handy reference for you and others who may use the rack.
By following these maintenance and care tips, you’ll extend the life of your DIY truck bed bike rack and enjoy many safe and secure biking adventures.
Safety Considerations
When you’re building a DIY truck bed bike rack, safety is paramount. Here are some key considerations to keep in mind to ensure that your bike rack is safe for use:
- Wear Protective Gear: Always use gloves and safety glasses when working on your bike rack. This protects you from potential injuries while cutting materials or drilling.
- Secure Mounting: Make sure the rack is securely mounted to the truck bed. It should not move or shift while the vehicle is in motion. Use heavy-duty bolts and locking nuts for a firm installation.
- Smooth Edges: All edges of the rack should be smooth and rounded off to prevent injury or damage to the bikes. You can use sandpaper or a file to smooth out any sharp edges.
- Padding: Add padding at contact points where the bike meets the rack. This will protect both your bike and the truck from scratches and dents. Foam or rubber works well for this purpose.
- Check for Obstructions: Before drilling or installing the rack, ensure there are no obstructions or vital components under the truck bed area where you’ll be working.
- Load Distribution: Distribute the weight of the bikes evenly across the rack to avoid imbalance. This helps maintain the stability of the truck while driving.
- Regular Maintenance: Inspect the rack regularly for any signs of wear, loose fittings, or corrosion. Tighten any loose parts and replace worn-out components as needed.
- Follow Manufacturer Guidelines: If you’re using power tools or specific materials, always follow the safety guidelines provided by the manufacturers.
- Test Before Use: After installation, test the rack with your bikes loaded in a safe environment before hitting the road. Make sure everything is secure and functioning as expected.
By following these safety considerations, you can enjoy peace of mind knowing that your DIY truck bed bike rack is built with safety in mind, ensuring a worry-free transport of your bikes.
FAQs About DIY Truck Bed Bike Rack
Discover answers to common questions about DIY truck bed bike racks. Learn how to build and install your own rack with our helpful faqs.
To ensure your DIY bike rack is secure, use sturdy materials and reliable fastening methods like PVC cement for PVC racks or pocket anchors for aluminum racks. Additionally, make sure the rack is firmly attached to the truck bed and provides adequate support for the bikes. It’s important to follow detailed instructions and, if possible, consult with someone experienced in DIY projects.
Yes, you can build a bike rack that fits multiple bikes. Most DIY plans are customizable. For instance, you can modify a simple PVC rack to accommodate more bikes by adding additional sections. Ensure that the design allows for enough space between bikes to prevent damage during transport.
Yes, there are DIY bike rack designs that don’t require drilling into your truck. Some designs use the truck bed’s existing features to secure the rack, such as the bed rails or tie-down points. These designs are less permanent and can be easily removed when not needed.
To measure your truck bed for a DIY bike rack, you’ll need to determine the width and length of the bed’s floor area. Measure the width between the bed rails and the length from the bulkhead to the tailgate. It’s important to account for any wheel wells or other obstructions. These measurements will help ensure your bike rack fits properly and maximizes space.
The best way to protect your bikes and truck from scratches is to use padding or soft materials where the bike and rack contact the truck bed. Rubber or foam padding can be added to the rack’s structure. Additionally, ensure that all fasteners and contact points are smooth and secure to prevent movement that could cause damage during transit.
Closing Thoughts
Wrapping up, building a homemade DIY truck bed bike rack is a rewarding project that saves money and offers a personalized solution for transporting your bikes. Remember to gather all necessary materials and follow the steps carefully. With this guide, you'll enjoy a secure and efficient way to travel with your bikes.


