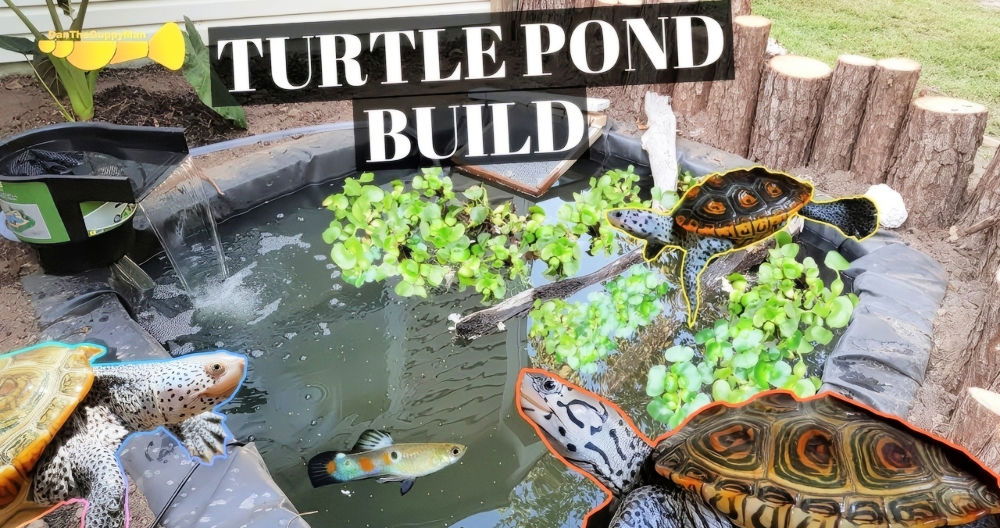
I once faced the challenge of building a cheap and easy DIY turtle basking area for my pet turtle. I started by gathering materials like a plastic bin, some rocks, and a lamp for heat. With these items in hand, I transformed the plastic bin into a DIY turtle basking platform. The process was simple, and it didn't cost much.
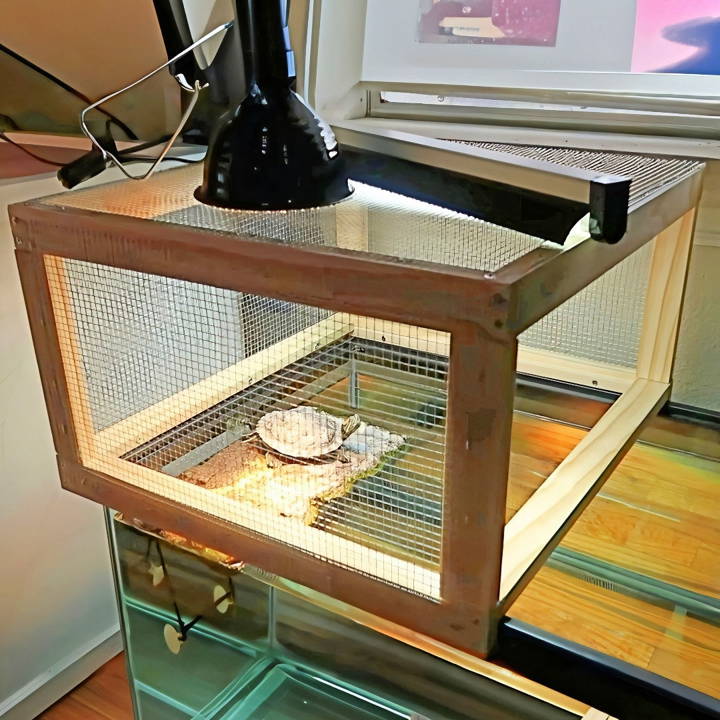
Adding an above-tank structure was equally straightforward. I crafted a sturdy ramp using non-slip material to ensure my turtle could comfortably get to its basking spot. The final setup provided a safe and cozy environment for my turtle to enjoy some sunbathing. By following these steps, anyone can easily build a comfortable home for their pet turtle.
Building your turtle's basking area can be rewarding and affordable. Give these steps a try, and your turtle will thank you!
Materials You'll Need and Why
- Two 8-foot Select Pine Wood (1x2): Kiln-dried to remove toxicity concerns, these will form the basic structure.
- Two Dowels (Half-inch, 36-inch): These will help secure the basking area's edges and provide additional support.
- Screws (Various Sizes): For securing all the pieces together. I used Number 6 (1 and 1.5-inch) for the wood frame and Number 8 (2.5-inch) screws for attaching the frame to the dowels.
- Hardware Cloth (1/4-inch mesh): This will cover the frame, offering a durable surface for your turtle to bask on.
- Staple Gun: This is used to secure the hardware cloth to the wooden frame.
- Saw and Drill: For cutting wood and pre-drilling holes to prevent splintering.
Step by Step Instructions
Make a perfect basking spot for your turtle with our DIY turtle basking area guide. Step-by-step instructions from cutting wood to attaching hardware cloth.
Step 1: Cutting the Wood
I began by cutting the select pine wood into eight pieces of 18 and 1/4 inches and four pieces of 8 inches. Most hardware stores will cut the wood for you, making transportation easier if you're like me and have a smaller vehicle.
Step 2: Assembling the Frame
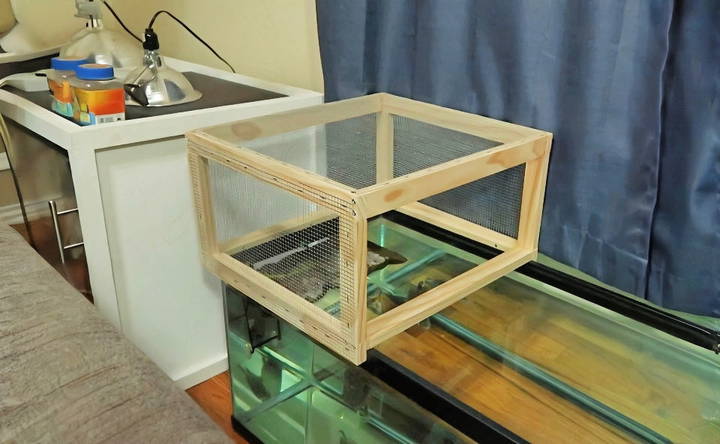
Lay out four of the 18 and 1/4-inch pieces to form a rectangle. This will serve as the base of your basking area. Join these pieces using the Number 6 (1.5-inch) screws, but remember to pre-drill the holes to avoid splitting the wood. Repeat the process for the top frame, ensuring one side has a flat piece to sit flush against the tank edge.
Step 3: Connecting the Frames
Using the eight-inch pieces, connect the top and bottom frames by screwing them in at each corner. Drawing a line ensures you don't accidentally drill into the existing screws. For this task, use the longer Number 8 (2.5-inch) screws for a firm hold.
Step 4: Adding Support with Dowels
Measure and cut the dowels to fit within the inner edges of the frame. These act as rests against the tank's edges, providing stability—drill hole guides before screwing them into place with Number 6 (1-inch) screws.
Step 5: Attaching the Hardware Cloth
Lay the hardware cloth over the top frame and secure it with a staple gun. Cut off any excess with wire cutters. Be mindful of sharp edges; you'll want them on the outside, away from your turtle.
Customization Tips
Building a basking area for your turtle doesn't just meet their health needs—it's also an opportunity to add a personal touch to your pet's environment. Here are some tips to customize your turtle's basking area while ensuring it remains a safe and healthy space.
- Choose the Right Materials Select materials that are safe for aquatic life. Avoid anything treated with chemicals or paints that could leach into the water. Natural rocks, untreated wood, and commercially available reptile habitat decor are great choices.
- Consider Your Turtle's Personality Some turtles are active climbers, while others prefer to lounge. Observe your turtle's behavior and design the basking area to suit their personality. For climbers, include ramps or steps; for loungers, a flat, spacious surface is ideal.
- Incorporate Live Plants Live plants not only make the habitat more attractive but also improve water quality. Choose turtle-safe plants like anacharis, java fern, or water lettuce. Ensure they are anchored well so they don't become dislodged by your turtle's activities.
- Add a Splash of Color While turtles don't see color the same way humans do, adding colored stones or backgrounds can make the tank more visually appealing for you and provide contrast for your turtle to enjoy.
- Keep It Functional Remember that the primary purpose of the basking area is for your turtle's health. Ensure the area is easily accessible, stable, and provides enough space for your turtle to dry off completely.
- Regular Updates As your turtle grows, you'll need to adjust the basking area. Plan for this by choosing a design that can be easily modified or expanded.
By following these tips, you can build a basking area that is both functional and personalized.
Troubleshooting Common Issues
When building a basking area for your turtle, you might encounter a few hiccups along the way. Here's a guide to solving some common issues, ensuring your turtle enjoys their sunbathing time safely and comfortably.
- Basking Area Too Slippery Turtles need a secure surface to climb onto without slipping. If the basking area is too slick, try adding a textured material like a non-adhesive shelf liner or rough tiles. These provide a better grip for your turtle's feet.
- Turtle Ignores the Basking Area If your turtle isn't using the basking spot, it might be too cold, too hot, or not easily accessible. Check the temperature with a reliable thermometer—it should be around 10°F warmer than the water. Make sure there's an easy path to the basking area, and consider adjusting the ramp or steps for better access.
- Basking Lamp Burns Out Quickly Heat lamps can burn out fast if they're not designed for long hours of operation. Invest in a high-quality reptile heat bulb and use a ceramic socket to prevent overheating. Always follow the manufacturer's guidelines for usage.
- Basking Area Takes Up Too Much Space Maximize your tank's swimming area by building a floating basking platform. These platforms attach to the glass with suction cups, allowing more room for your turtle to move around below.
- Water Quality Deteriorates Quickly A common issue is the basking area, which causes debris to fall into the tank and affects water quality. Regularly clean the basking spot and consider installing a more efficient filtration system to keep the water clear.
- Turtle Outgrows the Basking Area As turtles grow, they may need more space to bask. Design your basking area with expansion in mind. Modular designs or adjustable platforms can accommodate your turtle's growth over time.
Ensure your turtle's basking area is safe and inviting for relaxation and warmth. A well-maintained spot boosts your turtle's happiness and health.
Maintenance and Safety
Ensuring the maintenance and safety of your turtle's basking area is key to providing a healthy environment for your pet. Here's a guide to keeping the basking area in top condition, focusing on simple, clear instructions.
- Regular Cleaning: Keep the basking area clean to prevent the buildup of harmful bacteria. Once a week, gently scrub the surface with a brush and rinse with clean water. Avoid using soap or chemicals that could harm your turtle.
- Inspecting the Area: Check the basking area daily for any signs of wear or damage. Look for sharp edges or loose parts that could injure your turtle. Make repairs promptly to keep the area safe.
- Monitoring Temperature Use a reliable thermometer to ensure the basking spot remains at the correct temperature, which is typically between 85-95°F (29-35°C). Adjust the heat lamp as necessary to maintain a consistent warmth.
- UVB Light Replacement UVB bulbs lose effectiveness over time, even if they still emit light. Replace UVB bulbs every six months to ensure your turtle is getting the necessary UVB rays for their health.
- Water Quality Checks: Test the water regularly for proper pH levels and cleanliness. A good filtration system is crucial for maintaining water quality and should be cleaned according to the manufacturer's instructions.
- Safety Precautions: Ensure all electrical equipment is securely installed and out of reach of water splashes. Use covers for heat lamps and UVB bulbs to protect them from water and prevent any risk of fire.
Following these tips ensures a safe, clean basking spot for your turtle. Regular maintenance keeps your turtle healthy and prolongs your setup's life.
FAQs About DIY Turtle Basking Area
Get answers to common questions about building a DIY turtle basking area, enhancing your pet's habitat affordably and effectively.
A turtle basking area is a designated spot where turtles can leave the water to dry off, warm up, and absorb essential UVB rays. Turtles need this area to regulate their body temperature, aid in digestion, and receive necessary ultraviolet light for their health.
To ensure safety, the basking area should be sturdy and free of sharp edges. The ramp to the basking area should have a gentle incline and be easy for the turtle to climb. Regularly inspect the area for wear and tear to prevent accidents.
Yes, a heat lamp is crucial for building an ideal basking environment. Install a heat lamp above the basking area, ensuring it's securely attached and positioned to provide even warmth. Use a thermometer to monitor the temperature, which should be between 85-95°F (29-35°C) for most turtle species.
Clean the basking area regularly with a brush and turtle-safe disinfectant. Rinse thoroughly to remove any residue. Check the structural integrity and tighten any loose parts during cleaning. Replace materials as needed to maintain a hygienic and safe basking space.
To make the basking area more engaging, consider adding elements that mimic a turtle's natural habitat. This can include safe, non-toxic plants, smooth stones, and even a textured ramp for climbing. Ensure any additions are securely placed to prevent tipping or injury. Providing an enriching environment will encourage your turtle to utilize the basking area more frequently.
Conclusion
Wrapping up, building your own DIY turtle basking area is not only a fun project but also a great way to ensure your pet turtle has a safe and comfortable environment. Remember, a well-designed basking area is crucial for your turtle's health.


