One day, I noticed water pooling under my deck after a rainstorm. It caused the space to be muddy and unusable. Determined to make better use of that area, I decided to build a DIY under-deck drainage system. This would help keep the space dry and functional, even after it rains. It might seem like a big task, but I found it was easier than expected with a little guidance.
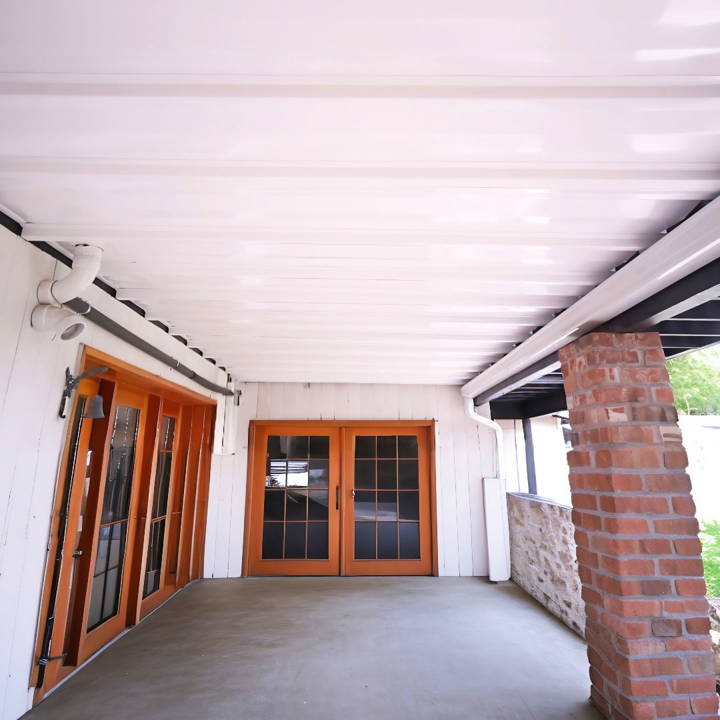
Starting with simple materials, I maked a plan and gathered all the necessary tools. The project involved installing an under-deck ceiling system to direct water away from the area beneath the deck. By taking it step by step, I managed to transform the once-wasted space into a usable area for storage or entertainment.
If I can do it, so can you—use the tips below to get started. These will help you make the most of the space under your deck.
Why Consider an Under Deck Drainage System?
- Maximizes Space: It turns the often-unused space under your deck into a cozy retreat or storage area.
- Protects Your Deck: Diverting water away helps prevent rot and decay, extending the life of your deck.
- Adds Value: It's an investment that increases the usability and value of your home.
How Does It Work?
The system channels rainwater that falls through the gaps in your decking boards into gutters and downspouts. This keeps the area beneath your deck dry and usable. It's a smart solution for those who want to make the most of every part of their property.
Choosing the Right System
There are various options available, from off-the-shelf kits to custom solutions. Consider factors like the size of your deck, the climate you live in, and your budget when selecting a system. Some systems are designed for easy DIY installation, while others might require professional help.
Materials Needed and Why
Installing a deck drainage system required me to gather specific materials essential for a successful project. The key components included:
- Combo Bracket: Acts as the skeletal structure for the drainage system, guiding water away from the deck.
- Ledger F Bracket: This component connects directly to the house, ensuring that water is directed away from the foundation.
- Large V Panels: These are the heroes that collect rainwater, channeling it into the drainage system.
- Stainless Steel Screws: Durable against all weathers, these keep the entire system intact.
- Galvanized Nails and Protac Tape: Essential for preventing moisture penetration and ensuring longevity.
- Gutter System: Collects and routes water away from the deck and house.
Each of these components has its unique role, ensuring that once installed, the deck would remain an enjoyable, dry zone, free from the worries of water damage or the annoyance of dripping sounds.
Step by Step Instructions
Learn how to build a DIY under-deck drainage system. Follow step-by-step instructions from initial measures to gutter installation for a dry, usable space.
Initial Measures
The first step involved measuring the distance between the deck joists meticulously. Precision here was crucial to ensure that the brackets would fit perfectly without any unnecessary gaps for water to sneak through. After getting the measurements, cutting the Ledger F Bracket required steadiness and an improvised jig using a spare 2x4 for crisp cuts.
Installing the Ledger F Bracket
As indicated in the guidelines, I marked an inch and a half up from the bottom of the joists and aligned the bottom of the F Bracket with these marks. Using stainless steel screws, I secured it in place, enjoying the simplicity of not needing to pre-drill, thanks to the pre-existing holes in the bracket.
Combo Bracket Assemblage
The correct placement of the combo bracket was next. Ensuring a downward angle for proper water flow was pivotal. I employed a simple pitch calculation, aiming for an eighth-inch downward angle per foot of decking. Using a chalk line for accuracy, I marked the required slope across the breadth of the deck.
Cutting and Fitting the V Panels
Cutting the V Panels was an adventure. I found scoring the vinyl with a utility knife and using a straight edge for a guide allowed for a neat break along the desired length. The panels needed to fit into the combo bracket snugly but without much force – a lesson I learned after several minutes of puzzled frowning and rereading the installation guide.
Protac Tape for Moisture Defense
Before laying down the panels, I lined the Ledger F bracket and exposed joist tops with Protac Tape. This wasn't just to stick things together; it served as a crucial barrier to keep moisture from sneaking into any crevices, ensuring the deck's structural integrity remained uncompromised.
Gutter Installation
The final piece of the puzzle was to install the gutter. Aligning it with the adjusted slope was vital, ensuring that all the collected water would be efficiently channeled away from the deck. The process required a mixture of sealant and precision to prevent leaks, ensuring that the effort put into the installation wouldn't be washed away with the next rainstorm.
Lessons Learned and Final Touches
The key lesson from this project was the value of meticulous planning. Every step required precision to ensure proper fit. Seeing the water flow smoothly through the drainage system, I felt proud of the dry, welcoming space under my deck.
Completing the project was a journey of problem-solving and learning, resulting in a dry space and better understanding of protecting the deck.
Customization Ideas for Under Deck Drainage Systems
Building a functional under-deck drainage system doesn't mean you have to sacrifice style. In fact, customizing your drainage system can enhance the overall look and feel of your outdoor space. Here are some ideas to inspire you:
Match Your Home's Aesthetic
- Choose materials and colors that complement your home's exterior. If you have a modern home, consider sleek metal panels. For a rustic look, opt for materials with a natural wood finish.
Incorporate Lighting
- Install LED strip lights or recessed lighting within the drainage system for a warm, inviting glow. This not only adds ambiance but also extends the usability of the space into the evening.
Add Heating Elements
- For cooler climates, integrating outdoor heaters can make the space cozy and comfortable year-round. Radiant heating panels can be a discreet and efficient option.
Build a Living Wall
- Use the wall space to install vertical planters. This greenery can act as a natural backdrop and improve air quality, all while hiding the drainage system.
Design a Water Feature
- If you're feeling adventurous, incorporate a water feature into the drainage design. The sound of trickling water can make a serene environment and mask noise from the drainage when it rains.
Use Decorative Panels
- Decorative panels with cut-out designs can add an artistic touch and serve as a conversation piece. They can also provide privacy if your under-deck area is visible to neighbors.
Think About Furniture
- Select furniture that fits the space and complements the drainage system's design. Consider built-in seating with waterproof cushions for a seamless look.
Consider Multi-Functional Elements
- Design elements that serve more than one purpose. For example, a built-in bench could also function as a storage space for outdoor cushions or gardening tools.
Play with Textures
- Mix and match different textures to add depth to the space. Combine smooth metals with rough stones or soft fabrics to make a tactile experience.
Personal Touches
- Finally, add personal touches that reflect your style. Whether it's outdoor art, a unique rug, or string lights, these details will make the space truly yours.
Use these customization ideas to make a practical and stylish under-deck drainage system. The goal is a space your family will love.
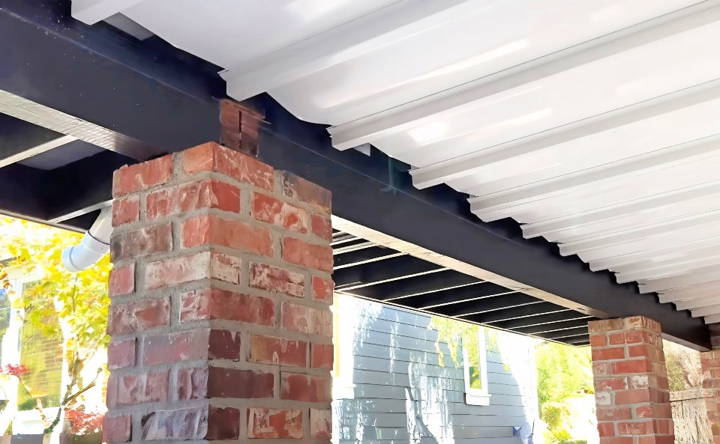
Maintenance and Upkeep of Under Deck Drainage Systems
Keeping your under-deck drainage system in top shape is crucial for ensuring it continues to protect your space from water damage. Regular maintenance is straightforward and doesn't require specialized skills. Here's how you can keep your system working efficiently:
Regular Inspections
- Check your system every few months, especially after heavy rain or snow. Look for any signs of leaks, clogs, or damage.
Cleaning Out Debris
- Remove leaves, twigs, and other debris that can accumulate in the gutters and downspouts. This helps prevent blockages and ensures smooth water flow.
Checking for Clogs
- Make sure the entry points to the downspouts are clear. Use a hose to flush out any obstructions if necessary.
Ensuring Proper Slope
- The gutters should have a slight slope towards the downspouts for optimal water drainage. Adjust if you notice water pooling.
Tightening Connections
- Over time, fasteners and connections can loosen. Tighten them up during your inspections to prevent any sagging or separation.
Sealant and Caulking
- Inspect the sealant around the system for any cracks or wear. Reapply caulking as needed to ensure a watertight seal.
Winter Preparations
- If you live in an area with freezing temperatures, make sure to clear the system before winter to prevent ice buildup, which can cause damage.
Professional Assessment
- Consider having a professional inspect your system every few years to catch any issues you might have missed.
Following these steps can extend the life of your under-deck drainage system, keeping the space dry and functional for years.
FAQs About DIY Under Deck Drainage System
Discover answers to common questions about DIY under-deck drainage systems and how to install one for a dry, usable outdoor space effectively.
A DIY under-deck drainage system is a home improvement project that involves installing a network of troughs and gutters beneath the deck to redirect rainwater away from the space underneath. This keeps the area dry, allowing for storage or additional outdoor living space.
Installing an under-deck drainage system can protect the structural integrity of your deck by preventing water accumulation and wood rot. It also makes a dry area below your deck that can be used for storage or as an additional outdoor living space.
There are two main types of under-deck drainage systems: above-the-joist and below-the-joist. Above-the-joist systems, like Trex RainEscape, cover the entire substructure and protect it from water damage. Below-the-joist systems are installed beneath the deck boards and may not offer the same level of protection.
To install a DIY under-deck drainage system, you'll need tools like a tape measure, marking pen, utility knife, staple gun, and caulk gun. The process involves measuring and cutting the troughs, attaching them between the joists, and connecting them to downspouts that lead to a gutter system.
Yes, with an above-the-joist system, you can install accessories like lights and ceiling fans because the joist bays remain dry. However, with a below-the-joist system, it may be difficult or impossible to install such accessories due to potential moisture in the joist bays.
Conclusion
In conclusion, making a DIY under-deck drainage system can transform your outdoor space into a functional area. This simple project can protect your deck, increase usable space, and enhance your home's value. With proper planning and tools, you can enjoy a dry, clean area beneath your deck.


