Learn DIY vacuum forming and make your own custom parts at home easily. Step-by-step guide for making high-quality molds and designs. It's an affordable way to mold plastic into various shapes by heating it and applying pressure. This DIY process is suitable for home projects and can be done with basic equipment found in your garage or workshop. Whether it's for model-making or crafting prototypes, vacuum forming has practical applications.
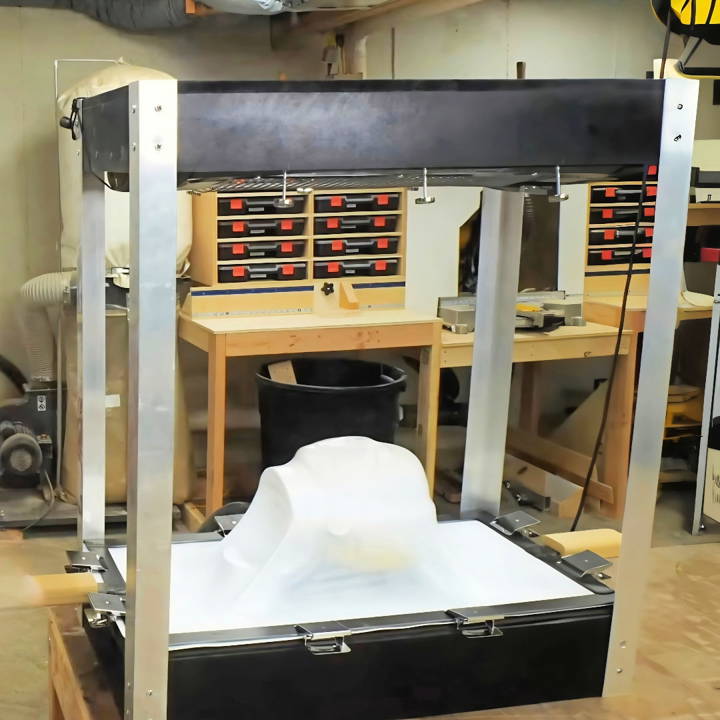
To begin with plastic vacuum forming, you'll need a vacuum former, plastic sheets, and a mold of your desired shape. Heat the plastic until it's pliable, then place it over the mold and let the vacuum pull the material tightly around it. This method is straightforward and effective for making uniform pieces.
How Does Vacuum Forming Work?
Here's a straightforward breakdown of the vacuum forming process:
- Heat the Plastic: A flat plastic sheet is heated until it becomes pliable.
- Position the Mold: The soft plastic is placed over a pre-made mold.
- Apply Vacuum: Air is removed from beneath the plastic, pulling it down to conform to the mold's shape.
- Cool Down: The plastic cools and solidifies, retaining the shape of the mold.
- Remove the Formed Plastic: The newly formed plastic piece is removed from the mold.
Why Use Vacuum Forming?
Vacuum forming is popular for several reasons:
- Cost-Effective: It's cheaper than other molding methods, especially for small production runs.
- Versatile: It can be used with a wide range of plastics and mold complexities.
- Speed: It's a quick process, allowing for faster production times.
Common Uses
This technique is used in various industries, including:
- Packaging: For making blister packs and clamshell packaging.
- Automotive: For making dashboards, door panels, and more.
- Signage: For producing signs with 3D elements.
Environmental Considerations
While vacuum forming is efficient, it's important to consider its environmental impact. Opt for recyclable plastics and aim to minimize waste during production.
Understand vacuum forming basics to appreciate its manufacturing role and use in DIY projects. Prioritize safety with ventilation and protective gear.
Gathering Materials
Discover why each material is needed for gathering materials in this detailed guide. Learn the essentials for successful materials collection.
Why Each Material is Needed
- MDF Sheets: Ideal for constructing durable, stable boxes for the vacuum former structure.
- Space Heater ($50 garage/shop model): An economical and effective heat source to soften the plastic sheets. Chosen for its heat output and affordability.
- Shop Vac: A readily available tool in most garages, providing sufficient vacuum power for this project.
- Plastic Sheets (Thin Styrene): The material to be formed. Styrene is preferred for its excellent thermal forming properties.
- Aluminum Angles and Flat Steel: For making a strong, heat-resistant frame that holds the plastic sheet over the vacuum box.
- EPA Foam: To ensure an airtight seal around the vacuum box, maximizing the vacuum's effectiveness.
Step by Step Instructions
Learn how to DIY vacuum forming with step-by-step instructions. Covering everything from building boxes, assembling, to testing. Perfect for real-world application.
Building the Boxes
- Cutting MDF: I started by cutting down MDF sheets into sizes for two boxes – one for the heater and another with holes for the vacuum.
- Drilling Holes: The top box required holes for venting heat properly, and the lower vacuum box needed a grid of holes for the air suction.
Assembling the Structure
- Heater Installation: After fitting the space heater into the top box, I ensured it was secured and all wires safely reconnected. This step required careful handling to avoid damaging the heating elements.
- Vacuum Box Setup: The bottom box was straightforward, with a side hole for the shop vac's hose, ensuring a snug fit for effective suction.
Making the Frames
- Welding Steel Frames: I fabricated two frames from flat steel — one to sit atop the vacuum box and another to press the heated plastic down. Accuracy here was crucial for evenly distributed suction.
- Foam Gasket: To address initial sealing issues, I added an EPA foam gasket around the vacuum box's edge, significantly improving the vacuum's efficiency.
Mounting the Heater and Vacuum Boxes
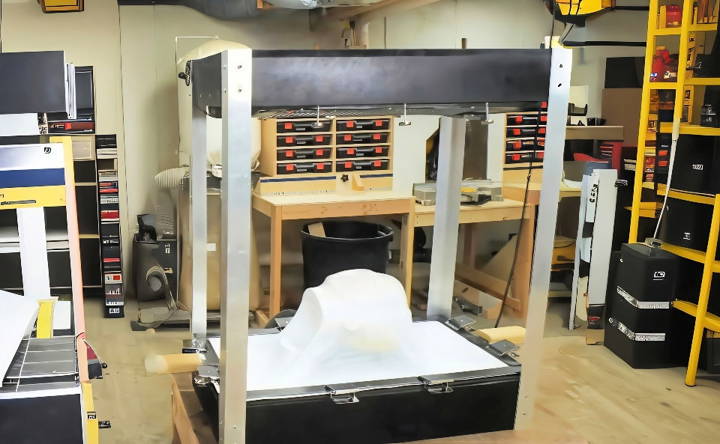
- Brackets and Alignment: Using aluminum angles, I connected the heater and vacuum boxes with precision, ensuring stability and proper alignment for optimal heat distribution.
Heating Element and Vacuum Testing
- Adjustments for Uniform Heating: Initial tests revealed uneven heating. By adjusting the placement of the heater, I obtained a more uniform heating area, critical for detailed forming.
- Optimizing Vacuum Seal: Experimenting with different configurations, including the foam gasket and frame positioning, I achieved a stronger vacuum seal crucial for detailed shapes.
Real-World Application
- First Successful Thermal Form: My first real test involved a simple object that showcased the vacuum former's capabilities. The detail captured in the mold exceeded my expectations, validating the project's success.
Reflections and Advice
This project was an incredible learning experience, demonstrating the power of DIY innovation. For anyone interested in exploring vacuum forming, remember:
- Be Patient: It may take several attempts to get everything right, from heating to vacuum sealing.
- Safety First: Always take precautions with heat and electrical components.
- Experiment: Don't be afraid to try different materials and object shapes.
What's Next?
I'm looking forward to pushing the boundaries of what I can make with my larger vacuum former, exploring larger and more complex projects. The possibilities are endless, from costume pieces to custom packaging.
Design Considerations for Molds
Making molds for vacuum forming is both an art and a science. The mold is the blueprint of your final product, so thoughtful design is key. Here's how to make sure your mold design is top-notch:
Choose the Right Material
Your mold can be made from different materials, each with its pros and cons:
- Wood: Great for beginners or low-volume projects. It's affordable but not as durable.
- Aluminum: Ideal for higher volume. It's more expensive but lasts longer and has better heat transfer.
- Composite Resins: A middle ground between wood and aluminum in terms of cost and durability.
Mind the Draft Angles
Draft angles are slight tapers on the sides of your mold. They help in removing the formed plastic without a hitch. A good rule of thumb is to include a draft angle of 1 to 3 degrees.
Keep It Smooth
Vacuum forming loves smooth curves and rounded corners. Sharp angles can cause the material to thin out or tear. So, round off those edges to ensure a quality finish.
Balance the Detail
You can achieve a surprising amount of detail with vacuum forming, but it depends on your material and mold quality. Remember, finer details may require a more sophisticated mold.
Think About the Environment
Consider using recycled or bio-based materials for your mold. Design it to be disassembled and recycled at the end of its life.
By keeping these considerations in mind, you'll be well on your way to designing molds that are not only effective but also environmentally conscious and suitable for your vacuum-forming needs.
Advanced Techniques in Vacuum Forming
Vacuum forming is a craft that can be refined with practice and knowledge. For those looking to take their skills to the next level, here are some advanced techniques that can enhance the precision and quality of your vacuum-formed creations.
Precision Heating
Advanced vacuum forming starts with precise control of heating. Use digital temperature controllers to ensure the plastic sheet is even heated. This uniformity is crucial for achieving consistent thickness and detail in the formed parts.
Plug Assists
A plug assist can be used to assist in deeper or more intricate molds. This is a tool that helps push the plastic into the mold before the vacuum is applied, ensuring that the material stretches evenly and reduces the risk of thinning or tearing.
Pre-Stretching
Pre-stretching the plastic sheet before forming can help maintain material thickness and avoid defects. This technique is particularly useful for large or complex shapes.
Twin-Sheet Forming
This advanced method involves forming two plastic sheets simultaneously and then bonding them together. The result is a hollow part that is strong and lightweight, often used in automotive and aerospace applications.
Pressure Forming
While vacuum forming relies on suction, pressure forming uses additional air pressure from above the heated sheet. This extra force can achieve greater detail and sharper definition in the final product.
Automated Trimming
After forming, the excess material must be trimmed. Advanced techniques include using CNC machines or laser cutters for precise and efficient trimming, which is especially beneficial for high-volume production.
Sustainable Practices
Incorporate sustainable practices by using recycled materials and designing for recyclability. Consider the entire lifecycle of your product to minimize environmental impact.
Learn these advanced techniques to elevate vacuum forming and make professional-grade products in your workshop.
Troubleshooting Common Issues in Vacuum Forming
When diving into the world of DIY vacuum forming, you might encounter a few hiccups along the way. Here's a guide to help you troubleshoot some of the most common issues, ensuring your projects turn out just right.
Webbing
Webbing is like those unwanted spider webs that appear between two points. It happens when the plastic stretches into thin strands between elevated parts of the mold. To fix this:
- Check your mold design; avoid sharp angles.
- Ensure even contact between the plastic sheet and the mold.
- Avoid overheating the plastic to prevent it from becoming too stretchy.
Inconsistent Wall Thickness
Your project's strength depends on a uniform wall thickness. If some parts are too thin, they might break or warp. Here's what you can do:
- Make sure the plastic sheet heats evenly.
- If using a deep mold, pre-stretch the plastic to maintain thickness.
- Review your mold design for potential improvements.
Loss of Vacuum
Sometimes, the vacuum might not hold, leading to incomplete forms. To solve this:
- Double-check that the vacuum is turned on and all valves are working.
- Look for leaks in the mold using talcum powder or corn starch.
- Maintain the mold surface to ensure a tight seal.
Poor Detail
If the finer details aren't coming through, consider:
- Using a plug assist to help push the plastic into detailed areas.
- Adjusting the timing of the vacuum cycle for better definition.
By keeping an eye out for these issues and knowing how to address them, you'll be on your way to making flawless vacuum-formed pieces.
Safety Precautions
When engaging in DIY vacuum forming, safety is paramount. This process involves high temperatures and potentially hazardous materials, so it's crucial to take the right precautions to ensure a safe working environment.
Personal Protective Equipment (PPE)
Always wear appropriate PPE:
- Heat-resistant gloves protect your hands from hot plastics and heating elements.
- Safety glasses shield your eyes from splinters and debris.
- Respirators or masks are essential if you're working with materials that emit fumes.
Workspace Safety
Keep your workspace safe and prepared:
- Work in a well-ventilated area to avoid inhaling toxic fumes.
- Keep a fire extinguisher nearby in case of emergencies.
- Ensure all heating elements are in good condition to prevent fire hazards.
Handling Materials
Be cautious with the materials you use:
- Choose plastics that are less toxic and recyclable to reduce health risks and environmental impact.
- Store flammable materials away from heat sources.
- Use tools like tongs or pliers to handle hot materials, keeping your hands at a safe distance.
Machine Safety
Operate machines with care:
- Regularly inspect your vacuum former for any signs of wear or damage.
- Ensure all safety guards are in place and functioning.
- Never bypass safety features or attempt to operate the machine without proper knowledge.
First Aid
Be prepared for accidents:
- Keep a first aid kit accessible.
- Learn basic first aid for burns and cuts.
- If an accident occurs, seek professional medical help immediately if necessary.
By following these safety precautions, you can enjoy the creative process of vacuum forming while minimizing the risk of injury or health issues.
FAQs About DIY Vacuum Forming
Get comprehensive answers to your faqs about DIY vacuum forming, from materials to techniques, and start your project with confidence!
Vacuum forming is a process where you heat a plastic sheet until it's soft, then stretch it over a mold and apply vacuum to shape it. This method is great for making objects like costume pieces, product packaging, and more at home.
Design your mold considering factors like:
Detail resolution: Fine details require a high-quality mold.
Draft angles: Slight angles on the sides help remove the formed plastic.
Undercuts: Avoid designs that trap the plastic on the mold.
Not all plastics are suitable for vacuum forming. Common choices include:
PETG: Good for clarity and strength.
Polystyrene: Easy to form, good for prototypes.
ABS: Durable, good for functional parts. Choose the right thickness for your project, usually between 0.020" and 0.250".
The thickness of the plastic sheet you use will depend on the size and detail of the mold, as well as the desired strength of the final piece. For smaller, more detailed molds, a thinner plastic (around 0.020" to 0.060") is typically used. For larger, less detailed molds, a thicker plastic (up to 0.250") may be necessary. It’s important to experiment to find the best thickness for your specific project.
Safety is paramount when working with heated materials and machinery. Here are some key safety tips:
Wear protective gear: This includes gloves, eye protection, and a long-sleeved shirt.
Ventilation: Work in a well-ventilated area to avoid inhaling fumes from heated plastic.
Monitor the temperature: Use a thermometer to ensure the plastic doesn't overheat and burn.
Secure equipment: Make sure all components are stable and secure to prevent accidents.
Emergency preparedness: Have a fire extinguisher and first aid kit nearby in case of accidents.
In Conclusion
In conclusion, DIY vacuum forming is a fantastic way to make custom parts at home. This technique is cost-effective, versatile, and easy to learn. Start your next project with diy vacuum forming and bring your creative ideas to life.


