Making your own DIY vampire fangs for cosplay or Halloween can be a fun and cost-effective project. Rather than buying expensive custom fangs, you can use thermoplastic beads to craft fangs that are perfectly tailored to your own teeth. I've done this myself, and it's not only a cheap alternative, but it also allows for more creativity when you want specific shapes and placements.

Here's how I do it step-by-step below, with some of the lessons I've learned along the way.
What You'll Need
- Thermoplastic beads: These are essential for this project. I usually use Instamorph, but brands like Polymorph and Friendly Plastics work just as well. You can grab a small bag for around $10 on Amazon, which is more than enough for multiple sets of fangs.
- Heat source: A heat gun works best, but a hair dryer or boiling water also does the trick. I've found that heating the beads with boiling water is messier and more time-consuming, so I stick with a heat gun.
- Tools for shaping: Your fingers will do most of the work, but tools like a metal or plastic tool (safe for the mouth) can help with detailing the fangs. Fingernails work wonders for shaping edges.
Step by Step Instructions
Learn to make DIY vampire fangs with step-by-step instructions, from heating thermoplastic beads to customization. Perfect for halloween and cosplay!
Step 1: Heat the Thermoplastic Beads
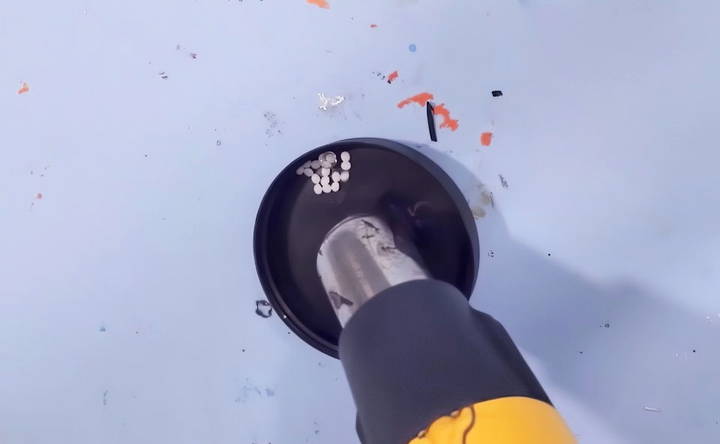
Start with a small pinch of thermoplastic beads. Place them in a heat-safe container like a lid or small bowl to keep them from scattering. Use your heat gun (or another heat source) and wait until the beads turn clear. This indicates that they're soft enough to mold.
When the beads are ready, I usually mold them into a little ball or a cone, making sure it's cool enough to touch but still soft. If it hardens too quickly, you can always reheat it slightly.
Step 2: Form the Fang Around Your Tooth
The first fang I always make is for one of my upper incisors since that's the classic placement. Take the softened plastic and press it onto your tooth, making sure to cover both the front and back. Don't worry if there's excess plastic, you can trim that later.
Now, shape the plastic into a fang. I use the back of my fingernail to make a sharp edge where the fang meets my tooth. By pressing my nail into the groove between my teeth, I get a clean, straight line. Once you have the basic shape, you can start to flatten and smooth out the fang so it looks more natural. I alternate between these motions—shaping and smoothing—until the fang looks just right.
If your nails aren't long enough or strong enough for this, you can use a small tool to shape the plastic. Just make sure it's safe to use in your mouth.

Step 3: Test the Fit and Trim Excess Plastic
Once you have the shape, press the plastic into your gums gently. This will show where to trim later. Make sure to bite down as well, so the fang fits properly and doesn't interfere with your lower teeth.
A little tip: I like to make the front of the fang thinner, so it doesn't stick out too far from my natural tooth. The back of the fang can be thicker to ensure it holds firmly in place. After it cools a bit but is still soft, I take the fang out of my mouth to trim the excess.

Step 4: Match the Other Fang
When you've got one fang done, it's time to make the other. I usually keep the first fang in my mouth as a reference, so the second one matches in size and shape. If they don't match exactly on the first try, don't worry. I've redone fangs several times until I was happy with them. Once you get the hang of it, making multiple pairs is pretty quick and easy.

Experiment with Different Fang Styles
Now that you have your basic fangs, you can experiment with different styles. For example, I've made fangs inspired by characters like Toga from My Hero Academia. She has pointy, fang-like teeth, but they're smaller than full vampire fangs. Here are a few different styles to consider:
- Classic Vampire Fangs: These are longer and more pronounced, placed on your upper incisors.
- Shorter Fangs (like Toga): These are smaller and less dramatic but still give off that fang-like vibe.
- Side Fangs: If you want fangs that are more visible when your mouth is relaxed, try placing them on the teeth next to your incisors. These are great if you don't want to constantly bare your teeth for photos.
- Bottom Teeth Fangs: Making fangs on your bottom teeth follows the same process, but it can be a bit trickier if you have an overbite like I do. Just make sure the fangs don't interfere with your upper teeth.
Advanced Techniques and Variations
- Snaggle Fang: A single fang on one side, often used for cutesy or animal-like characters. I usually place this on the tooth next to my front teeth.
- Double Layer Fangs: For a more aggressive look, try making fangs on both your upper and lower teeth.
- Bridged Fangs (for Kids): If you're making fangs for a child, safety is key. To prevent them from swallowing the fangs, you can make a “bridge” by connecting two fangs with extra plastic across the front teeth. It might not look as realistic up close, but it's much safer for kids.
Coloring and Customization
Thermoplastic beads also come in different colors. For example, I've used black thermoplastic to make the look of missing teeth by covering a tooth with the plastic. You can also use colors like white for more realistic-looking fangs, or even experiment with metallic colors for a supernatural effect.
Troubleshooting Common Issues
Making DIY vampire fangs can be a fun project, but sometimes, things don't go as planned. Here are some common issues you might encounter and how to solve them:
Fit and Comfort
- Fangs Are Too Loose: Solution: Use dental wax or moldable plastic to adjust the fit. Apply a small amount around the base of the fangs and press them onto your teeth. This will help secure them in place.
- Fangs Are Too Tight: Solution: Gently file down the inner edges of the fangs with a fine nail file. Be careful not to remove too much material at once. Test the fit frequently to ensure comfort.
- Discomfort While Wearing: Solution: Smooth any rough edges with a nail file. If the fangs are still uncomfortable, try using a dental adhesive designed for sensitive teeth. Avoid wearing the fangs for extended periods.
Appearance Issues
- Fangs Look Unnatural: Solution: Use enamel paint to add shading and details. Apply a base coat of white, then add light grey or yellow for a more realistic look. Finish with a clear, glossy sealant.
- Paint Is Chipping: Solution: Ensure the fangs are clean and dry before painting. Apply multiple thin coats of paint rather than one thick coat. Use a clear sealant to protect the paint.
Durability Problems
- Fangs Break Easily: Solution: Use a stronger material like dental acrylic to make the fangs. If they do break, you can repair them with a small amount of dental adhesive or super glue. Allow the glue to dry completely before wearing it.
- Fangs Fall Off: Solution: Make sure the fangs are properly fitted and use a strong dental adhesive. Avoid eating or drinking while wearing the fangs to prevent them from loosening.
Health and Safety Concerns
- Allergic Reactions: Solution: Test all materials on a small area of skin before use. If you experience any irritation, discontinue use immediately. Opt for hypoallergenic materials if you have sensitive skin.
- Choking Hazard: Solution: Ensure the fangs are securely attached and not too small. Avoid wearing them while sleeping or during activities that could cause them to come loose.
Maintenance Tips
- Cleaning the Fangs: Solution: Clean the fangs with a mild soap and warm water after each use. Avoid using harsh chemicals that could damage the material. Store them in a clean, dry place.
- Storing the Fangs: Solution: Keep the fangs in a protective case when not in use. This will prevent them from getting damaged or lost. Make sure they are completely dry before storing to avoid mold or mildew.
By addressing these common issues, you can ensure your DIY vampire fangs are comfortable, durable, and look great.
FAQs About DIY Vampire Fangs
Discover answers to common questions about DIY vampire fangs. Get tips on materials, safety, and techniques for the perfect vampire look.
It's best to avoid eating and drinking with DIY vampire fangs. The materials used, like fake nails or plastic straws, are not designed for consumption and could come loose or be swallowed. If you need to eat or drink, remove the fangs first to avoid any accidents.
DIY vampire fangs are generally temporary and can last for a few hours to a day, depending on the materials used and how well they are attached. For longer-lasting fangs, consider using denture adhesive cream, which provides a stronger hold.
To remove DIY vampire fangs:
Gently wiggle the fangs to loosen them.
Use warm water to soften any adhesive.
Carefully pull the fangs off your teeth.
Clean your teeth and gums thoroughly to remove any residue.
Yes, you can reuse DIY vampire fangs if they are made from durable materials like fake nails or plastic straws. To reuse them:
Clean the fangs thoroughly after each use.
Store them in a clean, dry place.
Reapply adhesive when you want to wear them again.
If your DIY vampire fangs cause discomfort:
Remove the fangs immediately.
Check for sharp edges and file them down if necessary.
Use a softer material like braces wax for a more comfortable fit.
Consult a dentist if you experience persistent discomfort or irritation.
Safety Tips and Final Thoughts
One important safety note: Never eat or drink while wearing your fangs. Thermoplastic isn't meant to handle food or drink, and it could warp or break. Always remove your fangs when you're not using them to avoid any accidents.
Crafting your own DIY vampire fangs gives you a lot of flexibility, whether you want simple vampire teeth or something more unique like a single snaggle tooth. It's a fun, cheap way to level up your cosplay or costume. The possibilities are endless, and I've had a lot of fun experimenting with different styles over the years.
Give it a try, and don't be afraid to mess up a few times—you'll get the hang of it with practice!


