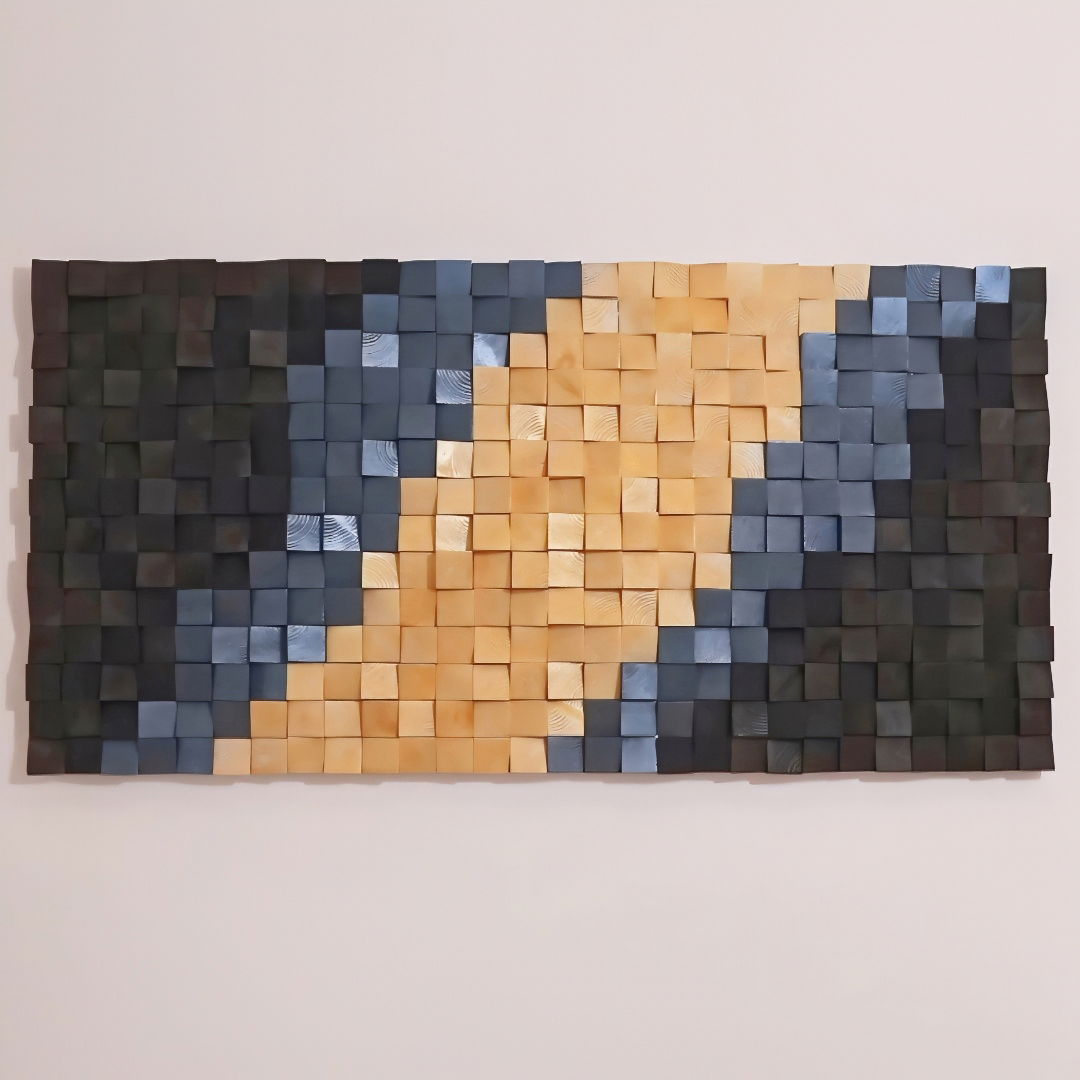
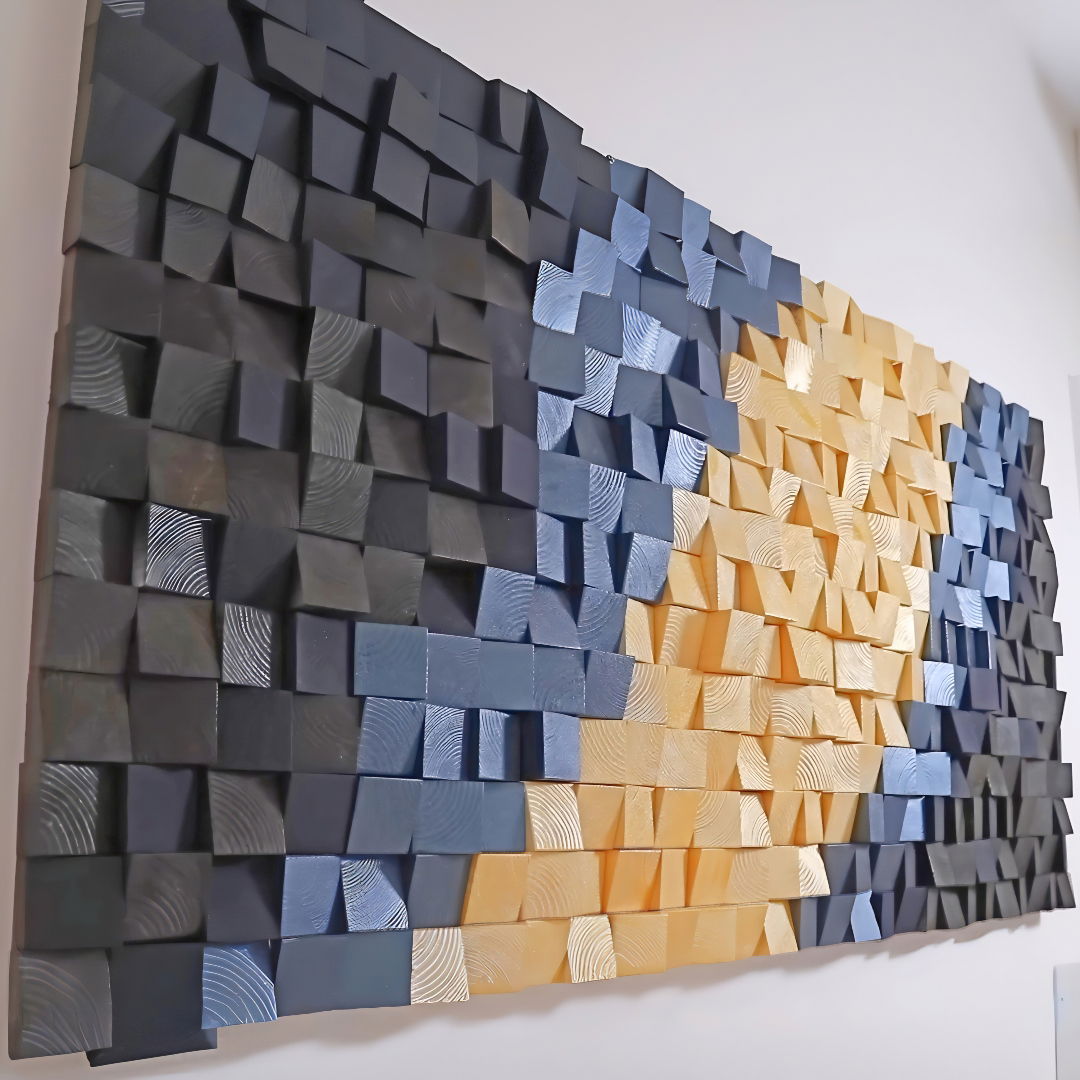
Decorating a new home is an adventure filled with excitement and, quite often, a hefty price tag, especially when it comes to wall art. After experiencing sticker shock from the prices of modern art pieces for my walls, I decided it was time to embrace the DIY spirit. Inspired by various internet sources, I set out to make a unique piece of wall art with my personal touch, involving lots of wooden blocks. Here's a step-by-step guide on how I did it, complete with insights and practical advice.
Gathering the Materials and Tools
My project involved using 2x2 plain timber to craft an art piece measuring 1.2 meters by approximately 60 centimeters. Here's why each material was chosen:
- 2x2 Timber: Provides a sturdy base for cutting into blocks of varying sizes, making the artwork truly stand out.
- MDF Board (6 mm): Serves as the perfect backing due to its flat surface and lightweight nature, essential for hanging.
- Battens: Used on the backing board to add strength and make a shadow gap when mounted on the wall.
- Primer and Acrylic Paint: Essential for adding color and protecting the wood.
Step by Step Instructions
Learn how to make a stunning art piece with step-by-step instructions from preparing the backing board to hanging and admiring the final product.
Preparing the Backing Board
The first step was building a strong, lightweight backing board. I chose a 6 mm MDF board for its simplicity and lightness. After cutting it to size, I marked and attached battens around the perimeter to prevent the piece from lying flat against the wall, which adds an intriguing shadow gap.
Cutting the Timber Blocks
This project required cutting nearly 400 blocks from the 2x2 timber, each with a straight and an angled end. To streamline the process, I utilized two mitre saws, setting one for straight cuts and the other for angled cuts. This design choice added visual interest to the final piece and simplified the cutting process.
Sanding and Priming
After cutting, each block needed to be sanded to ensure a smooth surface for painting. This step was crucial for the blocks to fit closely together. Next, I primed the blocks to prepare them for painting. Priming helps the paint adhere better and last longer.
Painting with Patience and Precision
I decided to paint the blocks in a variety of colors using both spray paint and brush-on acrylic paint. This step was the most time-consuming but also where the piece began to take on its unique character. To avoid the mess and waste often associated with spray painting, I found brush painting allowed for greater control and better coverage.
Assembling the Art Piece
With all the blocks painted, it was time to assemble the artwork. I laid out my design on a separate board first, which allowed me to adjust and rearrange blocks without commitment. Once satisfied with the design, I transferred the blocks to the prepared MDF board, gluing each one down. This process required patience and attention to detail, ensuring that each block was perfectly placed.
The Final Touches
As I stood back to admire the nearly completed work, I drilled holes for the mounting fixtures, carefully hidden behind four of the blocks. This detail ensured the piece could be securely mounted on the wall without visible fixtures ruining the aesthetic.
Hanging and Admiring
Hanging the piece was a moment of pride. It was heavier now, but the effort was worth it. The colors of the blocks caught the light differently throughout the day, building an ever-changing piece that drew the eye and sparked conversation.
Reflections
This project was more than a way to fill a space on my wall; it was a journey in creativity, patience, and DIY spirit. Along the way, I learned the importance of preparation, the value of taking your time, and the beauty of building something with your own hands.
For anyone looking to embark on their own DIY art project, remember: the process is just as important as the product. Choose materials wisely, don't rush the creative process, and enjoy the satisfaction that comes from making something uniquely yours. Your home, and your heart, will be all the richer for it.
Incorporating Trends in Wall Art: Fresh Ideas for a Modern Look
Wall art is more than just decoration; it's an expression of your personality and style. To keep your home decor up-to-date, consider incorporating the latest trends into your DIY wall art projects. Here are some fresh ideas to give your space a modern and stylish look:
1. Abstract Geometric Designs
Abstract geometric designs are all the rage right now. These bold and eye-catching patterns add a contemporary touch to any room. Here's how to make your own geometric wall art:
- Materials Needed:
- Canvas or wooden panel
- Acrylic paints in trendy colors (think blush pink, deep teal, or mustard yellow)
- Painter's tape or masking tape
- Paintbrushes
- Steps:
- Prep the Canvas: Start with a blank canvas or wooden panel. Choose a size that fits your wall space.
- Build the Base: Paint the entire canvas in a neutral color (white, gray, or beige).
- Tape Off Sections: Use painter's tape to make geometric shapes on the canvas. Think triangles, hexagons, or squares.
- Paint Inside the Shapes: Fill in the taped-off sections with your chosen colors. Experiment with different color combinations.
- Peel Off the Tape: Once the paint is dry, carefully remove the tape to reveal the crisp lines of your geometric design.
2. Botanical Prints and Nature-Inspired Art
Bringing the outdoors in is a timeless trend. Nature-inspired wall art adds a sense of tranquility and freshness to your home. Try these ideas:
- Pressed Flower Art:
- Collect flowers and leaves from your garden or a local park.
- Press them between heavy books for a few days.
- Arrange the dried flowers on a piece of cardstock or canvas and secure them with glue.
- Frame the artwork for a delicate and natural look.
- Leaf Prints:
- Dip leaves (real or artificial) in acrylic paint.
- Press them onto a canvas or paper to make leaf prints.
- Experiment with different leaf shapes and colors.
3. Textured Wall Hangings
Texture is making a comeback in interior design. Build tactile wall art using unconventional materials:
- Macramé Wall Hangings:
- Learn basic macramé knots (such as square knots and half-hitch knots).
- Use thick cotton cord or jute twine to make intricate patterns.
- Hang your macramé piece from a wooden dowel or driftwood.
- Fabric and Yarn Art:
- Cut fabric scraps or yarn into different lengths.
- Attach them to a wooden dowel or embroidery hoop.
- Arrange the pieces to form a unique and textured wall hanging.
Remember, the key to incorporating trends is to adapt them to your personal style. Whether you're a minimalist or a maximalist, there's a trendy wall art idea waiting for you. Happy crafting
DIY Wall Art: Frequently Asked Questions
Discover the answers to your DIY Wall Art questions in this comprehensive guide. Learn tips, techniques, and inspiration for building stunning wall decor.
1. How can I find inspiration for my wall art?
Inspiration is everywhere! Look for ideas in:
- Nature: Leaves, flowers, or landscapes.
- Quotes: Use meaningful phrases or lyrics.
- Textures: Experiment with different textures like burlap or lace.
- Personal Photos: Turn your favorite memories into art.
2. What are some easy techniques for beginners?
Start with simple techniques:
- Abstract Painting: Use bold colors and brush strokes.
- Decoupage: Cut out images from magazines and glue them onto your canvas.
- Stenciling: Apply paint through a stencil for precise designs.
3. How do I choose the right color palette?
Consider the room where your art will hang:
- Harmonious Colors: Match the colors in your art to the room's existing palette.
- Contrast: Use complementary colors for a striking effect.
- Neutral Tones: If you prefer a subtle look, stick to neutrals.
4. What about framing and hanging my DIY wall art?
- Framing: Decide whether you want to frame your art or leave it unframed.
- Hanging: Use picture hooks or adhesive strips for lightweight pieces. For heavier art, use wall anchors and screws.
5. How can I personalize my wall art?
- Add Text: Incorporate names, dates, or meaningful words.
- Layering: Combine different materials like fabric, paper, and paint.
- Collage: Build a collage of images or textures.
Remember, there are no strict rules in DIY wall art—just have fun and let your creativity flow!
Conclusion:
In conclusion, make gorgeous DIY wall art with our easy step-by-step guide. Add a unique touch to your space and let your creativity shine through. Start crafting your own beautiful decor today!


