Ice baths are an excellent way to enhance recovery, improve circulation, and reduce inflammation. However, maintaining the cold temperature can be costly, especially if you're using ice regularly. Many people opt for high-priced water chillers to address this, but you don't have to spend thousands of dollars. With a little DIY effort, you can build your own DIY water chiller for an ice bath for around $500. This guide provides a detailed, step-by-step explanation of the entire process.
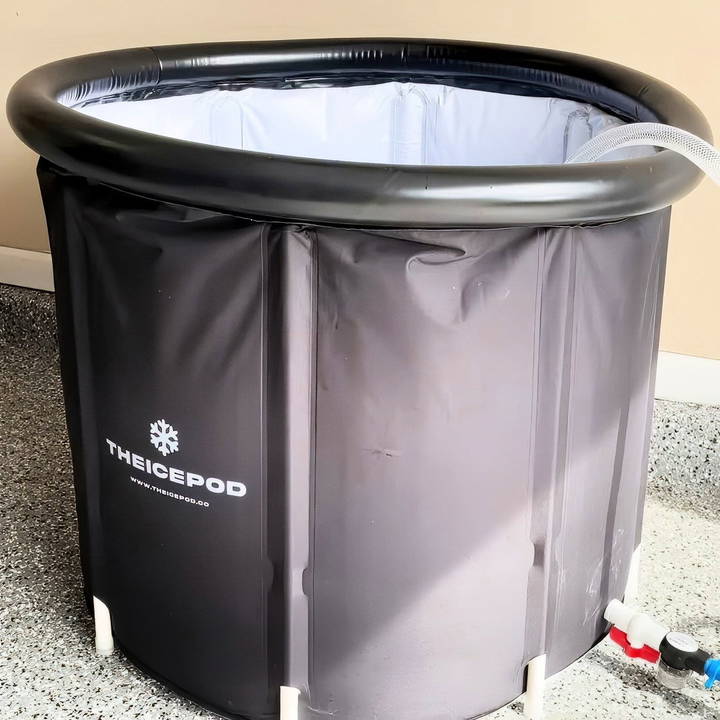
Why Build Your Own Water Chiller?
Commercial water chillers for ice baths, such as those offered by Ice Pod, can cost upwards of $1,000 to $3,000. While they are effective, they use the same basic technology as aquarium chillers, which are far more affordable. A DIY water chiller replicates the performance of commercial models at a fraction of the cost. Here are some reasons to consider this project:
- Cost Efficiency: Save hundreds, if not thousands, of dollars.
- Customizable Setup: Tailor the design to your specific needs and space.
- Ease of Maintenance: Learn how the system works, so you can troubleshoot or modify it.
Materials Needed for the DIY Water Chiller
Below is the list of components required for this project, including their purpose and tips on choosing the right ones:
1. Aquarium Chiller
- Recommended Model: 1/3 HP chiller (e.g., Active Aqua).
- Purpose: Cools the water circulating through the system.
- Cost: $250–$400.
- Where to Buy: Available on Amazon, eBay, or specialty aquarium stores.
2. Water Pump
- Recommended Model: Active Aqua 400 GPH water pump.
- Purpose: Circulates water between the ice bath and chiller.
- Cost: $50–$100.
- Note: A pump with around 400 gallons per hour (GPH) is sufficient for most setups.
3. Hoses
- Size: 3/4-inch diameter hoses.
- Purpose: Allows water to flow between components.
- Tip: Opt for thicker hoses for better water flow and cooling efficiency.
4. Sediment Filter
- Size: 1/2-inch or 3/4-inch filter.
- Purpose: Filters out debris like grass, dirt, and bugs.
- Cost: Around $20–$30.
- Placement: Installed at the ice bath's drainage valve.
5. Hose Clamps
- Purpose: Secures the hoses to the fittings and prevents leaks.
- Cost: $10–$15 for a pack.
- Tip: Soften the hose ends in hot water before attaching for a snug fit.
6. Barbed Fittings
- Types:
- 90-degree barbs for hose bends.
- 3/4-inch to 1/2-inch barbs for connecting to the filter and pump.
- Cost: $0.60–$1.00 each.
- Where to Buy: Available at hardware stores like Lowe's or Home Depot.
7. Optional Accessories
- Plumber's tape for sealing threads.
- GFCI outlet for electrical safety.
Step by Step Instructions
Build your own DIY water chiller for ice baths with easy step-by-step instructions, maintenance tips, and troubleshooting advice.
Step 1: Prepare the Ice Bath
- Start by identifying the drainage valve on your ice bath. This is where you'll attach the sediment filter.
- If your ice bath doesn't have a drainage valve, consider adding one for convenience.
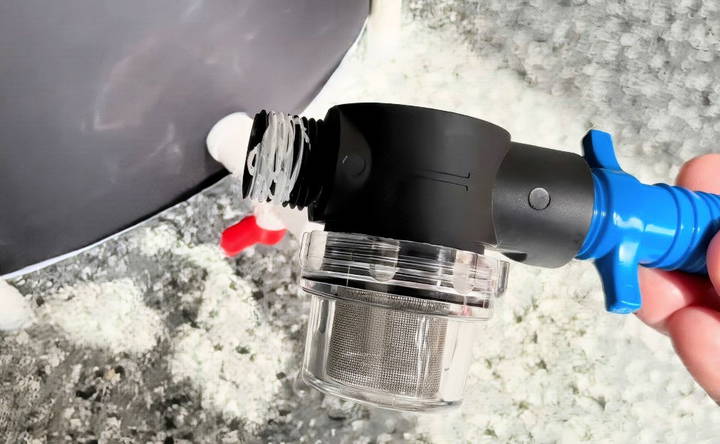
Step 2: Install the Sediment Filter
- Attach the sediment filter directly to the drainage valve.
- Use a 3/4-inch to 1/2-inch barbed fitting to connect the filter.
- Wrap plumber's tape around the threads for a tight seal.
- The filter ensures that large debris doesn't clog the system.
Step 3: Set Up the Pump
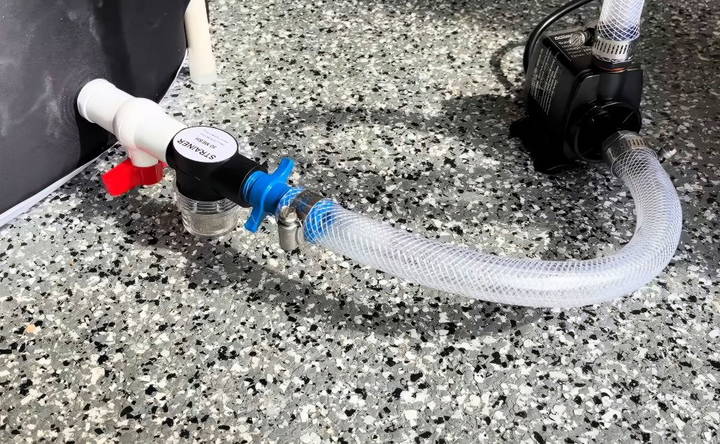
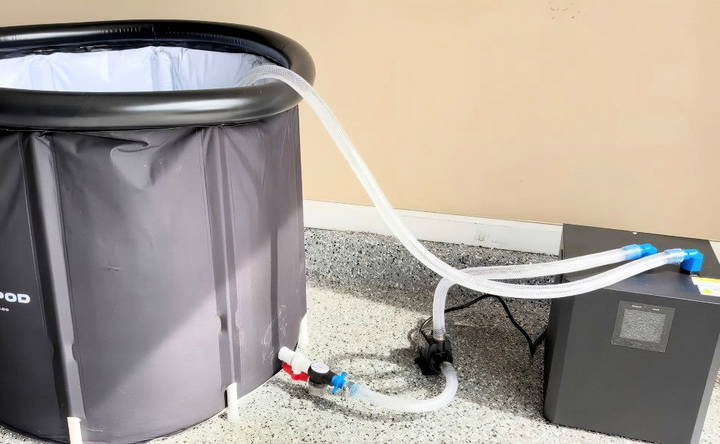
- Connect a hose from the sediment filter to the pump's intake port.
- Secure the connection with hose clamps.
- Make sure the pump is placed on a stable surface close to the ice bath.
Step 4: Connect the Chiller
- Cut two hoses to the desired length, considering the distance between the pump and the chiller.
- Attach one hose from the pump's output to the chiller's intake port.
- Connect another hose from the chiller's output back to the ice bath.
- Use hose clamps to secure all connections.
Step 5: Position the Chiller
- Place the chiller on a raised platform or flat surface.
- Ensure it has proper ventilation to avoid overheating.
- Keep the chiller away from direct sunlight and walls.
Step 6: Test for Leaks
- Before powering on the chiller, turn on the pump to circulate water through the system.
- Check all connections for leaks and tighten as needed.
- Run the pump for a few minutes to ensure smooth water flow.
Step 7: Activate the Chiller
- Plug in the chiller and set the desired water temperature (e.g., 50°F).
- The chiller will automatically cycle on and off to maintain the set temperature.
Maintenance and Cleaning Tips
To keep your DIY water chiller functioning optimally, regular maintenance is essential:
- Clean the Sediment Filter: Remove and rinse the filter weekly to prevent blockages.
- Sanitize the Water: Use a pool sanitizer or food-grade hydrogen peroxide to keep the water clean.
- Add natural enzymes to dissolve body oils and other contaminants.
- Inspect the System: Check hoses, clamps, and fittings periodically for wear and tear.
Key Considerations and Troubleshooting
- Placement of the Chiller: Ensure the chiller is in a well-ventilated area to avoid overheating.
- Flow Rate: A pump with a higher flow rate (GPH) may improve cooling performance.
- Initial Cooling Time: Depending on the starting water temperature, it may take several hours to reach the desired chill.
Final Thoughts:
Building your own water chiller for an ice bath is a rewarding and cost-effective project. By following these instructions, you can build a system that rivals expensive commercial models for a fraction of the cost. Whether you're an athlete seeking faster recovery or someone looking to enjoy the benefits of cold therapy, this DIY setup has you covered.
With proper maintenance, your DIY water chiller can provide years of reliable performance, saving you money and enhancing your ice bath experience. Start building your system today and enjoy the benefits of cold therapy without breaking the bank!
FAQs About DIY Water Chillers for Ice Baths
Get answers to common questions about DIY water chillers for ice baths. Learn methods, materials, and tips to enhance your ice bath experience.
If the chiller runs continuously, expect an increase of about $30 per month, depending on usage and local energy rates.
Yes. Despite their advertised range of 68–79°F, 1/3 HP chillers can cool water into the 40s or 50s, especially with proper insulation and moderate ambient temperatures.
Initial cooling from warm tap water to around 50°F can take 10–12 hours. Using ice or running the chiller overnight can significantly reduce this time.
Check the sediment filter for blockages. If the pump still struggles, backfill the hoses with water to prime the system. Ensure all hoses are securely attached and air is not trapped.
Yes, but ensure the chiller is protected from direct sun and rain. Using a gazebo or a custom-built shelter is ideal for extending its lifespan.
Use sanitizing products like Sirona sanitizer and food-grade hydrogen peroxide. Follow up with Sirona testing strips to measure water balance weekly.
For larger tubs or poorly insulated systems, consider upgrading to a 1/2 HP chiller and insulating hoses and the tub. This reduces strain on the chiller and improves efficiency.
Verify that the pump is functioning and water is flowing freely. Insulate your tub and hoses to improve efficiency. If the issue persists, the chiller may have a refrigerant leak.
Not necessarily. Use a timer or smart plug to manage operating hours. You can also set the chiller to maintain the temperature within a few degrees of your target when idle.
Yes, but be aware of noise from the chiller and ensure the area can handle potential water leaks. Proper ventilation is essential to manage heat exhaust from the chiller.


