Finding a way to entertain my kids outdoors was my new challenge. I remembered my childhood and thought about building a DIY water table. The project seemed fun and useful, and I couldn't wait to get started. It would be a great outdoor activity for my kids, and it promised hours of joy. Plus, making something with my own hands always feels rewarding.
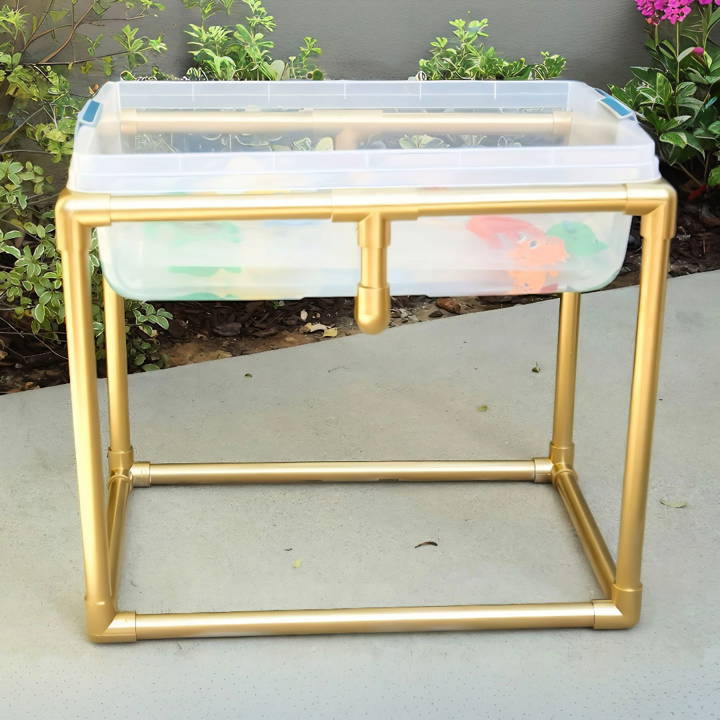
I started gathering materials like plastic tubs, pipes, and a few basic tools. With a bit of creativity and some guidance from online tutorials, the water table began to take shape. My kids were excited and couldn't wait to use it. The DIY water table not only became a hit but also helped improve their sensory skills and kept them engaged for hours.
I'm excited to share this with you because making a DIY water table can bring as much joy to your family as it did to mine. With easy steps and a bit of effort, you can build something fun and useful for your kids, too.
Educational Benefits of a Homemade Water Table
Playing with a homemade water table is not just a fun activity for children; it's also a valuable educational experience. Here's how a water table can benefit kids' development:
- Sensory Exploration: Water play allows children to explore different textures and temperatures, which is crucial for sensory development. They learn concepts like wet and dry, warm and cold, and start to understand the properties of water.
- Motor Skills Development: Scooping, pouring, and splashing help improve fine motor skills. These actions require coordination and control, which are essential for writing and other precise movements.
- Cognitive Growth: Children learn basic scientific principles through play. They can experiment with cause and effect, such as what happens when they mix water with sand. They also begin to grasp concepts like volume and density.
- Language Skills: As children play, they often talk about what they're doing or what they plan to do next. This narrative play helps develop their language skills, including vocabulary, sentence structure, and storytelling.
- Social Interaction: When children play together at a water table, they learn to share, negotiate, and collaborate. These are important social skills that will benefit them throughout their lives.
- Emotional Development: Water play can be soothing and can help children express their emotions. It also provides an outlet for stress and can lead to improved concentration and focus.
Adding a water table to playtime offers fun and supports your child's development. Always supervise water play for safety.
Materials Needed and Their Importance
Before diving into the construction, here's what you'll need:
- Approximately 19 feet of 3/4 inch PVC Pipe: This forms the structure of the table, providing stability and height.
- Eight 3-way Elbow Connectors & Two 3/4 inch T Connectors: For joining the pipes at angles, crucial for the frame's integrity.
- Two 3/4 inch Elbow Connectors: To connect the stabilizer bar that adds extra support.
- A Large Plastic Bin (40 gallons recommended): This serves as the basin for the water. Size can be adjusted based on available space and the number of children likely to use it simultaneously.
- A PVC Pipe Cutter: For cutting pipes to the desired lengths, ensuring clean cuts for secure connections.
Understanding why each material was needed made the shopping process much smoother. I focused on obtaining quality materials, ensuring the table would be durable and safe for toddler play.
Step by Step Instructions
Make a fun DIY water table for kids with this easy guide. Perfect summer project to keep your children entertained and cool.
Step 1: Cutting the PVC Pipe
With my PVC pipe and cutter in hand, I measured and marked off the lengths needed: two 21-inch, four 10-inch, five 14.5-inch, four 16-inch, and two 3.5-inch pieces. Following the measurements carefully was crucial for ensuring the frame would assemble correctly.
Step 2: Assembling the Base
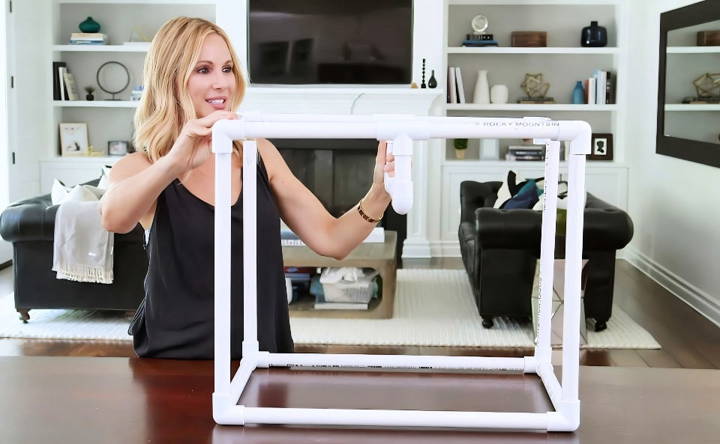
I started by making a rectangle with the 21-inch and 14.5-inch pieces, using four 3-way connectors. This buildd a stable base for the table, ensuring it wouldn't topple during play.
Step 3: Constructing the Top Frame
Next, I joined two of the 10-inch pieces with a T connector and repeated this for the remaining two 10-inch pieces. These formed the sides of the top frame, with the remaining 3-way connectors used at each corner, mimicking the base's assembly.
Step 4: Adding the Stabilizer Bar
The stabilizer bar was buildd by inserting the 3.5-inch pieces into the bottom of each T joint, then attaching an elbow connector to each and connecting them with the last 14.5-inch piece. This extra step added crucial stability.
Step 5: Attaching the Legs and Finalizing the Frame
The last four 16-inch pieces served as legs. I inserted them into the base and then attached the top frame. Double-checking that everything was secure, my frame was now sturdy and ready.
Step 6: The Fun Part - Playtime!
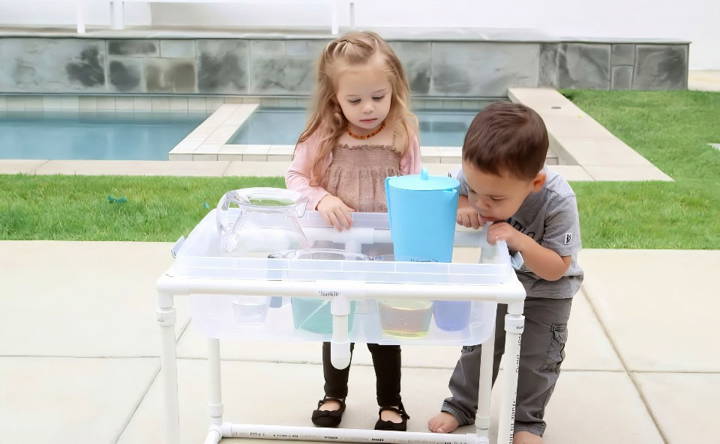
Taking the frame and the plastic bin outside, I placed the bin on top, delighted with how seamlessly it fit. It was a moment of pride, seeing my project come together perfectly.
Personal Touches and Tips
Choosing to paint the frame gold added a chic touch, making the water table not just a play item but also a decorative piece for our backyard. My child loved it, and the versatility was remarkable. We even filled it with sand some days for a different experience. For maintenance, a lid kept it clean, and disassembly for storage was surprisingly simple.
Customization Ideas for Your Homemade Water Table
Building a homemade water table is a fantastic way to provide a personalized play area for your children. Here are some customization ideas that can enhance the play experience while catering to your child's interests and developmental stage:
- Theme-Based Design: Choose a theme that your child loves, such as pirates, mermaids, or aquatic animals. Decorate the water table with figures and toys that match the theme to spark the imagination.
- Interactive Elements: Add items like water pumps, pipes, or water wheels to encourage exploration and understanding of water flow and mechanics.
- Sensory Add-Ons: Introduce various objects with different textures, such as smooth pebbles, sponges, or rubber toys, to stimulate tactile senses.
- Educational Tools: Incorporate measuring cups and funnels to teach concepts of measurement and cause and effect. This can also introduce basic math skills in a playful context.
- Garden Integration: If you have a garden, consider integrating the water table with natural elements. Planting around the table or using water to nurture nearby plants can teach children about nature and caring for the environment.
- Adjustable Height: Make the legs of the water table adjustable so it can grow with your child, ensuring it remains accessible and enjoyable as they get taller.
- Colorful Palette: Use bright, non-toxic paints to make the water table visually appealing and stimulating. Colors can be used to build zones for different types of play.
- Chalkboard Surface: Apply chalkboard paint to one side of the water table to allow children to draw and write, combining water play with creative expression.
- Seasonal Features: Change the accessories and toys according to seasons or holidays to keep the water table exciting and relevant all year round.
- Safety Features: Ensure that all materials are child-safe and that the table is stable. Rounded corners and non-slip surfaces can help prevent accidents.
Incorporate these ideas to make a fun, educational, and sensory-rich water table. Keep the design simple, safe, and suited to your child's interests.
Maintenance and Care for Your Homemade Water Table
Keeping your homemade water table clean and well-maintained is essential for ensuring it remains a safe and enjoyable space for children to play. Here's a straightforward guide to help you take care of your water table:
- Regular Cleaning: After each use, empty the water and rinse the table with clean water. Once a week, clean the table with a mild soap solution to remove dirt and grime.
- Disinfecting: To disinfect the water table, use a solution of one tablespoon of bleach mixed with one gallon of water. Apply this solution with a cloth and let it air dry.
- Checking for Damage: Inspect the water table regularly for any signs of wear and tear. Look for cracks, splinters, or loose parts that could harm children.
- Storage: If you're not using the water table for an extended period, store it in a dry, shaded area to prevent sun damage and warping.
- Water Quality: If you're using the table frequently, consider adding a few drops of vinegar to the water to keep it fresh and reduce the growth of algae and bacteria.
- Toy Care: Clean the toys and accessories used in the water table with the same care as the table itself. This prevents the spread of germs and ensures they're always ready for play.
- Seasonal Care: Before winter, make sure to drain the water table to prevent freezing and cracking completely. During summer, keep the table covered when not in use to protect it from the sun's UV rays.
- Safety Checks: Always ensure that the table is stable before use. Tighten any loose screws and replace any worn-out parts immediately.
Extend the life of your DIY water table with simple care tips for a hygienic play space. A bit of maintenance keeps the fun flowing!
Safety Precautions for Homemade Water Tables
Ensuring the safety of children is paramount when they are engaging in water play. Here are some key safety precautions to consider for your homemade water table:
- Stable Construction: Make sure the water table is sturdy and well-balanced to prevent tipping over. Check that all parts are securely attached.
- Smooth Edges: Avoid sharp edges or corners where children could hurt themselves. Use sandpaper to smooth out any rough areas.
- Non-Toxic Materials: Use materials that are free from harmful chemicals. If you're painting the table, choose non-toxic, lead-free paint.
- Supervised Play: Always supervise children during water play. It only takes a small amount of water for a child to drown, so never leave them unattended.
- Appropriate Water Depth: Keep the water level low, especially for younger children. A few inches of water is enough for play without posing a risk.
- Slip-Resistant Surface: Place the water table on a non-slip mat or ensure the area around it is slip-resistant to prevent falls.
- Regular Inspections: Periodically check the water table for any damage or potential hazards, such as loose screws or cracked containers.
- Safe Accessories: Only use toys and accessories that are appropriate for the child's age and do not pose a choking hazard.
- Emergency Preparedness: Keep a first aid kit nearby and learn basic first aid and CPR in case of accidents.
- Weather Considerations: On hot days, ensure children are protected from the sun with sunscreen and hats, and on cold days, make sure the water is not too cold to prevent hypothermia.
These safety measures ensure a fun and secure homemade water table for kids. Put safety first to avoid accidents and injuries.
FAQs About Homemade Water Table
Discover answers to common questions about homemade water tables, including materials, construction tips, and safety guidelines.
To ensure stability:
Cut the PVC pipes to the precise lengths as per the design.
Use a rectangle of PVC pipes with connectors to form a sturdy base.
Add a middle stabilizer bar with elbow connectors to prevent wobbling.
Securely attach the legs and top frame to the base.
Make sure the plastic bin fits snugly within the frame.
Yes, you can customize your water table by:
Adding gold spray paint or any color of your choice to the frame for a unique look.
Including various water toys to enhance playtime.
Adjusting the size of the table to fit your space and the number of children who will use it.
For safety:
Ensure all pipe cuts are smooth and free of sharp edges.
Check that all connections are tight and secure to prevent the structure from collapsing.
Always supervise children during play to prevent accidents.
To maintain your water table:
Empty and clean the bin regularly to prevent mold and mildew.
Inspect the PVC frame periodically for any loose connections or damage.
Store the water table in a dry place when not in use to extend its lifespan.
To make your homemade water table both fun and educational:
Incorporate learning themes such as floating and sinking, water cycles, or measuring volumes.
Use food coloring to teach color mixing.
Add natural elements like leaves, stones, or flowers for sensory play.
Include measuring cups and funnels to practice pouring and measuring.
Build mini-ecosystems with toy fish and plants to learn about aquatic habitats.
The Outcome
By sharing my experience, I hope to inspire you to take on this homemade DIY water table. The smiles and excitement on your kids' faces will make it all worthwhile.


