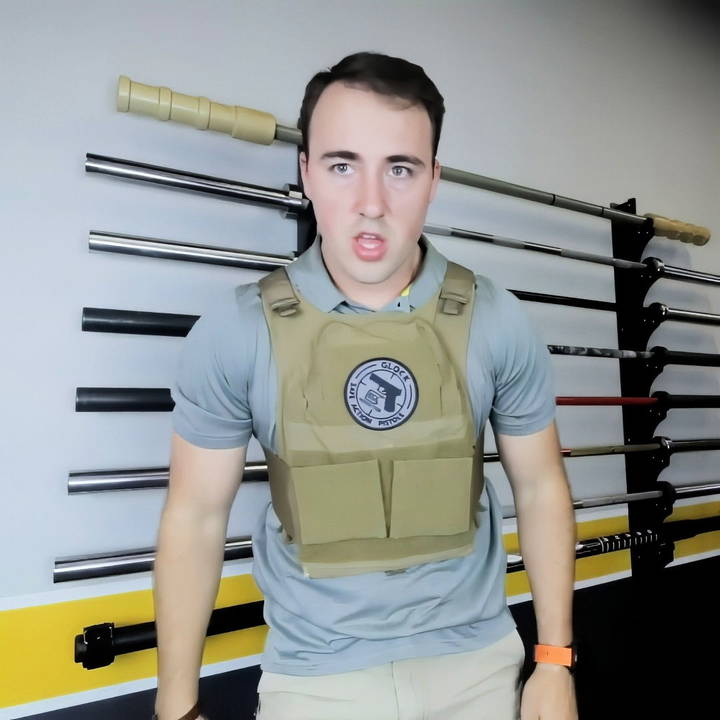
When it comes to fitness, especially functional training or CrossFit, a weight vest can be a game-changer. It adds resistance to your workout, helping you build strength and endurance. However, buying a commercial weight vest can be expensive, with some costing well over $150. I decided to build my own DIY weighted vest for less than $50, and it works just as well as the expensive ones! Here's how I did it and how you can make one too, without breaking the bank.
Why a DIY Weight Vest?
A weight vest is a versatile tool for adding extra resistance to various exercises, from pull-ups to push-ups, squats, lunges, and even cardio. But high-quality weight vests like the 5.11 Tactical Vest, popular in CrossFit, can cost upwards of $200. I love using weight vests but didn't want to spend that much, so I set out to make one for under $50 that's functional, durable, and adjustable to different weights.
Materials You'll Need
The materials are straightforward and inexpensive, and you can find most of them on Amazon or at a local store. Here's what you'll need:
- Plate Carrier Vest ($48): The core of this project is a tactical plate carrier vest, which is essentially the same as what's used in many high-end commercial weight vests. You can easily find one online for around $48.
- Cardboard: You'll use this to make a base for securing the weights.
- Two 10-pound Weight Plates: These are the actual weights you'll use to add resistance.
- Zip Ties: Essential for securing the weights to the plate carrier.
- A Knife or Scissors: To cut the cardboard.
- A Marker: To outline your cutouts.
- Optional: Brand Markers: If you want to add a personal touch, like a logo or branding, go for it!
Step by Step Instructions
Learn to make a DIY weighted vest with our step-by-step guide. Customize and use it for effective workouts. Save money and get fit now!
Step 1: Set Up the Plate Carrier
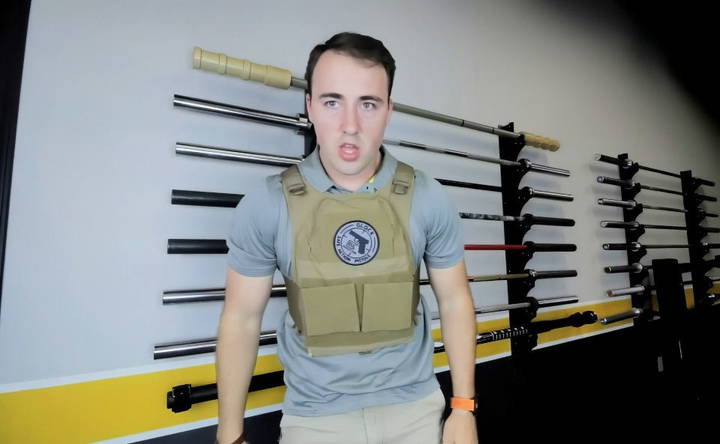
The plate carrier vest is the most crucial part of this DIY project. It's the shell that holds everything together and allows you to wear the weights comfortably. When shopping for a plate carrier, look for one that's well-reviewed and has good adjustability for a snug fit, which will prevent the weights from bouncing around during your workouts.
Step 2: Make the Cardboard Plates
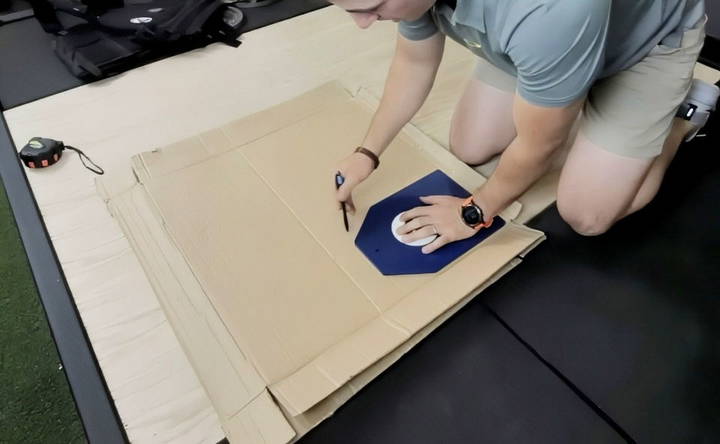
This is where the fun begins. First, take your cardboard, which will act as a placeholder for your weights inside the vest. Using the size of an actual weighted plate, measure and cut out two cardboard rectangles.
Here's what I did:
- I traced the actual weighted plate I had, but if you don't have one, no problem! A typical plate size is about 11.5 inches long and 9 inches wide, which is the size you'll want to aim for when cutting out your cardboard.
- After tracing, I cut out two pieces of cardboard for both the front and back sections of the vest. These cardboard pieces are there to help hold the weight plates securely in place.
Step 3: Cut Out the Weight Plate Circles
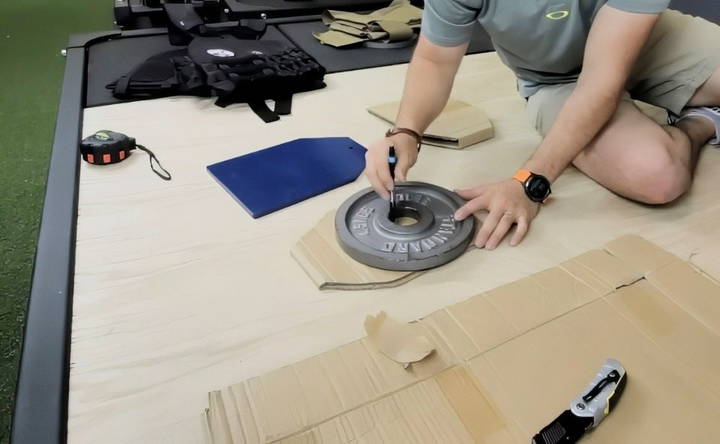
Now, you'll need to place the actual weights onto the cardboard and outline them. This will give you a guideline for cutting out holes in the cardboard, which will allow the weight plates to fit snugly and stay in place.
- Place the weight plate on top of the cardboard, align it with the bottom edge, and trace around the plate.
- Cut out the circle carefully using a sharp knife or scissors.
Step 4: Secure the Weights
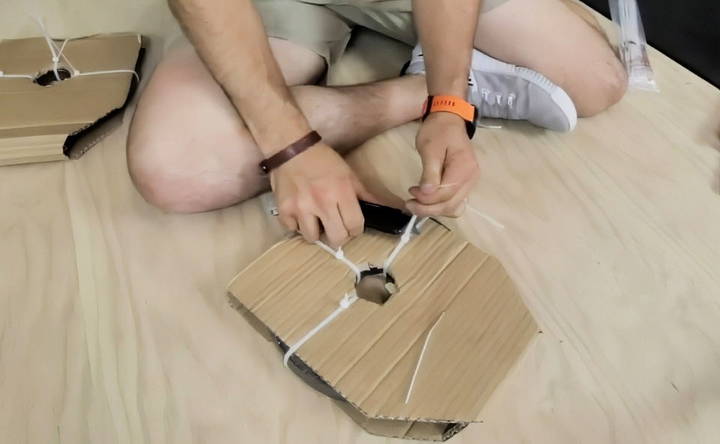
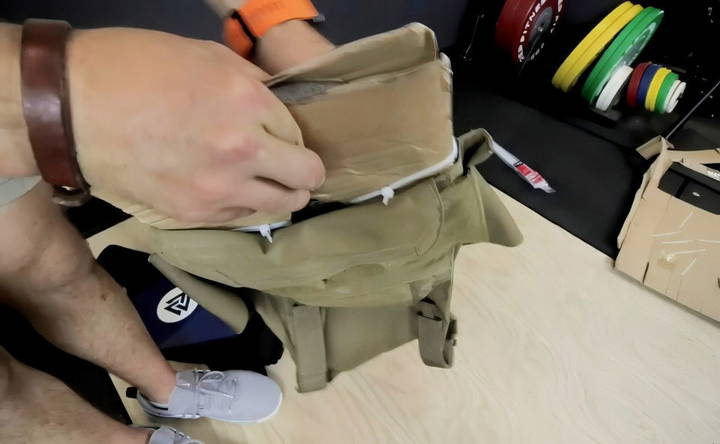
With the cardboard cutouts ready, you can now attach the weight plates. Here's where the zip ties come in handy. Simply place the weights onto the cardboard and secure them with zip ties.
- Make sure the weight is aligned with the bottom of the cardboard, ensuring it doesn't shift around.
- Use multiple zip ties to fasten the weights securely so they don't move or slide while you're wearing the vest.
Step 5: Customize Your Vest (Optional)
At this point, you have a fully functional DIY weight vest. But why stop there? You can add some custom branding to your vest to make it look like one from a high-end company. I grabbed a marker and wrote "ROGUE" on mine. This step is entirely optional but can add a fun, personalized touch to your vest.
Step 6: Insert the Plates Into the Vest
Now that you have your weighted plates ready, it's time to put them into the vest. Slide the cardboard with the attached weights into the front and back compartments of your plate carrier vest. Adjust the straps to ensure a tight fit. If you've secured everything properly, the weights should feel snug, and there shouldn't be any movement while you're working out.
Benefits of a DIY Weight Vest
Making your own weight vest doesn't just save you money, it allows you to customize the weight and the feel of the vest to your liking. Whether you're doing the CrossFit workout "Murph" or adding extra resistance to your bodyweight exercises, the DIY weight vest performs just as well as a commercial vest.
Additionally, since you're using standard weight plates, you can easily adjust the weight according to your needs. Whether you want a 10-pound vest for a lighter workout or go all out with 20 pounds, you can simply swap out the plates.
Exercises to Try with Your Weight Vest
Once you've got your weight vest ready, you can incorporate it into a variety of exercises:
- Pull-ups: Add extra weight to your pull-ups for more strength training.
- Push-ups: Challenge your upper body and core by doing weighted push-ups.
- Lunges: Weighted lunges will help increase the intensity of your leg workouts.
- Squats: A great way to build strength and endurance.
- Running or Walking: Take your cardio to the next level by adding resistance.
Troubleshooting: Common Issues and Solutions
Here are a few things to watch out for:
- Loose Fit: If your vest is too loose, the weights might bounce around during your workout. To avoid this, make sure the vest is adjusted properly and that the zip ties are securing the weights tightly.
- Weight Balance: Ensure that both sides of the vest are equally weighted. Uneven weights can cause discomfort or lead to injury.
- Durability of Materials: While cardboard is sturdy enough for this purpose, it may wear down over time, especially with heavy use. Consider replacing it periodically or using thicker cardboard for more durability.
Customization Ideas
Customizing your DIY weighted vest can make it more functional and enjoyable to use. Here are some simple and effective ideas to personalize your vest:
1. Personalization
Discover how to personalize clothing with pockets, different fabrics, and reflective strips to enhance style and functionality.
Add Pockets:
- Purpose: Pockets can hold small items like keys, phones, or snacks.
- How to Add: Sew or attach pockets to the front or sides of the vest. Use durable fabric and strong stitching to ensure they can hold weight.
Use Different Fabrics:
- Purpose: Different fabrics can make the vest more comfortable or stylish.
- How to Choose: Select breathable fabrics for hot weather or waterproof materials for outdoor use. Mix and match colors and patterns to reflect your personal style.
Incorporate Reflective Strips:
- Purpose: Reflective strips enhance visibility during evening or early morning workouts.
- How to Add: Attach reflective tape or fabric strips to the front and back of the vest. Ensure they are securely fastened and visible from a distance.
2. Adjustability
Discover ultimate comfort with our adjustable straps and customizable training aid featuring removable weights for a tailored workout experience.
Adjustable Straps:
- Purpose: Adjustable straps ensure a snug fit for different body sizes.
- How to Add: Use Velcro or buckle straps on the shoulders and sides. This allows you to tighten or loosen the vest as needed.
Removable Weights:
- Purpose: Removable weights let you adjust the vest's weight for different exercises.
- How to Add: Make pockets or compartments for weights. Use small sandbags, metal plates, or other weighted objects that can be easily added or removed.
3. Comfort Enhancements
Discover top comfort enhancements with optimal padding and ventilation. Upgrade your comfort instantly with our expert tips and product picks.
Padding:
- Purpose: Padding can prevent discomfort and chafing during use.
- How to Add: Sew foam or soft fabric padding into the shoulder and chest areas. Ensure the padding is evenly distributed and securely attached.
Ventilation:
- Purpose: Ventilation helps keep you cool during workouts.
- How to Add: Use mesh fabric in areas prone to sweating, like the back and underarms. This allows for better airflow and reduces overheating.
4. Functional Additions
Optimize your adventure with a functional additions hydration pack featuring a modular design for ultimate convenience and versatility.
Hydration Pack:
- Purpose: A hydration pack can keep you hydrated during long workouts.
- How to Add: Attach a small hydration bladder to the back of the vest. Ensure the drinking tube is easily accessible.
Modular Design:
- Purpose: A modular design allows you to add or remove components based on your needs.
- How to Add: Use Velcro or snap buttons to attach different modules, like extra pockets or weight compartments. This makes the vest versatile for various activities.
Customize your weighted vest for functionality and personal preferences to enhance workouts and maximize your DIY project.
Safety Tips
When making and using a DIY weighted vest, safety should be your top priority. Here are some essential safety tips to ensure you use your vest effectively and without injury:
1. Proper Weight Distribution
Learn tips for proper weight distribution. Ensure even weight distribution and start light for optimal performance and safety.
Even Weight Distribution:
- Why It Matters: Uneven weight can cause muscle strain and imbalance.
- How to Achieve: Distribute the weights evenly across the vest. Ensure both sides have the same amount of weight to maintain balance.
Start Light:
- Why It Matters: Starting with too much weight can lead to injury.
- How to Achieve: Begin with a lighter weight and gradually increase as your strength improves. This allows your body to adapt safely.
2. Material Safety
Discover safe, non-toxic materials with secure fastenings for peace of mind. Ensure everyday safety with our comprehensive material safety guide.
Non-Toxic Materials:
- Why It Matters: Some materials can be harmful if they come into contact with your skin.
- How to Achieve: Use non-toxic, skin-friendly materials. Avoid using lead or other hazardous substances for weights.
Secure Fastenings:
- Why It Matters: Loose weights can fall out and cause injury.
- How to Achieve: Ensure all weights are securely fastened. Use strong stitching, Velcro, or zippers to keep weights in place.
3. Usage Guidelines
Learn the correct fit and how to increase usage with our comprehensive usage guidelines gradually. Ensure optimal performance and safety.
Proper Fit:
- Why It Matters: A poorly fitting vest can cause discomfort and restrict movement.
- How to Achieve: Adjust the vest to fit snugly but comfortably. Make sure it does not shift or bounce during use.
Gradual Increase:
- Why It Matters: Increasing weight too quickly can lead to overexertion.
- How to Achieve: Gradually increase the weight over time. Listen to your body and avoid pushing yourself too hard.
4. Exercise Precautions
Stay safe with exercise precautions. Learn the importance of warm-up and how to monitor your form to prevent injuries and maximize your workouts.
Warm-Up:
- Why It Matters: Warming up prepares your muscles for the added weight.
- How to Achieve: Perform a light warm-up before using the weighted vest. This can include dynamic stretches or light cardio.
Monitor Your Form:
- Why It Matters: Poor form can lead to injuries, especially with added weight.
- How to Achieve: Focus on maintaining proper form during exercises. If you feel pain or discomfort, stop and reassess your technique.
5. Regular Maintenance
Ensure longevity and efficiency with regular maintenance tips! Learn how to inspect and clean your equipment properly for optimal performance.
Inspect Regularly:
- Why It Matters: Wear and tear can compromise the vest's safety.
- How to Achieve: Regularly check the vest for any signs of damage. Repair or replace any worn-out parts immediately.
Clean Properly:
- Why It Matters: A dirty vest can cause skin irritation and degrade materials.
- How to Achieve: Follow the manufacturer's instructions for cleaning. Use mild soap and water, and ensure the vest is completely dry before use.
By following these safety tips, you can enjoy the benefits of your DIY weighted vest while minimizing the risk of injury. Always prioritize safety to make the most out of your workouts.
FAQs About DIY Weighted Vests
Discover the essentials in our faqs about DIY weighted vests, covering construction tips, benefits, and safety precautions.
A DIY weighted vest is a homemade vest that you can add weights to. It’s used to increase the intensity of workouts by adding extra resistance.
Making your own weighted vest can save you money and allow you to customize it to your needs. It's also a fun and rewarding project.
Start with a small amount of weight, such as 5-10% of your body weight. You can gradually increase the weight as you get stronger.
Yes, you can easily add or remove weight plates to adjust the resistance. This makes the vest versatile for different workouts.
You can use a weighted vest for various exercises like push-ups, pull-ups, squats, and running. It adds resistance and makes these exercises more challenging.
Final Thoughts
This DIY weighted vest project is a fantastic way to get a functional, durable, and customizable weight vest without spending a fortune. With just a few materials and some time, you'll have a great training tool that can improve your workouts. I've been using mine for months, and it works just as well as any commercial vest I've tried. Best of all, it cost me less than $50!
Give it a try, and you'll see that building your own weight vest is not only fun but also practical and cost-effective.


