When my dog Bella was about to have puppies, I knew I needed a DIY whelping box to keep her and the puppies safe. I started looking for ideas and stumbled upon a great step-by-step guide. This guide made everything crystal clear and simple. Building a cozy and safe space for Bella was easier than I thought.
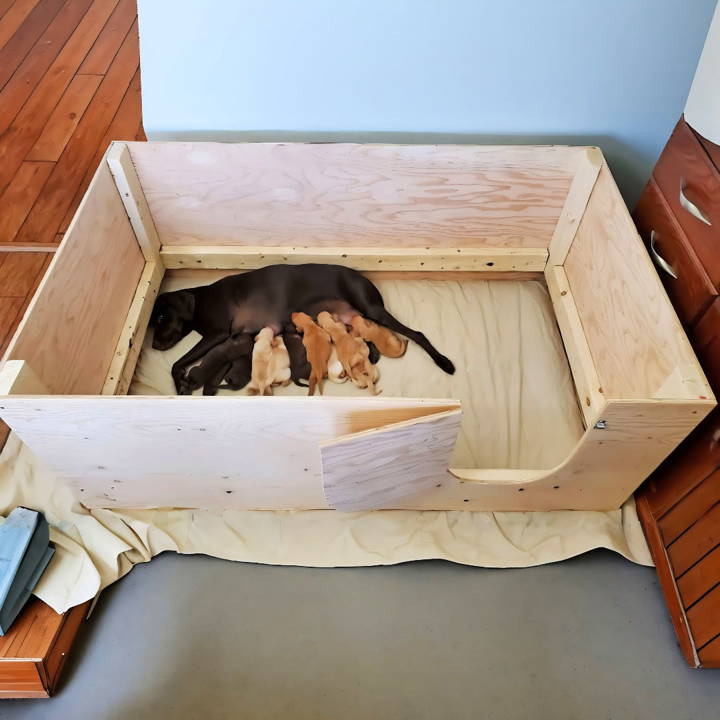
If you have a pregnant dog, I truly believe that making your own DIY whelping box can be a rewarding experience. It's not just about saving money but also ensuring the safety and comfort of your pet and her babies. I am confident these steps will help you. I'm helping with this:
Why a Whelping Box?
A whelping box is essential not only for the safety of the newborn puppies but also for the comfort of the mother. It offers a controlled environment, preventing the puppies from wandering off and getting lost or injured. The design incorporates a high door that allows the mother to enter and exit freely while keeping the puppies inside. Additionally, the internal structure is designed to prevent the mother from accidentally squishing her puppies against the walls.
Materials Needed
- 4x8 Sheet of Plywood: This will form the base and sides of the whelping box. Plywood is sturdy and easy to clean, making it an ideal choice.
- Three 2x4s: These will be used to make the frame inside the whelping box, adding an extra layer of protection for the puppies.
- 1 1/2 inch screws: These will secure the 2x4s to the plywood.
- Two Hinges, a Bolt Latch, and Half-inch Screws: These are for the door, ensuring easy access while keeping it secure.
Step by Step Instructions
Learn how to build a whelping box with our step-by-step DIY instructions. This is the perfect guide for making a safe space for your pregnant dog.
Cutting the Plywood
Start by marking the middle of the 4x8 sheet of plywood at 24 inches and cut it in half. This gives you the bottom and one side of the whelping box. Next, mark your long 2x4 boards at three feet and cut them. This simple step forms the basic structure of your whelping pen.
Building the Frame
Using one of the 2x4s, cut four pieces measuring 20 and a half inches each. These will connect the corners of your whelping box, offering support and stability. Attach these to the smooth side of your short plywood boards, screwing them from the outside. This step is crucial as it forms the foundation of your pen.
Assembling the Box
Now, screw the longboard to one of your prepared short boards, ensuring the smooth side is inward. Repeat the process for the other sides. Your aim is to have a smooth interior surface, preventing any harm to the puppies or their mother.
Adding the Safety Rails
Cut two 56-inch 2x4s and two 29-inch 2x4s for the inner rails. These rails are strategically placed to prevent the mother from accidentally pressing against a puppy and harming it. Attach these boards inside the box, flush with the bottom of the other 2x4s.
Building the Door
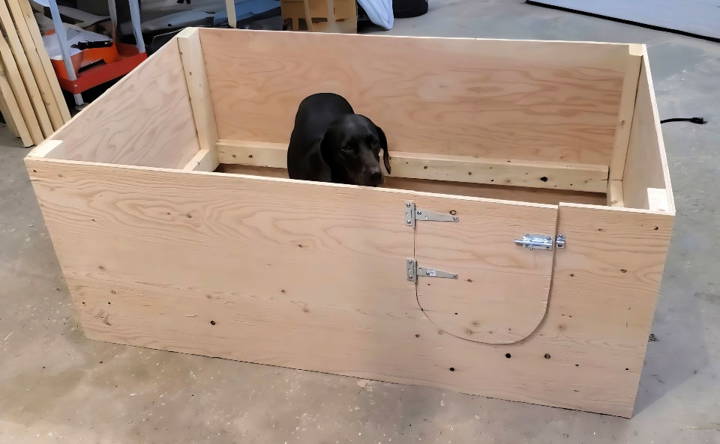
One feature that sets my whelping box apart is the door. Using a bowl, I marked a semicircle at least seven inches from the bottom and then cut it out with a jigsaw. The hinges and bolt latch were attached securely, ensuring the door moved freely and locked effectively.
Final Touches
After assembling the box, I smoothed out any rough edges with sandpaper to prevent splinters. An important note is that once the puppies grow, the internal 2x4s can be repositioned to the top, preventing them from climbing out.
Building this whelping pen was an act of love for the incoming pups. The assembly was simple, and its easy disassembly made cleaning practical for the messy birthing process.
Customization Ideas for Your Whelping Box
Building a whelping box that caters to the specific needs of your dog and her puppies is not just practical; it's also a way to add a personal touch to this important space. Here are some ideas to customize your whelping box:
Choose the Right Size
- Measure your dog from nose to tail and add a few inches to ensure she has enough room to stretch out.
- The box should be large enough for all the puppies to nurse without overcrowding.
Select Comfortable Bedding
- Opt for materials that are soft yet easy to wash, like fleece or flannel.
- Avoid bedding that's too thick or fluffy, as it can pose a risk to the puppies.
Add a Heating Element
- Puppies can't regulate their body temperature well, so consider installing a safe heating pad or lamp.
- Ensure any heating elements are well-protected to prevent any accidents.
Incorporate Easy-to-Clean Surfaces
- Line the box with a waterproof layer like a tarp or plastic sheeting for easy cleanup.
- Choose a material that's durable and resistant to chewing.
Install Adjustable Puppy Rails
- Puppy rails prevent the mother from accidentally lying on her puppies.
- Make them adjustable so you can move them as the puppies grow.
Personalize with Colors and Patterns
- Paint the exterior of the box with pet-safe paint to match your home decor.
- Use washable covers for the bedding in fun patterns or colors.
Ensure Proper Ventilation
- Good airflow is essential to keep the puppies and mothers comfortable.
- Drill small holes near the top of the sides if the box doesn't have a wire mesh top.
Build a Removable Door
- A door can help contain the puppies as they become more mobile.
- Make it removable so the mother can easily enter and exit.
Think About Storage
- Add compartments or pockets to store essential items like thermometers, towels, and records.
- Keeping these items close can save time during the whelping process.
Consider these customization tips to make your whelping box functional, cozy, and inviting for the mother and puppies. Balance practicality with comfort for the perfect nurturing environment.
Troubleshooting Common Issues
When you're building and using a DIY whelping box, you might run into a few common issues. Here's how to tackle them effectively:
The Box is Too Slippery
- Solution: Newborn puppies can struggle on slippery surfaces. Line the bottom of the box with a non-slip mat or use layers of newspaper topped with towels for better grip.
Maintaining the Right Temperature
- Solution: Puppies need warmth but can't regulate their body temperature. Use a heat lamp or pad on one side of the box, so there's a cooler area if they get too warm.
The Box Isn't Sturdy Enough
- Solution: If the box feels flimsy, reinforce the corners with additional brackets or use thicker plywood. Make sure it can support the weight of the mother and puppies without bowing.
Difficulty Cleaning
- Solution: Whelping can be messy. Choose materials that are easy to clean, like laminated wood or plastic. Avoid porous materials like untreated plywood, which can harbor bacteria.
Puppies Escaping the Box
- Solution: As puppies grow, they'll try to explore. Ensure the sides are high enough to contain them. Consider adding a removable door for when the mother needs to enter and exit.
Mother Dog is Anxious
- Solution: Some dogs may feel anxious in a new space. Introduce the whelping box early and place it in a quiet, familiar area. Add items with her scent to make her more comfortable.
Unsafe Bedding
- Solution: Bedding like hay or wood shavings can irritate puppies' skin and eyes. Use vetbed or fleece blankets instead, and avoid small pieces that puppies could burrow under and suffocate.
Anticipating and solving these issues ensures a safer, more comfortable environment for the mother and her puppies. Always monitor the whelping box and adjust as needed.
FAQs About DIY Whelping Box
Discover answers to common questions about DIY whelping boxes, including materials, size, and setup tips for a comfortable birthing environment.
A DIY whelping box is a homemade enclosure where a mother dog, known as a dam, can safely give birth to and care for her puppies. It’s essential for providing a secure, warm, and clean space for newborns and helps prevent them from being accidentally hurt by the mother or wandering away.
The size of the whelping box should be based on the size of the dam. It should be big enough for her to stretch out fully and turn around without touching the sides. A good rule of thumb is the length of the dam plus one foot squared.
Cleanliness is crucial in a whelping box to prevent infections. Line the box with washable bedding and change it frequently. The box itself should be wiped down regularly with a pet-safe disinfectant, and any soiled areas should be cleaned immediately.
Yes, a sturdy cardboard box can serve as a temporary whelping box. However, it's important to reinforce it to ensure it's strong enough to hold the dam and her puppies. Also, be prepared to replace it if it becomes soiled, as cardboard is not as easy to clean and disinfect as other materials.
For bedding, you can use clean, soft, and absorbent materials like fleece blankets or towels. These materials should be easy to wash and change regularly. Avoid using materials that can fray or have loose threads, as these can pose a choking hazard for the puppies.
Conclusion
Building my own DIY whelping box was a wonderful adventure. I found it informative and engaging, and I believe you will, too. Try it out and provide your furry friend the best care possible.


