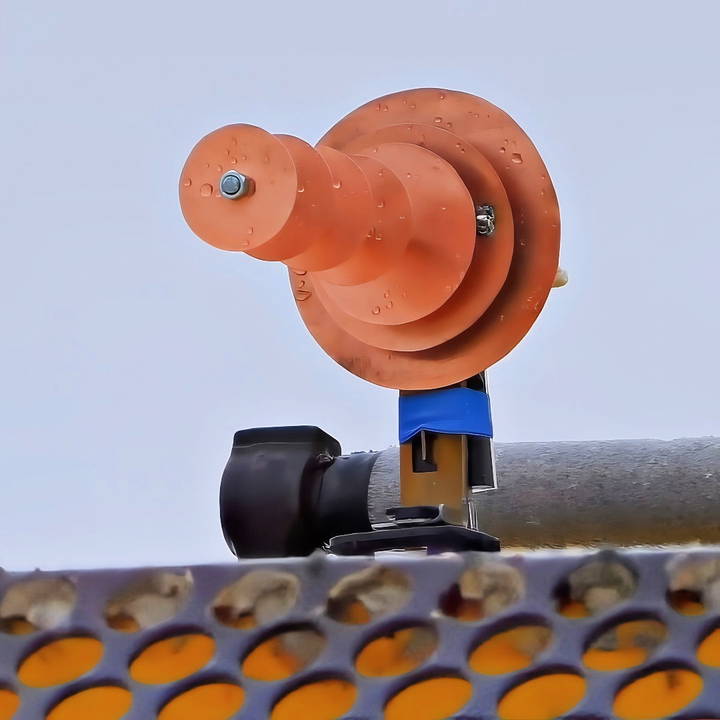
In today's world, staying connected is more important than ever. Whether you're trying to extend your home Wi-Fi range to cover a larger area, or you want to connect to a distant network, a DIY Wi-Fi antenna can be an exciting project that provides practical benefits. In this guide, I'll explain the steps to build a powerful 'Wi-Fi gun,' essentially a hybrid antenna for long-distance Wi-Fi transmission and reception.
This guide is based on a step-by-step method for making a highly effective Wi-Fi gun, combining elements of two popular antenna types: the Yagi antenna and the microchip patch antenna. The result is a device that can pick up Wi-Fi signals from hundreds of meters away and even transmit them back to other devices. Best of all, it's made from simple materials and can be assembled with basic tools.
What You'll Need
Before diving into the build process, let's gather the essential materials and tools:
- Copper sheet (3 mm thick)
- Metal stud or bolt
- USB Wi-Fi adapter (with a detachable antenna)
- Satellite TV cable
- Pigtail connector (for connecting the cable to the Wi-Fi adapter)
- Scissors or tin snips (for cutting copper sheet)
- Drill (for making holes in copper circles)
- Soldering iron (for attaching wires)
- Screw nuts and washers
- Pliers
- Scotch tape or plastic casing (optional for securing wires)
Step by Step Instructions
Learn how to boost your signal with a DIY wifi antenna. Follow step-by-step instructions from design to testing for optimal performance.
Step 1: Designing the Hybrid Antenna
The Wi-Fi gun you'll be building uses a combination of the Yagi antenna (known for its directional signal capabilities) and a patch antenna (a flat antenna often used in communication systems). Together, these provide a highly focused beam, allowing you to aim your Wi-Fi antenna like a rifle.
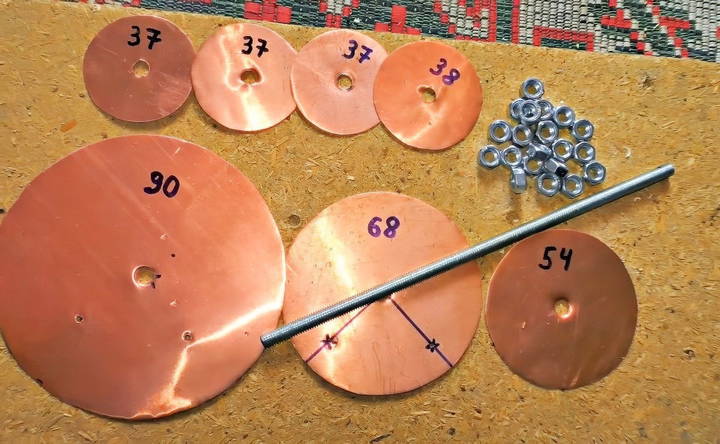
- Cutting the Copper Circles: Begin by cutting seven circles out of the copper sheet. These will act as the antenna's reflectors.
- The circles should have precise diameters according to your design, but typical values for such antennas are around 7–10 cm. Accuracy is essential, as even a small deviation in size can reduce the performance of the Wi-Fi gun.
- Drill Holes in the Copper Circles: Before cutting out the circles, drill holes in their centers. This will allow you to thread them onto the metal stud or bolt later. Ensure the holes are neatly aligned to avoid problems when assembling.
- The metal circles will be spaced evenly along the metal stud to form the backbone of your Wi-Fi gun.
Step 2: Assembling the Antenna
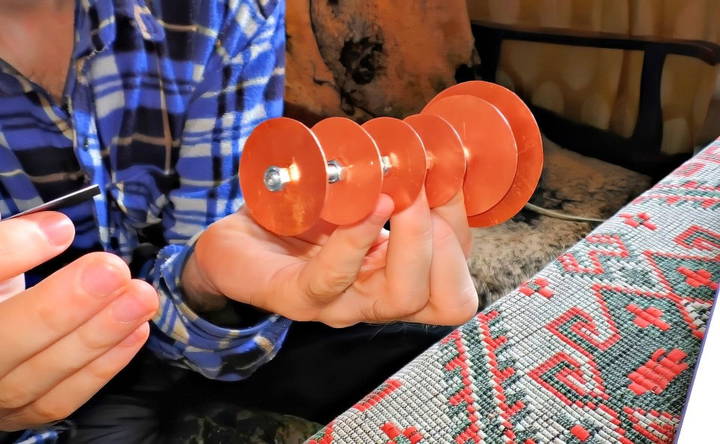
Now that you have your copper circles ready, it's time to assemble the antenna structure.
- Thread the Copper Circles: Thread the circles onto the metal stud or bolt, separating them with nuts to ensure even spacing. The spacing between each copper circle should be around 30 mm.
- Adjust the nuts to keep this distance as precise as possible, ensuring a balanced assembly. If the spacing varies, the antenna's signal will not be focused correctly.
- Adding Holes for the Wires: In the first and second circles, you need to make extra holes for the wires that will connect the antenna to the Wi-Fi adapter. The outer copper circles will connect to the ground, while the inner circles will connect to the central wire of the Wi-Fi adapter.
Step 3: Connecting the Antenna to the Wi-Fi Adapter
To make your Wi-Fi gun work with a standard USB Wi-Fi adapter, you'll need to disassemble the adapter and connect it directly to the antenna.
- Disassemble the USB Wi-Fi Adapter: Carefully open up your USB Wi-Fi adapter to expose its internal antenna. Most adapters have a detachable antenna, which makes it easier to connect to your Wi-Fi gun.
- Be cautious not to damage any internal components when disassembling.
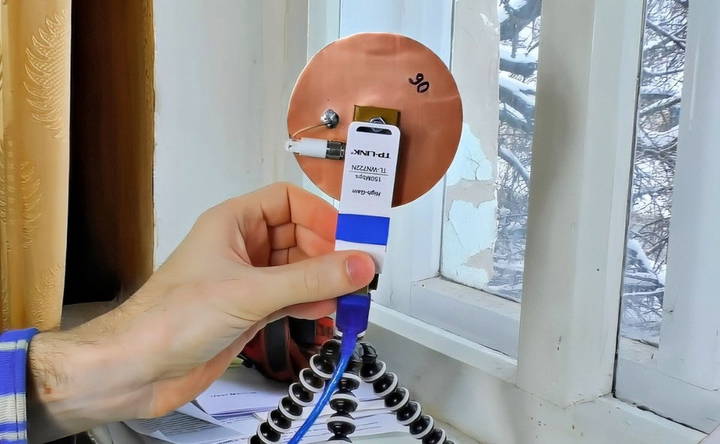
- Solder the Connections: You'll need to solder the central wire of the adapter to the second copper circle (the one closest to the center of the antenna).
- The outer braid of the wire should be connected to the first copper circle (the outermost one). This will ground the antenna and improve signal reception.
- Make sure your soldering is clean and strong. Weak connections can reduce performance or cause the antenna to stop working altogether.
- Connecting the Satellite TV Cable: You'll also need to connect the satellite TV cable to extend the Wi-Fi gun's range further. Cut off the unnecessary parts of the TV connector and attach the cable securely to the last copper disk.
- Use a pigtail connector to connect this cable to the Wi-Fi adapter. This part can be tricky to find, so make sure you have it on hand before you start the project.
Step 4: Using the Wi-Fi Gun
Once the Wi-Fi gun is assembled, you can use it to either receive or transmit Wi-Fi signals. Here's how you can start using it:
- Connecting to a Laptop or Smartphone: If you want to connect your Wi-Fi gun to a smartphone or tablet, you can do so with a technique called capacitive coupling. This method involves stripping the cable and placing it near the antenna of your smartphone, which is usually located at the top or bottom of the device.
- You can use a plastic casing or tape to hold the wire in place near the smartphone's antenna.
- Connecting to a Router: You can also use the Wi-Fi gun to extend your router's signal. By attaching it to your router, you can cast a Wi-Fi signal over a large distance. This is particularly useful if you want to cover a large outdoor area or share Wi-Fi between buildings.
Step 5: Testing the Range and Performance
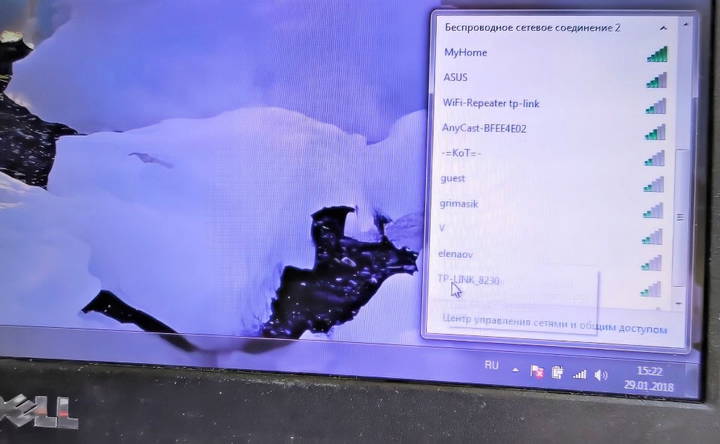
Once your Wi-Fi gun is operational, it's time to test its capabilities. Aim the antenna in different directions and observe the number of Wi-Fi signals it picks up. If you live in an urban area, you may be able to detect dozens of routers that your standard Wi-Fi adapter wouldn't be able to reach.
- Check Signal Strength: Use a Wi-Fi analyzer app on your smartphone or laptop to see the signal strength and quality. You should notice that the Wi-Fi gun can pick up signals from routers located hundreds of meters away.
- Test Connection Speed: After connecting to a distant network, test the connection speed. In most cases, the Wi-Fi gun will maintain the full speed provided by the distant router, as it minimizes signal loss.
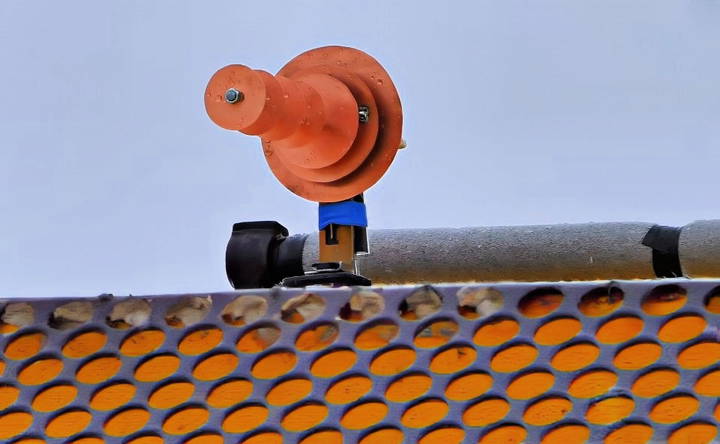
- Long-Range Performance: For long-range testing, mount the Wi-Fi gun on a stable platform (like a roof) and point it towards a distant router. In testing, the Wi-Fi gun has been shown to pick up signals from distances up to 3 kilometers, and with the right setup, it can even transmit Wi-Fi over several kilometers.
Step 6: Troubleshooting and Enhancements
- Improving Stability: If your Wi-Fi gun loses signal at long distances, check that the copper circles are still evenly spaced and that the connections are secure. Loose connections or poorly spaced elements can significantly reduce performance.
- Weatherproofing the Antenna: If you plan to leave the Wi-Fi gun outdoors for extended periods, consider weatherproofing it. Use a protective casing or sealant to protect the copper elements from corrosion.
- Boosting the Signal: For even longer distances, you can pair multiple Wi-Fi guns or use a more powerful router. With the right configuration, a DIY Wi-Fi antenna can be effective over 10 kilometers or more.
Conclusion:
Building a DIY Wi-Fi antenna, or a Wi-Fi gun, is a rewarding project that can greatly improve your wireless connectivity. Whether you're trying to connect to distant networks or extend your home Wi-Fi range, this antenna provides a cost-effective solution. With a few simple materials, basic tools, and a bit of patience, you can build a powerful device capable of picking up Wi-Fi signals from miles away.
By following this guide, you now have the knowledge to assemble your own Wi-Fi gun. Test it out, experiment with different configurations, and enjoy a stronger, more reliable Wi-Fi signal wherever you go.
FAQs About DIY Wi-Fi Antenna
Discover answers to common questions about DIY wi-fi antennas, enhancing signal strength, and boosting connectivity at home.
A Wi-Fi gun is a directional antenna designed to focus Wi-Fi signals, allowing you to capture and transmit them over long distances. It works by combining elements from a Yagi antenna and a patch antenna, concentrating the signal in a specific direction, much like aiming a rifle at a target.
Under optimal conditions, this DIY Wi-Fi gun can capture Wi-Fi signals from distances up to 3 kilometers. If properly constructed and mounted on a rooftop, it may even reach 10 kilometers or more with minimal signal loss.
Yes, you can use different types of metal for the antenna, but copper is preferred for its conductivity. The uploaded transcript mentions using 3 mm thick copper sheets, which are easy to cut and handle.
The essential components include copper sheets, a metal stud or bolt, a USB Wi-Fi adapter, a satellite TV cable, and a pigtail connector. A soldering iron is also required to attach wires.
In many places, using high-gain directional antennas might be subject to legal restrictions, especially when transmitting signals. Always check your local regulations before building or using this device to avoid interference with other networks.
If the antenna isn’t functioning properly, check for common issues such as improper spacing between the copper discs, loose connections, or incorrect soldering. Replacing bent rods or adjusting the antenna’s alignment might also help, as mentioned by other users in the comments.
Yes, by using capacitive coupling, you can connect the Wi-Fi gun to your smartphone. Strip the cable and place it near your phone's internal antenna (usually located at the top or bottom). Secure the wire with plastic casing or tape for stability.
To protect your Wi-Fi gun from weather damage, you can enclose it in a PVC pipe or use a sealant on the copper elements. This will prevent corrosion while ensuring that the antenna remains functional outdoors.
Scaling up the antenna can increase its range, but this will also narrow its beam width, making it harder to maintain a stable connection, especially in windy or obstructed areas.


