Making your own wind turbine at home is more than just a science project—it's a step toward sustainable living. I love this project because it's an accessible way to show how renewable energy works, and it's perfect for anyone looking to reduce their carbon footprint. Using everyday materials, you can build a DIY wind turbine that generates small amounts of electricity. Try experimenting with different blade designs to see how they impact efficiency!
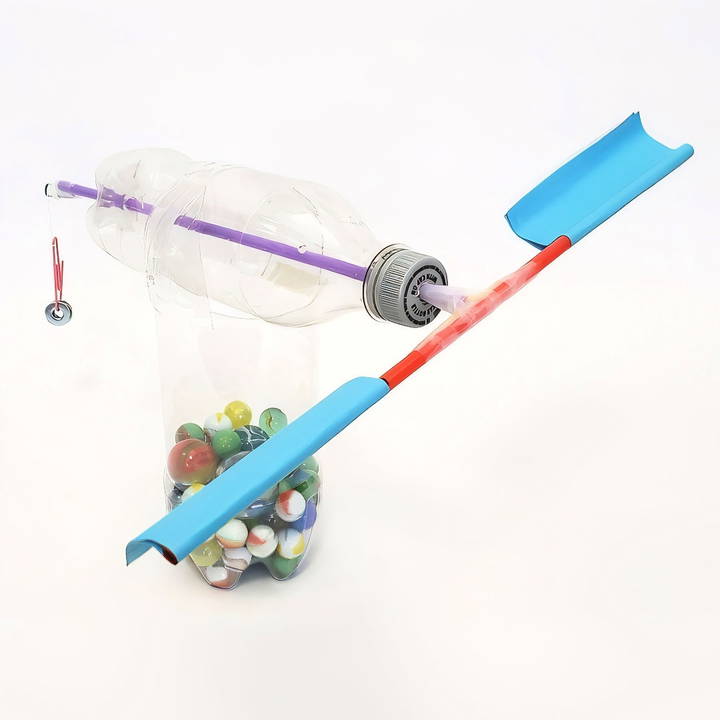
What You'll Learn
By the end of this guide, you'll understand how wind turbines convert wind energy into mechanical energy, and you'll have built your very own model turbine capable of lifting weights. You'll also explore how different variables, like blade design and wind speed, affect the turbine's performance.
Materials You'll Need
Before you begin, gather the following materials, most of which you probably already have at home:
- One-liter plastic bottle: This will form the base (tower) of your wind turbine.
- Smaller plastic bottle: This will serve as the nacelle (housing for the turbine's axle).
- Marbles, rocks, or heavy objects: These will weigh down the base and keep it stable.
- Scissors: For cutting the bottles.
- Drill and quarter-inch drill bit: To create holes for the axle.
- Drinking straws: To construct the turbine's rotor and blades.
- Paper: To form the blades.
- Tape: To secure components.
- Paper clips: For making the axle and other parts.
- Glue: To attach components securely.
- String: To test the turbine's lifting power.
- Small weights: Like washers or additional paper clips, to hang on the turbine for testing.
Step by Step Instructions
Learn how to create your own energy source with DIY wind turbine instructions. Step-by-step guide from building the tower to turbine testing.
Step 1: Building the Tower
The first step is constructing a stable base for your wind turbine, which we will create using a one-liter plastic bottle.
- Cut the top off the bottle: Begin by cutting off the neck of the bottle using scissors. This will serve as the base of the wind turbine, providing a sturdy foundation.
- Add weight to the base: Fill the bottom of the bottle with marbles, rocks, or other heavy objects. This step is crucial because it will prevent your turbine from toppling over when exposed to wind. You need a strong, stable base to ensure smooth turbine operation.
- Prepare the nacelle connection: Use scissors to cut two pieces from the top of the bottle. These cuts will allow you to attach a smaller plastic bottle horizontally on top, which will act as the nacelle that holds the axle and blades.
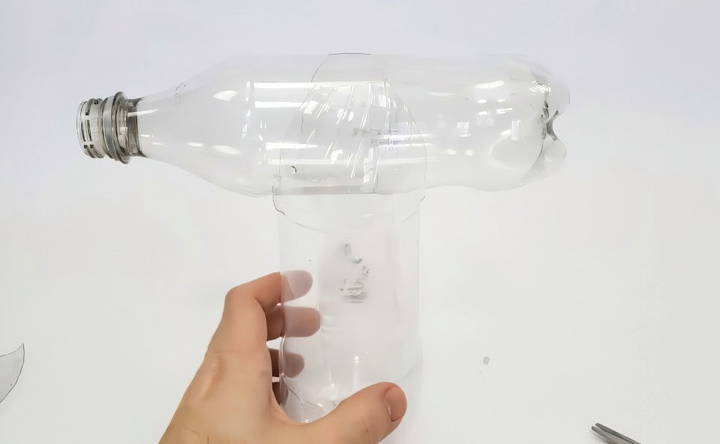
Step 2: Preparing the Nacelle and Axle
The nacelle houses the axle and rotor blades, allowing them to spin freely.
- Drill holes for the axle: Using a quarter-inch drill bit, carefully drill a hole in the cap and bottom of the smaller bottle (the nacelle). Make sure these holes are slightly larger than the diameter of the drinking straws that will serve as the axle, ensuring smooth rotation.
- Ensure a free-spinning axle: After drilling the holes, insert a straw through them to check that it can spin freely. If the straw doesn't rotate smoothly, widen the holes slightly using the drill bit.
Step 3: Crafting the Turbine Blades
The blades are one of the most critical components of your wind turbine. They capture the wind's energy, which powers the rotor and axle.
- Make the blade templates: Cut two rectangles from a sheet of paper, each measuring approximately 8 by 10 centimeters. This basic design is easy to make, but you can experiment with different shapes and sizes for better performance.
- Shape the blades: Without creasing them, fold each piece of paper in half lengthwise and tape the edges together to form a teardrop shape when viewed from the side. The teardrop design helps the blades catch more wind, increasing efficiency.
- Attach the blades to the rotor: Pinch the end of one straw and press it into another to create a longer straw. Mark the straw at 10 cm from each end. Apply glue from the end of the straw up to this line, and attach one blade to the straw with the rounded side facing up. Hold it in place until the glue dries. Repeat for the second blade on the opposite side.
Step 4: Assembling the Rotor and Axle
Now, you'll complete the assembly of the rotor and axle system, which is crucial for the turbine's ability to spin and generate mechanical movement.
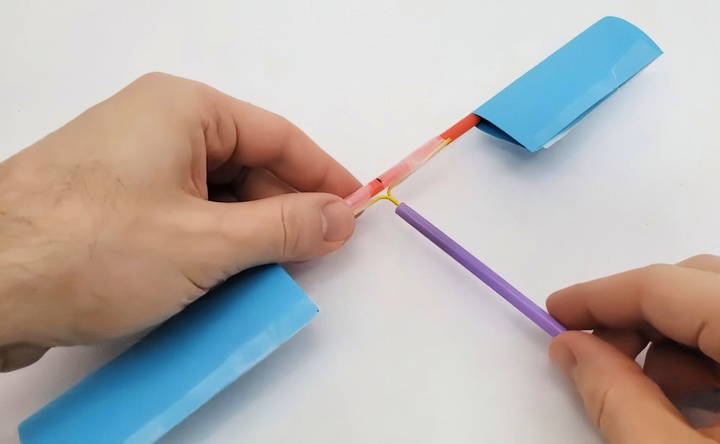
- Prepare the axle: Straighten a paper clip and bend it into a T-shape using needle-nose pliers. Attach this T-shaped paper clip to the center of your rotor (the two connected straws) with tape. This setup will help balance the blades and keep the axle aligned.
- Secure the axle: Take another straw and slide it over the T-shaped paper clip to form the axle. Make sure it fits tightly and spins without friction. Tape the straw to the rotor securely.
- Curve the blades: For optimal performance, the blades need to be curved. Wrap each blade tightly around the straw and hold it for about one minute. This will give them a natural curve that helps them capture wind more effectively. Once you've curved both blades, let them uncurl.
Step 5: Final Assembly
Now that you have all the components ready, it's time to put everything together and prepare for testing.
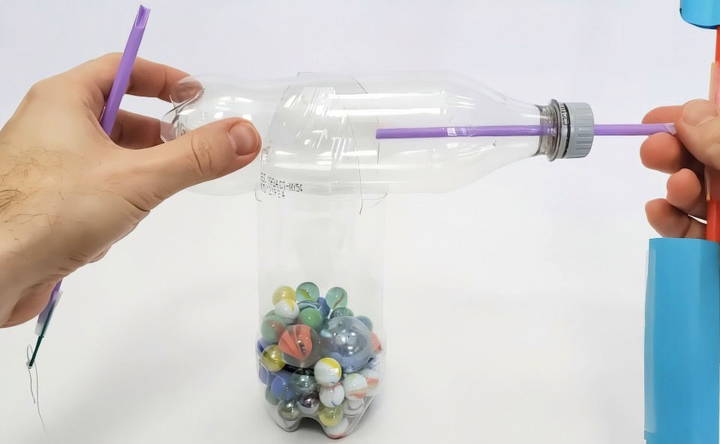
- Assemble the turbine: Take the smaller bottle (nacelle) and place it horizontally on top of the larger bottle (tower). Thread the axle (with the blades attached) through the holes in the smaller bottle.
- Connect the axle halves: Pinch the end of one straw and insert it into the other straw to join the two halves of the axle. Ensure the straws fit snugly but don't press too hard, as this could bend or damage them. Spin the rotor by hand to check that the entire assembly can rotate smoothly.
- Secure the nacelle: If necessary, use tape to attach the nacelle securely to the tower. You want to ensure the smaller bottle doesn't wobble when the rotor spins.
Step 6: Testing Your Wind Turbine
Your wind turbine is now fully assembled and ready for testing. Follow these steps to evaluate its performance:
- Use a fan: Place a small tabletop fan a short distance from your wind turbine. Turn the fan on to its lowest speed and observe whether the blades start spinning. If the turbine doesn't rotate, move the fan closer or increase the speed.
- Experiment with weights: Tie a piece of string slightly longer than the tower height to the paper clip attached to the axle. Attach small weights, such as washers or additional paper clips, to the string. As the turbine spins, observe how much weight the turbine can lift. This experiment simulates the mechanical work that a real wind turbine performs when generating electricity.
- Reset and test different conditions: To reset the string, simply turn off the fan and unwind the axle by hand. You can also experiment with different variables, such as changing the blade size, shape, or fan speed, and measure how each factor affects the turbine's performance.
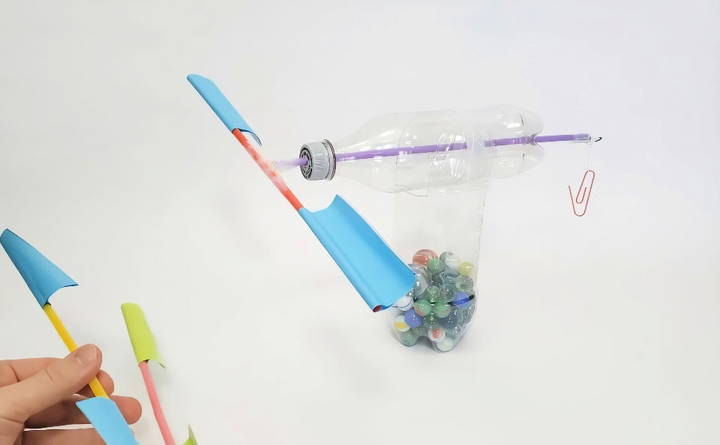
Understanding Wind Turbine Science
Discover how wind turbines work and the key factors affecting their performance in our comprehensive guide to understanding wind turbine science.
How Does a Wind Turbine Work?
Wind turbines convert the kinetic energy of wind into mechanical energy. As wind blows, it pushes against the curved turbine blades, causing them to rotate. This rotation turns the rotor and the connected axle, making movement that can be used to lift weights or generate electricity.
Factors Affecting Wind Turbine Performance
Several variables influence the efficiency of a wind turbine:
- Blade shape and size: Larger or more aerodynamic blades can capture more wind, generating more mechanical energy.
- Wind speed: The faster the wind, the more energy your turbine can produce.
- Turbine height: Elevating the turbine can help it access stronger winds, improving performance.
Conclusion: Exploring Renewable Energy
Building your own wind turbine is a great way to learn about renewable energy and the science behind harnessing wind power. Through this DIY project, you can explore different turbine designs, test various factors that affect performance, and better understand how wind turbines are used in real-world applications. Whether for a science project or personal curiosity, this project is an engaging and practical introduction to green energy technologies.
FAQs About DIY Wind Turbine
Discover answers to common questions about DIY wind turbines, from installation tips to choosing the right materials and enhancing efficiency.
You can use any heavy object you have at home, like stones, coins, or sand. Some builders even suggest using water, but be cautious, as it could cause a mess if the tower falls over. Experiment with what you have to create a sturdy base.
Yes, you can use thin foam sheets or other lightweight materials instead of paper. Foam is more durable and holds its shape better, which can improve the efficiency of your wind turbine.
First, check that the rotor can spin freely by hand. Ensure the axle isn’t too tight and the fan speed is sufficient. You can also try using larger blades, moving the fan closer, or adding some lubricant like washing-up liquid along the straw to reduce friction.
If your turbine is small and light enough, you might be able to blow on it to make it spin. However, a fan is more consistent for testing and will likely yield better results.
Yes, thread will work fine as long as it is strong enough to hold the weight. Just make sure it wraps easily around the straw and doesn’t add unnecessary friction to the system.
A small tabletop fan works well for this project. You can start with the fan on its lowest speed and adjust from there depending on how the turbine performs.
Make sure the turbine's propeller blades aren’t getting stuck. You can try using lighter weights, increasing the fan speed, or replacing the blades with larger ones to capture more wind. It may also help to reduce friction by checking the axle and ensuring it rotates smoothly.
Yes, instead of straws, you can experiment with materials like wooden skewers, which are sturdier and may reduce bending. You can also try lubricating the axle to minimize friction and improve the turbine's efficiency.
The size of the paper clip isn't crucial. As long as it fits into the straw and holds the axle properly, it should work fine. Feel free to adjust the size if needed.


