Making my own DIY window well cover was a rewarding project. I started by measuring the size of the window well to ensure a perfect fit. My goal was to protect my home from debris and rain. I gathered all the necessary materials, such as polycarbonate sheets, aluminum angles, and screws. This project looked simple, but it required precision and patience.
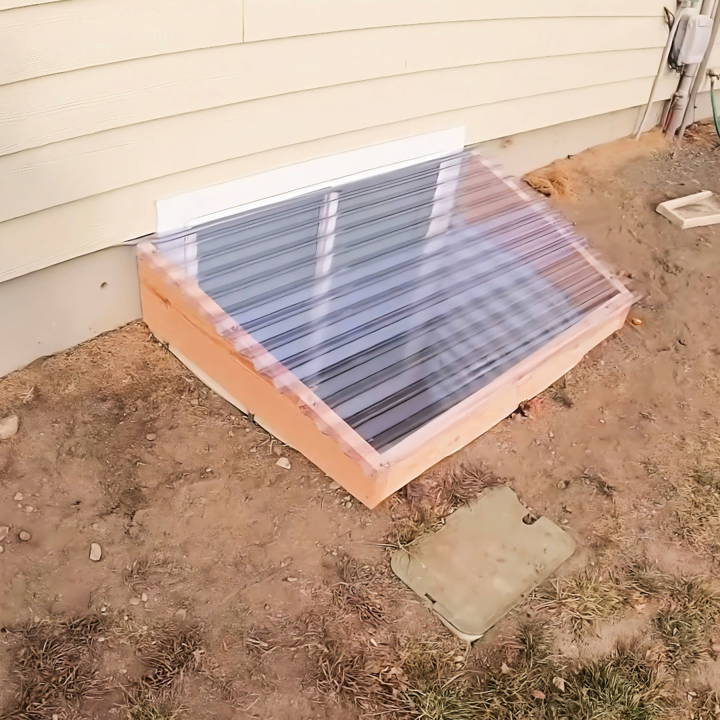
Next, I carefully cut the polycarbonate sheet to match the measurements. I then attached the aluminum angles to the edges for stability. The final step was securing the cover over the window well-using screws. This DIY project not only gave me a sense of accomplishment but also improved the safety and appearance of my home.
With these tips and steps, you can make your own DIY window well cover easily and confidently.
Why A Window Well Cover?
Before jumping into the steps, it’s vital to understand why a window well cover is essential. Primarily, it serves to prevent accidents, keeping children and pets safe from falling into the window well. Additionally, it acts as a barrier against debris and water, minimizing maintenance and potential water damage.
Materials Needed
- Measuring Tape: For accurate measurements of the window well dimensions.
- Scrap Wood: Useful as a ruler for measuring and as a guide for cutting.
- Lumber (2x6 and 2x12): Serves as the frame for the cover. The variation in size assists in creating a slope for water runoff.
- PC Panel: Chosen for its durability and transparency, allowing light into the basement while protecting the well.
- Screws and Drill: For assembling the wooden frame securely.
- Saw: A necessary tool for cutting the lumber to the required dimensions.
- Brackets: Used to attach the cover securely to the window well.
The choice of materials is critical to ensure durability, functionality, and ease of construction. Each item serves a specific purpose, from measuring to assembly, ensuring the end product is robust and effective.
Step by Step Instructions
Learn how to make a DIY window well cover with our step-by-step guide. From measuring to final assembly, we covered it all for a perfect fit.
Step 1: Measuring the Window Well
Using the scrap wood and measuring tape, I measured the dimensions of the window well – length, width, and height. For slope calculation, the back height was kept at 12 inches, gradually sloping to 6 inches towards the front for efficient water runoff.
Step 2: Cutting the Lumber
Based on the measurements, I marked and cut the lumber. This involved creating a sloped cut from one end of the 2x12 to match the desired slope from back to front.
Step 3: Assembling the Frame
I used the 2x6 as a guide to create a uniform slope across both sides. Post-marking, I pre-drilled holes to prevent the wood from splitting and then secured the pieces together using screws.
Step 4: Attaching Brackets
Selecting clips designed for broom handles, I found them to perfectly fit the window well’s edge. I placed two on each side and two in the middle for balanced support.
Step 5: Preparing and Attaching the PC Panel
Given the depth of my window well, I overlapped two sheets for added strength. I laid them over the frame, ensuring an overhang for secure attachment. Using a straight edge, I marked and cut the panels to fit the frame perfectly.
Step 6: Final Assembly
Finally, I secured the PC panel to the wooden frame using screws, creating a lightweight yet sturdy cover. The clips then easily attached to the window well, holding the cover firmly in place.
Tips for Success
- Pre-Drilling: Always pre-drill holes to prevent the wood from splitting. This ensures a cleaner and more secure assembly.
- Safety First: When cutting or drilling, always ensure tools are safely stored away from children and that protective gear is worn.
- Customization: Feel free to customize the size or materials based on your specific needs. The fundamental process remains the same.
Customization Tips for Aesthetics
Making your window well covers look good is just as important as their functionality. After all, they’re part of your home’s first impression. Here are some tips to ensure your covers are both practical and pleasing to the eye:
- Choose the Right Materials: Start with materials that are easy to work with and paint. For example, clear acrylic can be painted on the underside so the paint doesn’t wear away, while metal grates can be powder-coated in different colors.
- Painting Your Covers: If you’re painting your covers, use a primer suitable for the material. For acrylic, a plastic primer works best, and for metal, a rust-inhibiting primer will do the trick. Choose outdoor paint that withstands the elements.
- Adding Decorative Elements: Consider adding decorative elements like faux ironwork or stencil designs. These can be applied directly to the cover or added as separate pieces that attach securely.
- Landscaping Integration: Use plants and stones around your window wells to integrate them into your garden. Low-growing plants or flowers can add color without obstructing the light.
- Lighting for Safety and Beauty: Install small LED lights around the perimeter of your window well for a subtle glow that’s both attractive and functional, ensuring safety at night.
- Reflect Your Home’s Style: Match the style of your window well covers with the architectural style of your home. Whether it’s modern, rustic, or traditional, consistency is key.
- Regular Updates: Just like any other part of your home, trends change. Keep your covers updated with a fresh coat of paint or new designs every few years to keep them looking current.
By following these tips, you’ll create window well covers that are not only effective but also enhance the beauty of your home.
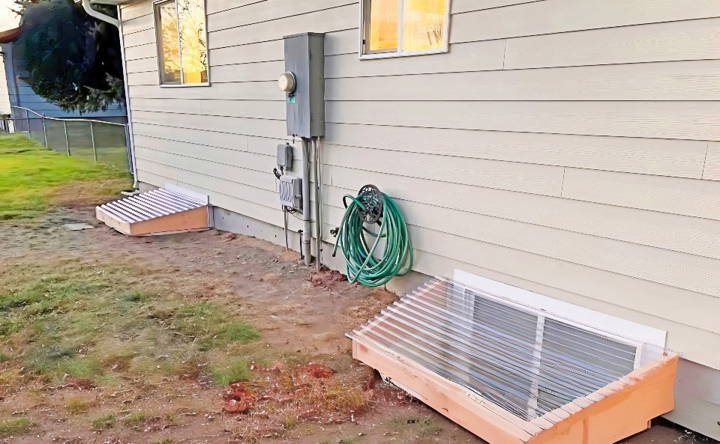
Advanced Customization
For those who love a DIY challenge and want to take their window well covers to the next level, advanced customization can be both a fun project and a value-add for your home. Here’s how you can up the ante:
- Security Features: Consider installing lockable covers to prevent unauthorized access. Simple slide bolts or key locks can be added to most cover designs without compromising aesthetics.
- Automation: For the tech-savvy, adding automation to your window well covers can be a game-changer. Think about installing a motorized system that allows you to open and close the covers with the push of a button—ideal for hard-to-reach windows.
- Weather Sensors: Integrate weather sensors that automatically close the covers in case of rain or snow. This not only protects your basement from water damage but also adds a ‘smart home’ element to your property.
- Custom Fit and Shape: If you have irregularly shaped window wells, creating a custom-fit cover can be a practical solution. Use flexible materials like polycarbonate that can be cut to size and shape on-site.
- Enhanced Durability: Upgrade the materials to industrial-grade for increased longevity. For instance, using UV-resistant acrylic or galvanized steel can ensure your covers withstand the test of time and elements.
- Eco-Friendly Options: Explore eco-friendly materials such as recycled plastics or sustainably sourced woods. These options not only look great but also contribute to a greener home.
These advanced window well covers protect your basement and modernize your home’s exterior. Balance innovation, practicality, and safety.
Troubleshooting Common Issues
When it comes to DIY window well covers, you might run into a few hiccups along the way. Here’s how to tackle some of the most common issues:
- Condensation: If you notice water droplets forming under your cover, improve ventilation. Drill small holes for air circulation or leave a slight gap at the edges.
- Rusting: Metal covers can rust over time. To prevent this, apply a coat of rust-resistant paint. If rust appears, sand it down and repaint the affected area.
- Poor Fit: A cover that doesn’t fit well can be a hazard. Ensure accurate measurements before cutting materials. If gaps exist, use weather stripping to seal them.
- Cracking: Acrylic or plastic covers can crack. To fix, use a specialized adhesive designed for the material. Prevent cracks by avoiding sharp impacts and heavy weights on the cover.
- Snow Load: In heavy snow areas, reinforce your covers. Use sturdy materials and consider a sloped design to encourage snow to slide off.
- Leaf Debris: Leaves can clog your well and cover. Install a cover with raised edges or regularly clear out debris to maintain proper function.
Addressing these issues promptly keeps your window well covered in top condition, ensuring safety and aesthetics. Regular maintenance is key to long-term success.
FAQs About DIY Window Well Cover
Discover answers to faqs about DIY window well cover. Get insights on materials, installation, benefits, and maintenance tips for your window well covers.
Installing a DIY window well cover can provide several benefits, including:
Protection: It keeps out rain, snow, and debris, preventing water damage and clogging.
Safety: It prevents accidents by stopping people and pets from falling into the well.
Pest Control: A well-sealed cover can deter rodents and insects from nesting.
Ventilation: Certain designs allow for air circulation while still providing protection.
Aesthetics: Custom covers can be designed to complement your home’s exterior.
To measure and plan:
Measure the width and depth of your window well at the widest and deepest points.
Decide on the type of cover you need based on your priorities, such as waterproofing or light transmission.
Calculate the amount of material needed, adding 10% for overage and potential errors.
Yes, you can create a safety window well cover by:
Using sturdy materials like thick polycarbonate or reinforced wood.
Ensuring the cover fits snugly within the well’s perimeter.
Designing the cover to support the weight of a person if stepped on.
Maintaining your cover involves:
Regular cleaning to remove debris and ensure clear visibility if using transparent materials.
Inspecting for damage or wear, especially after severe weather.
Reapplying sealants or paint as needed to maintain waterproofing and appearance.
Ensuring a proper fit for your DIY window well cover involves:
Accurate Measurement: Measure the window well’s length, width, and projection from the house. Use the widest and deepest points for the best fit.
Design Considerations: Account for any pipes or obstructions. The cover should extend beyond the well’s edges for complete coverage.
Secure Attachment: Use a mounting system that anchors the cover to the foundation or window well edge to prevent shifting.
Conclusion
Making your own DIY window well cover is a practical and satisfying home improvement project. With my experience and the steps I've shared, you're fully equipped to start. This guide will help you protect your home and give you the confidence to tackle other DIY projects.


