I remember the first time I decided to build something with my own hands. The joy of seeing a plan come to life and knowing that I made it was amazing. Building a DIY wishing well was a project that caught my eye. With some free wishing well plans and a little effort, I knew I could make something special for my garden.
Starting was simpler than I thought. I followed the instructions in the wishing well plans step by step. It took some time, but seeing each part come together was worth it. I'm now sharing this with you so you can enjoy building your own. This guide will definitely help you build something wonderful.
Historical Significance of Wishing Wells
Wishing wells have been a part of human culture for centuries, serving as a symbol of hope and a place to harbor our deepest desires. The tradition of tossing a coin into a well while making a wish is a practice that spans across various cultures and historical periods.
- Origins and Evolution The concept of the wishing well is believed to have originated from European folklore, where wells were considered sacred and were often associated with deities and spirits. The act of making a wish was thought to send a message to the divine, and the offering of a coin was a way to show gratitude or seek favor.
- In ancient times, water was a precious resource, and wells were a vital part of communities. They were not only sources of water but also communal gathering spots. The reverence for water led to the belief that wells had spiritual significance, and thus, the tradition of making wishes at these sites began.
- Cultural Diversity Across the world, wishing wells carry different meanings and practices. In Norse mythology, for example, the god Odin sacrificed his eye at the Well of Urd to gain wisdom. In Celtic traditions, wells were often seen as gateways to the otherworld and were treated with great respect.
- Modern-Day Significance Today, wishing wells are still prevalent and have taken on new forms and interpretations. They are found in public places like parks and gardens, and they continue to be a source of wonder and enchantment. The simple act of making a wish at a well connects us to our ancestors and the shared human experience of hope and longing.
Wishing wells symbolize our deep desire for something greater, reflecting tradition and collective dreams. Tossing a coin links us to a timeless ritual and each other, spanning generations.
Materials Needed and Why
For this project, you'll need:
- 2x4 lumber for the structure: It's sturdy and ideal for outdoor projects.
- Fence boards for aesthetic appeal.
- Wood screws and nails for assembly.
- A large dowel rod and a small wooden block for the rotating handle.
- A bucket, to add charm and hold flowers.
- Wood protector, to safeguard your wishing well against the elements.
Each of these materials plays a critical role in making a durable and visually appealing wishing well.
Step by Step Instructions
Learn how to build a DIY wishing well with our step-by-step instructions from constructing the base to adding the finishing touches. Perfect weekend project!
Step 1: Constructing a Two-Foot Box
We started by constructing a two-foot square box from the 2x4 lumber. This would serve as the base of the wishing well, providing stability and structure.
Step 2: Adding Support for the Roof
Finding the center of our box, we installed additional 2x4s vertically on opposite sides. These would support the roof of the wishing well, making a sturdy frame to build upon.
Crafting the Roof
Discover essential tips and insights on crafting the roof for a durable, stylish, and efficient home. Your guide to roofing excellence is here!
Step 1: Cutting the Lumber at a 45-Degree Angle
For the roof, we cut a five-foot 2x4 at a 45-degree angle, mirroring this cut with another 2x4. This would allow the pieces to join seamlessly, forming the peak of the roof.
Step 2: Assembling the Roof
Using nails, we attached these pieces together, adding a shorter, 45-degree angled support block at the apex for additional stability.
Finishing Touches
Discover the essential finishing touches: adding a rotating handle, edging the top of the box, and attaching the bucket for a polished look.
Step 1: Adding the Rotating Handle
My husband drilled holes on the sides to insert the large dowel rod, securing it with a wooden block. This would act as the handle to complete the wishing well's traditional look.
Step 2: Edging the Top of the Box
He also trimmed fence boards in half and cut them at a 45-degree angle, attaching them around the top edge of the base box for a polished appearance.
Step 3: The Bucket
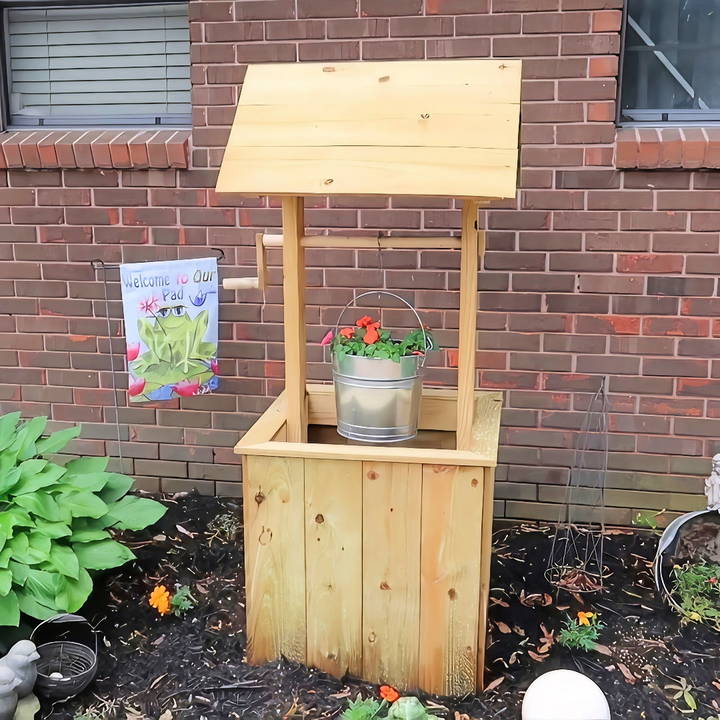
We attached a small, galvanized bucket to the dowel rod using a rope. This would serve as a planter for flowers, adding a burst of color and life to the wishing well.
The Final Product
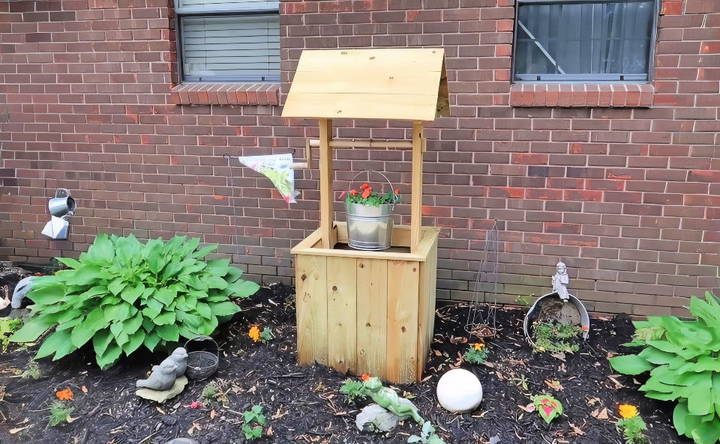
After a few tweaks and the addition of flowers in the bucket, the wishing well was complete. Nestled within our garden, it stood as a testament to creativity and personal touch, replacing the old birdbath with something far more unique and special. It became not just a focal point in our garden, but a symbol of what can be achieved with a bit of imagination and effort.
The total cost of materials came in around $50, a fraction of what a pre-made wishing well or another concrete birdbath would cost. The sense of satisfaction from building something with my own hands, however, was priceless.
Customization Ideas for DIY Wishing Wells
Building a DIY wishing well is a wonderful way to add a personal touch to your garden or event. Here are some customization ideas to make your wish truly unique:
- Choose Your Style Decide on the overall look of your wishing well. Do you prefer a rustic, wooden design or a more elegant, brick-based structure? Consider the style of your garden or the theme of your event when making this decision.
- Material Matters Select materials that not only complement your style but are also durable and suitable for your climate. Wood, stone, and bricks are popular choices. For a more sustainable option, consider using recycled or upcycled materials.
- Size and Shape Think about the size and shape of your wishing well. It could be small and quaint or large and grandiose, depending on its purpose and location. Shapes can vary from the traditional round well to a more modern square or hexagonal design.
- Decorative Details Add decorative elements to your wishing well. This could include carving patterns into the wood, painting it with vibrant colors, or adorning it with lights for a magical evening glow.
- Functional Features If your wishing well isn't just for show, consider adding functional features. This could be a working crank and bucket for an authentic feel or a hidden compartment to use it as a cooler for events.
- Plant-Friendly Turn your wishing well into a planter. Line the bottom with garden fabric and fill it with soil to build a stunning display for flowers or herbs.
- Personalize It Make your wishing well personal by adding your name, a special date, or a meaningful quote. This is especially lovely for events like weddings or anniversaries.
- Safety First Ensure your wishing well is safe. If it's accessible to children, avoid sharp edges and ensure it's stable. If it's a functional well, make sure the water is clean and the area around it is slip-resistant.
By incorporating these ideas, your DIY wishing well will not only be a beautiful addition to your space but also a reflection of your personal style and creativity.
Maintenance and Preservation of DIY Wishing Wells
Ensuring your DIY wishing well remains a charming feature in your garden for years to come requires regular maintenance and preservation. Here's how you can keep your wish well in top condition:
- Choose the Right Materials Start by selecting materials that are known for their durability and resistance to the elements. Pressure-treated wood, cedar, or redwood are excellent choices for their natural decay and insect resistance.
- Protective Finishing: Apply a sealant or wood stain designed for outdoor use. This will protect your wishing well from moisture and UV damage, helping to prevent rot and maintain its appearance.
- Regular Inspections Make it a habit to inspect your wishing well periodically. Look for signs of wear or damage, such as splintering wood or loose components. Address these issues promptly to prevent further deterioration.
- Cleaning Routine Keep your wishing well clean by removing debris, such as leaves and twigs, which can trap moisture against the wood. A gentle scrub with soapy water can remove dirt and grime without damaging the wood.
- Avoid Water Accumulation If your wishing well isn't designed to hold water, ensure proper drainage to prevent water from pooling. This will reduce the risk of wood rot and insect infestation.
- Winter Care In colder climates, take extra steps to winterize your wishing well. Covering it or storing it away during harsh weather can extend its life and preserve its beauty.
- Refresh the Finish Every few years, refresh the protective finish on your wishing well. A new coat of sealant or stain can revitalize its look and reinforce its protection against the weather.
By following these simple maintenance and preservation steps, your DIY wishing well will continue to be a delightful addition to your outdoor space, evoking the magic of wishes and dreams for a long time.
FAQs About DIY Wishing Well
Explore FAQs about DIY wishing well: get answers, tips, and step-by-step guidance for making your own charming garden feature.
A DIY wishing well is a decorative piece often found in gardens or used at events like weddings. It’s a homemade version of the traditional well where people can toss coins and make wishes. Building one involves basic carpentry skills and materials like wood, nails, and paint.
Consider the purpose of your wishing well. If it’s for a garden, you might want a rustic, wooden design. For weddings, a more decorative style may be suitable. Look at various plans online or in carpentry books to find a design that fits your needs and skill level.
Yes, there are many wishing well designs that cater to beginners. These plans provide step-by-step instructions and often require simple tools and materials. Just follow the instructions carefully, and you'll be able to build a beautiful wishing well.
Personalize your wishing well by painting it in your favorite colors, adding decorative elements like a roof or bucket, or carving initials or symbols into the wood. You can also plant flowers around it or use it as a planter for a unique touch.
Maintaining your DIY wishing well is important to ensure it lasts for years. Regularly check for any loose nails or screws and tighten them. If it's made of wood, inspect for signs of rot or insect damage and treat accordingly. Repaint or reseal the wood every few years to protect it from the elements. If you've used it as a planter, make sure to water the plants and replace the soil when necessary.
Conclusion
Completing my first DIY wishing well project gave me so much satisfaction. I encourage you to try it and see for yourself. The steps below will guide you. These plans will help you build a beautiful wishing well.


