Starting a DIY wood kiln is a great way to dry wood using natural sunlight. It's affordable, energy-efficient, and easy to set up. I first learned about solar kilns when I needed a low-cost solution to dry wood for my woodworking projects. With just a few basic materials, I was able to build a kiln in my backyard and get started on drying wood effectively.
The process may sound complex, but it's actually simple when you break it down. I'm sharing this guide to help you understand how a solar wood kiln works, how to build one, and what you need to get started. By the end, you'll have the confidence and knowledge to build your own kiln and dry wood efficiently using the sun's power.
I hope this encourages you to take the first step in building your own DIY wood kiln. These tips will make it easier for you to get started.
Setting Up Your Workspace
Before diving into the build, it's crucial to have a solid and level surface to work on. This will affect the entire drying process.
Why Leveling is Important
When stacking wood, the top pieces will press down on the bottom ones. If your base isn't flat, it will cause the entire stack to conform to an uneven shape. This results in crooked and unusable lumber.
How to Level Your Surface
- Using Rocks or Uneven Ground: Move the boards left and right until they reach the same height.
- Using Shims: If you aren't working with rocks, wooden shims work perfectly. They provide a quick fix for leveling your surface.
Gathering Your Materials
Let's talk about the materials you will need to build your solar kiln. Understanding why each material is essential can help make informed choices that could affect cost, efficiency, and durability.
Essential Materials
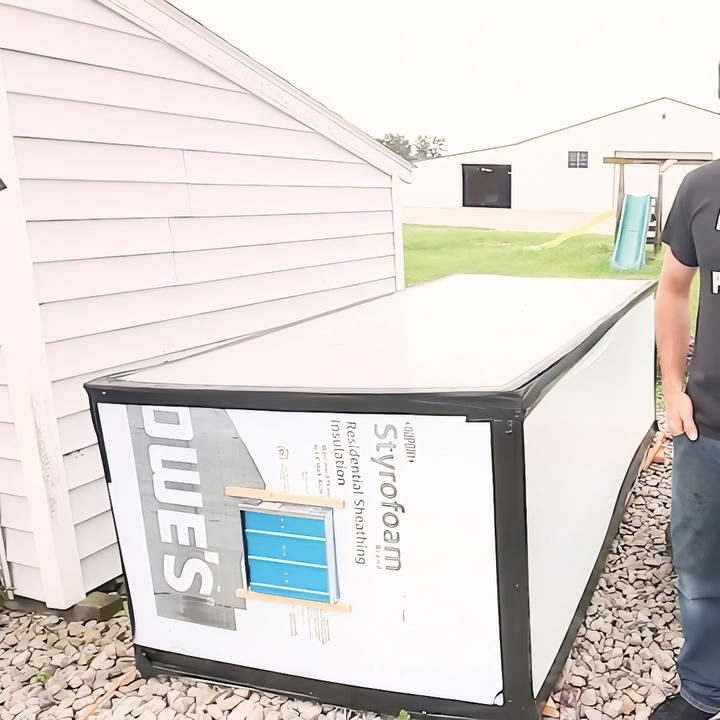
- Half-inch Insulation Foam Sheets: Acts as the walls of your kiln. It's important for retaining heat. I purchased mine for about $22 per sheet. Prices may vary, but thicker sheets are easier to work with, although more expensive.
- Polycarbonate Sheets Allow sunlight to enter while maintaining heat. Acts like a greenhouse top. Around $80. There are cheaper alternatives like thick saran wrap, but I recommend polycarbonate for durability and insulation.
- Gorilla Tape: Secures the structure. I found that the waterproof Gorilla Tape worked best due to its strong adhesion.
- Vent Fan with Thermostat Controller: Helps control humidity and temperature within the kiln. A fan with a high air volume capacity is essential. Available for approximately $90.
- Pinless Moisture Meter: This allows you to measure the moisture content without damaging your wood. Around $50 but worth every penny for accurate readings.
Step by Step Instructions
Learn how to build a DIY wood kiln with step-by-step instructions, from assembling the box to installing a vent fan and ensuring proper airflow.
Building the Solar Wood Kiln
Once you've gathered your materials and set your workspace, it's time to construct the kiln. Here's a step-by-step guide to making a functional solar kiln.
Step 1: Assembling the Box
- Build a Frame: Use the half-inch insulation foam sheets. While some might opt for wooden frames, they're not necessary.
- Secure with Tape: Once your box is assembled, tape the corners liberally. It might seem too simple, but the structure becomes quite rigid with tape alone.
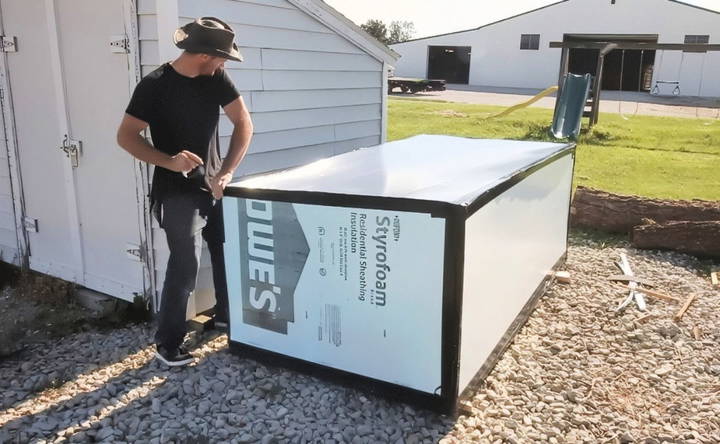
Step 2: Adding the Polycarbonate Lid
- Adjust for Sunlight: You need a way to let sunlight in without losing heat. The dual-wall polycarbonate ensures this balance.
- Make it Look Good: Despite initial concerns about aesthetics, a neatly taped assembly doesn't look too bad, especially since it's not permanent.
Step 3: Installing the Vent Fan
- Placement: Decide where you want to place the fan. This can be done before or after assembling your kiln.
- Functionality: The fan works in tandem with the thermostat controller, exhausting air out once a set temperature is exceeded.
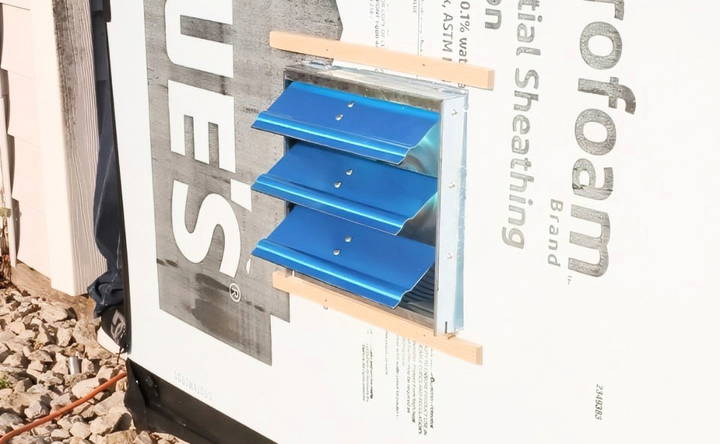
Step 4: Measuring Wood Moisture
To ensure your wood reaches the desired dryness, use the pinless moisture meter. Its accuracy and non-invasive application make it a must-have tool.
Fine-Tuning Your Solar Wood Kiln
After setting up your basic kiln, your journey doesn't end there. It's crucial to monitor and make continual adjustments for optimal performance.
Learning From Experience
Initially, I thought installing a dehumidifier would enhance the drying process. However, it produced too much heat and disturbed the temperature balance. Remember, the sun should be your primary heat source when constructing an outdoor kiln.
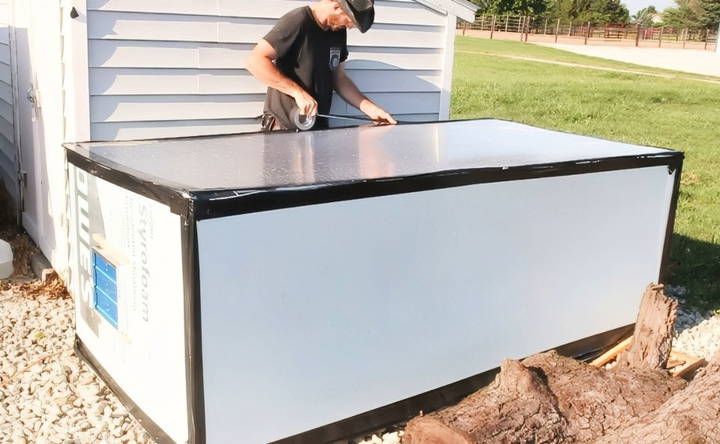
Ensuring Proper Airflow
Your kiln must have ports for airflow. These vents prevent the box from collapsing under negative pressure and allow moisture to escape efficiently.
Considerations for an Indoor Kiln
If drying lumber indoors is more your style, you'll need a slight shift in materials and methodology.
Indoor Modifications
- Heat Source: A simple dehumidifier can serve as both a heater and a fan.
- Structure: Since you don't rely on sunlight, the box may not need to be transparent but should still retain heat effectively.
Advanced Kiln Building Techniques
Explore advanced kiln-building techniques including solar kilns, kiln automation, dehumidification kilns, and vacuum kilns for optimal performance.
Solar Kilns
Harness the power of the sun! A solar kiln uses sunlight to heat and dry lumber. They're environmentally friendly and can be surprisingly effective. However, they require careful design and placement to capture sunlight optimally and might not be suitable in areas with limited sunshine.
Kiln Automation
Embrace the convenience of technology! Automation uses sensors and controllers to monitor and adjust your kiln's temperature and humidity automatically. This ensures consistent drying conditions and reduces the risk of errors, but requires some technical knowledge to set up and might be more expensive.
Dehumidification Kilns
For areas with high humidity, dehumidification kilns are a great choice. They use a dehumidifier to remove moisture from the air, allowing you to dry lumber effectively even in damp climates. While this adds some complexity to the design, it can be invaluable in certain regions.
Vacuum Kilns
Vacuum kilns are the gold standard for fast and efficient lumber drying. They use a vacuum chamber to lower the boiling point of water, allowing the wood to dry at lower temperatures. This reduces the risk of warping and cracking. However, they're complex to build and operate, requiring specialized equipment and careful control.
Remember
Advanced techniques often require additional research, planning, and resources. Don't be afraid to consult experienced builders or consider taking workshops to expand your skills. The rewards of a well-built and efficient kiln are worth the effort.
Troubleshooting Common Issues
Find expert solutions for troubleshooting common issues like uneven drying, warping, mold, and temperature control problems. Resolve them effectively!
Tackling Problems Head-On
Even the best-built kilns can experience hiccups. Let's explore some common issues and their solutions:
Uneven Drying
Signs: Some boards warp or crack while others remain damp. This can be caused by poor air circulation or inconsistent heat distribution.
Solution:
- Check Your Vents: Make sure air is flowing evenly throughout the kiln. Adjust vents as needed to direct air to areas that are drying slower.
- Rearrange Your Wood: Reposition boards to ensure heat reaches all surfaces equally. Avoid overcrowding the kiln, as this can hinder air circulation.
- Consider a Fan: A small fan can help circulate air, ensuring even drying, especially in larger kilns.
Warping and Cracking
Signs: Boards bend or develop cracks during drying. This is often due to drying the wood too quickly.
Solution:
- Slow Down: Adjust your drying schedule to a slower pace. Gradual drying helps the wood adjust to the moisture loss without stressing its structure.
- Check Humidity: Monitor the humidity levels in your kiln. High humidity can slow down the drying process, reducing the risk of damage.
Mold and Mildew
Signs: Fuzzy or discolored patches appear on the wood. This usually happens in humid environments or if the wood is not drying fast enough.
Solution:
- Increase Airflow: Improve ventilation in your kiln to reduce humidity. Open vents or consider adding a fan.
- Raise the Temperature: Slightly increase the temperature to speed up drying and discourage mold growth.
- Clean and Sanitize: If mold is present, remove affected boards and clean the kiln thoroughly with a mild bleach solution.
Temperature and Humidity Control Problems
Signs: Your kiln struggles to maintain the desired temperature and humidity. This can be caused by a faulty thermostat, leaks, or other issues.
Solution:
- Check Your Thermostat: Ensure it's functioning correctly and calibrated accurately.
- Inspect for Leaks: Look for gaps or cracks in the kiln structure that might be letting air in or out.
- Consider Insulation: Adding insulation to your kiln can help maintain stable conditions, especially in extreme weather.
Troubleshooting is key in DIY kilns. Seek online advice or consult experts. With patience, you can achieve beautifully dried lumber.
Safety Precautions
Ensure safety while building and using your kiln. Learn about fire hazards, proper ventilation, handling hot materials, and more essential tips.
Keeping Safe While Building and Using Your Kiln
Building and using a DIY kiln involves working with heat, wood, and potentially flammable materials. Safety should always be your top priority. Here are some essential precautions:
Fire Hazards
- Fire-Resistant Materials: Build your kiln using fire-resistant materials like brick, concrete, or metal. Avoid using wood or other flammable materials in the kiln's construction.
- Regular Inspections: Inspect your kiln regularly for any signs of wear and tear, cracks, or damage. Address any issues promptly to prevent fire hazards.
- Fire Extinguishers: Keep fire extinguishers readily available near your kiln. Make sure they are in good working order and that you know how to use them.
- Clearance: Maintain a safe distance between your kiln and any flammable structures or materials.
Ventilation
- Adequate Airflow: Ensure proper ventilation in and around your kiln. This helps prevent carbon monoxide buildup and other health hazards.
- Exhaust System: Consider installing an exhaust system to vent fumes and smoke away from your work area.
- Carbon Monoxide Detectors: Install carbon monoxide detectors in your workspace to alert you of any dangerous levels of this odorless gas.
Handling Hot Materials
- Protective Gear: Wear heat-resistant gloves and clothing when handling hot wood or kiln components.
- Proper Tools: Use long-handled tools to avoid burns when loading or unloading your kiln.
- Cool Down: Allow wood and kiln components to cool down completely before handling them without protection.
Additional Safety Tips
- Electrical Safety: If your kiln uses electricity, ensure all wiring is properly installed and grounded. Avoid using extension cords or overloading circuits.
- First Aid Kit: Keep a well-stocked first aid kit on hand in case of minor injuries.
- Training: If you're new to kiln building or operation, seek guidance from experienced woodworkers or consider taking a safety course.
Always prioritize caution and use common sense when working with your kiln. By following these precautions, you can enjoy the rewards of a DIY kiln while minimizing risks.
FAQs About DIY Wood Kiln
Discover the essentials of DIY wood kilns with our FAQs. Learn construction tips, benefits, and safety guidelines for building your own wood kiln.
Absolutely! A DIY kiln is a great way to ensure your firewood is properly seasoned and ready to burn efficiently. Just make sure to follow the appropriate drying schedule for the type of wood you're using.
Drying times vary depending on the wood species, thickness, and desired moisture content. Generally, it can take anywhere from a few weeks to several months. It's essential to monitor the wood's moisture content regularly to ensure proper drying.
Yes, you can! There are many affordable DIY kiln designs using readily available materials like salvaged wood and insulation. Consider using solar power or repurposing an old refrigerator to keep costs down.
If building a kiln isn't feasible, you can try air drying. This involves stacking wood outdoors with proper spacing and cover to allow for natural drying. However, air drying takes longer and is more susceptible to weather conditions.
Use a moisture meter to check the wood's moisture content. The ideal moisture content for most woodworking projects is between 6-8%. For firewood, aim for a moisture content below 20%.
This usually indicates that the wood is drying too quickly. Slow down the drying process by reducing the temperature or increasing the humidity in your kiln.
Yes, you can! However, it's crucial to follow specific drying schedules for the wood species you're using and monitor the moisture content closely to ensure the wood is suitable for furniture making.
Conclusion
There you have it—a comprehensive guide to building your own DIY wood kiln. By following these steps and incorporating the right materials, you can dry lumber efficiently and cheaply. It's a rewarding experience, allowing you to reap the benefits of dried wood for various projects. Thank you for accompanying me on this journey, and best of luck with your drying endeavors.
If you have questions or need further guidance, feel free to reach out. I'd be more than happy to help you along your kiln-building journey or discuss any woodworking projects you might have.


