Building something useful is always rewarding. I once made a DIY wood lantern for my backyard. It wasn't just a fun project; it also added a warm glow to my outdoor space. All I needed were some wooden slats, nails, and a bit of creativity. Building it step-by-step was simple and enjoyable.
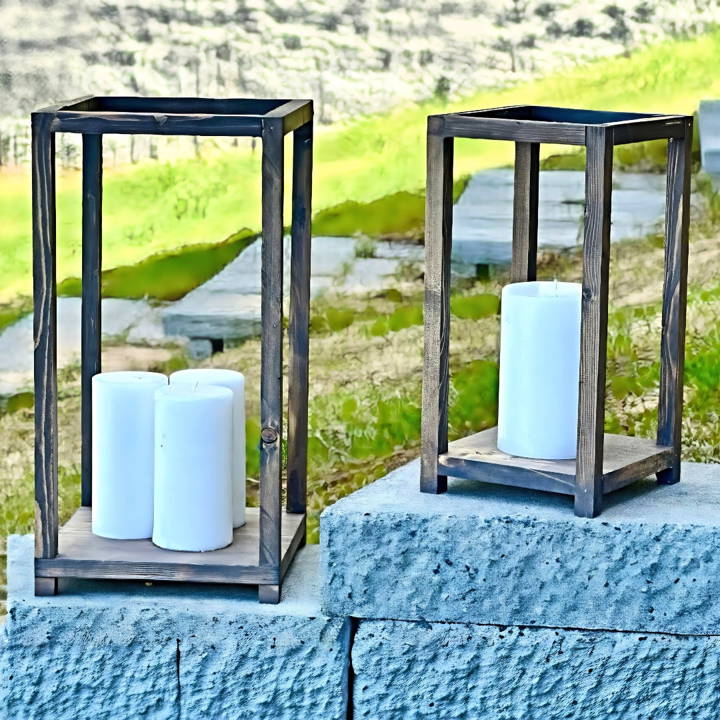
If you enjoy working with your hands and adding personal touches to your space, you will love making a DIY lantern. It's a great way to spend the weekend and results in something practical and beautiful. Plus, you'll get the satisfaction of saying, "I made this!" If you're looking for a new project, this guide will be perfect to get you started. These steps will help you build your unique lantern quickly and easily.
Preparation and Materials Needed
Before diving into the process, it's essential to gather your materials and understand why each is pivotal.
- Wood Planks: Depending on the size of the lantern you aim to build (small, medium, large), you'll need different width boards (1x6 for small, 1x8 for medium, and 1x10 for large). The type of wood is up to you, though I found pine to be a great, affordable option.
- Saw: A jigsaw and a regular saw will be vital for cutting your wood to the correct dimensions and shapes.
- Brad Nailer or Hot Glue Gun: These are crucial for assembling the pieces. While the Brad nailer offers a more robust build, a hot glue gun could suffice for lighter, decorative use.
- Sandpaper (120 grit): Smoothens the wood surfaces, ensuring your lantern has a polished look and feel.
- Wood Stain and Foam Brush: Adds color and protection, enhancing the wood's natural beauty.
- Safety Gear: Don't forget protective eyewear and gloves, especially when sawing or nailing.
Understanding the purpose of each material helps in planning and ensures a smoother making process.
Step by Step Instructions
Learn how to build unique DIY lanterns with easy, step-by-step instructions to add a personal touch to your space. Perfect for handmade decor enthusiasts!
Step 1: Cutting the Wood
First, decide which lantern size you're going for–small, medium, or large. Then, cut your wood plank to the required dimensions. These initial cuts form the base and top of your lantern.
Step 2: Building the Frame
After your bases are ready, rip one additional material into * ¾ inch widths—these act as the vertical pieces of your lantern's frame. The length of these pieces will depend on the height you desire for your lantern. This process might seem daunting, but it's all about patience and precision.
Step 3: Choose Your Lantern Base Style
Choose from jigsaw, double base, or tiny-foot lantern base styles. Learn assembly and finishing touches to build your perfect lantern!
Style 1: Jigsaw Base
For a sleek look, mark and cut corners out from your base to match the thickness of your vertical pieces. This style requires careful marking and a steady hand with the jigsaw.
Style 2: Double Base
If you prefer a more pronounced base, construct your lantern with two layers of wood at the bottom, providing extra height and stability.
Style 3: Tiny Feet
For something subtle, add small wooden blocks to act as "feet" for your lantern. It's a small detail that adds character.
Step 4: Assembling Your Lantern
Regardless of the base style chosen, start assembling by attaching your vertical pieces to the base using a Brad nailer or hot glue. Then, secure the top pieces to form the lantern's frame. This step is where your lantern starts to take shape, so take your time to ensure everything aligns properly.
Step 5: Finishing Touches
Once assembled, sand your lantern with 120 grit sandpaper to smooth any rough edges. Then, apply wood stain with a foam brush. This not only adds color but also seals the wood, offering a bit of protection. Choose a stain that complements your decor or go natural for a rustic feel.
Personalization Tips for DIY Lanterns
Building a DIY lantern is a delightful project that allows for personal expression and creativity. Here are some tips to help you personalize your lantern and make it uniquely yours:
- Choose a Theme: Reflect on what inspires you. It could be a favorite color, a season, a holiday, or even a memory. Let this theme guide your choice of materials and design.
- Add Personal Touches: Incorporate elements that have personal significance, like a piece of fabric from a cherished garment, beads from a special necklace, or a pattern that reminds you of a place you love.
- Play with Colors: Colors can set the mood. Warm colors like reds and oranges build a cozy atmosphere, while cool colors like blues and greens evoke calmness. Pick colors that resonate with your personal style.
- Use Photos: For a truly personal touch, attach photos to the lantern's panels. Whether they're family photos, pictures from travels, or images of your favorite artwork, they'll add a unique story to your lantern.
- Inscribe Quotes or Messages: Write or paint meaningful quotes, affirmations, or messages on your lantern. Every time you light it, you'll be reminded of these words.
- Experiment with Light: The type of light you use can change the ambiance. Try different colored lights, or use a dimmer to adjust the brightness to suit your mood.
- Accessorize: Add ribbons, lace, or tassels to the lantern. These small additions can make a big difference in the overall look and feel.
- Consider the Environment: If you're using your lantern outdoors, think about how it will blend with your garden or patio. Natural materials and earthy tones can complement outdoor spaces beautifully.
- Make it Interactive: Build a lantern that changes with you. Design panels that can be switched out or use materials like chalkboard paint so you can draw new designs whenever you wish.
The key to personalization is making choices that reflect who you are. There are no rules—only guidelines to spark your imagination.
Upcycling Ideas for DIY Lanterns
Upcycling is a creative and eco-friendly way to transform everyday items into beautiful and functional lanterns. Here are some ideas to inspire your next DIY project:
- Tin Can Lanterns: Clean out tin cans from your recycling bin, and with a few holes punched in a design, they can become charming lanterns. Add a handle from an old wire coat hanger for easy hanging.
- Glass Jar Lanterns: Glass jars of all sizes can be repurposed into lanterns. You can paint them, wrap them with twine or lace, and place either candles or LED lights inside for a warm glow.
- Cardboard Carton Lanterns: Milk or juice cartons can be cut and covered with colorful tissue paper to build a soft, diffused light. This is a great project to do with kids.
- Old Frame Lanterns: If you have old picture frames, you can construct a box lantern. Just attach the frames together and add a light source inside. It's a stylish way to reuse those frames.
- Mason Jar Lanterns: Mason jars are perfect for making lanterns. They can be filled with sand and a candle or decorated on the outside with glass paints for a stained-glass effect.
- Repurposed Lamp Lanterns: Take an old lamp and remove the wiring to turn it into a candle lantern. You can paint the base for a fresh look or leave it as is for a vintage feel.
- Upcycled Bottle Lanterns: Wine bottles can be cut at the bottom and fitted with candles to make elegant lanterns. They're perfect for a romantic dinner setting or as a centerpiece.
The key to upcycling is to see the potential in items that might otherwise be thrown away. With a little creativity, you can build something beautiful, reduce waste, and add a personal touch to your home.
Advanced Techniques for DIY Lanterns
For those who have mastered the basics of lantern making and are looking to elevate their craft, advanced techniques can add complexity and beauty to your creations. Here are some sophisticated methods to try:
- Stained Glass Effect: Use special glass paints to build a stained glass look on glass jar lanterns. This technique involves outlining designs with black paint and then filling in with translucent colors.
- Electrical Wiring: For a more permanent lantern, learn basic electrical wiring to install a bulb and switch. Always prioritize safety and consult with a professional if you're unsure.
- Soldering Metal Frames: If you're into metalwork, soldering a custom frame for your lantern can be a rewarding challenge. It allows for intricate designs and durable construction.
- Paper Cutting Art: Incorporate paper-cutting art into your lantern design. This can range from simple cut-outs to complex silhouettes that cast beautiful shadows when lit.
- Woodworking: Build a wooden lantern by using woodworking tools to carve or assemble a lantern frame. This can be as simple as a box shape or as complex as a lattice design.
- 3D Printing: If you have access to a 3D printer, you can design and print custom parts for your lantern, such as intricate filigree patterns or personalized panels.
- Remote-Controlled Lighting: Integrate remote-controlled LED lights into your lanterns for adjustable brightness and color, adding a modern twist to your creation.
- Eco-Friendly Solar Power: For outdoor lanterns, consider using solar panels to charge during the day and light up at night, combining traditional crafting with green technology.
Master these techniques to elevate your crafting skills and build standout, sophisticated lanterns. Take your time, stay safe, and enjoy the process.
FAQs About DIY Lantern
Explore faqs about DIY lanterns! Get answers to common questions, tips, and tricks for making your own beautiful and functional lanterns.
You can use different light sources such as:
Candles for a traditional look (be cautious with fire safety).
Battery-powered LED tea lights for a safer alternative.
Fairy lights for a whimsical touch.
Yes, safety is important. Here are some tips:
Always wear safety gear when using tools.
Be careful with sharp objects and hot surfaces.
If using candles, never leave them unattended and keep the lantern in a safe area away from flammable materials.
To ensure stability and safety:
Use a flat base for your lantern to prevent tipping.
If using wood, ensure all pieces are securely fastened with nails or screws.
For tin can lanterns, sand down any sharp edges.
Always place your lantern on a heat-resistant surface if using candles.
Get creative with decorations by:
Painting or staining the wood for a custom color.
Wrapping the lantern with twine or rope for a rustic look.
Using tissue paper or wax paper for a translucent effect on paper lanterns.
Adding beads or shells for a beach-themed lantern.
Yes, to make an outdoor lantern:
Choose weather-resistant materials like treated wood or rust-proof metals.
Consider a sealer or outdoor paint to protect against the elements.
Use LED lights instead of candles to avoid fire hazards.
Ensure any electrical components are rated for outdoor use.
Final Thoughts
With this guide, you are all set to begin your DIY wooden lanterns project. I hope my experience inspires you. Getting started is the hardest part, but these tips will make it easier and more fun. Give it a try; you won't regret it!


