Starting a DIY worm bin was one of the best decisions I made for my garden. It wasn't just about reducing waste but also improving the quality of my soil with rich, natural compost. I remember my first attempt—gathering all the materials, drilling holes in the bin for ventilation, and adding layers of shredded newspaper. It was surprisingly easy and rewarding.
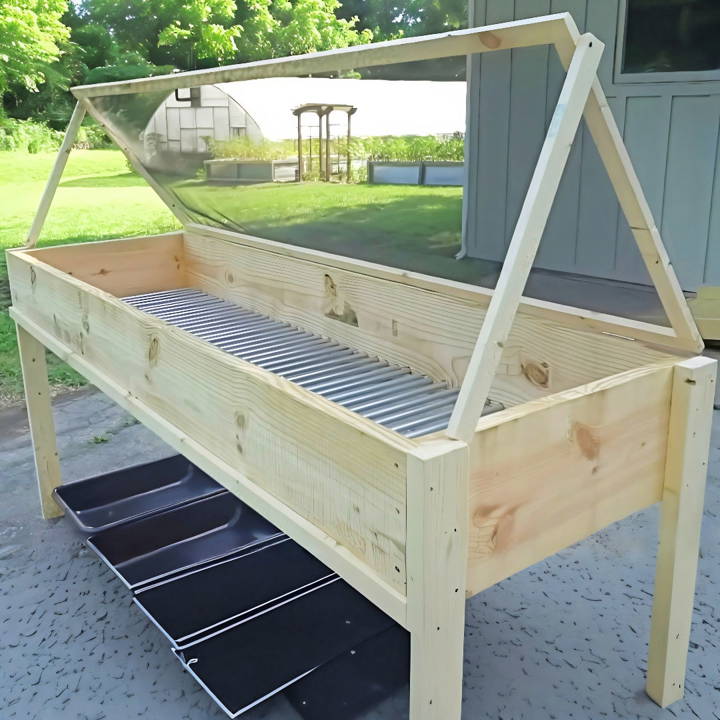
Once I introduced the worms to their new home, the changes were incredible. The scraps I used to throw away became dark, nutrient-rich soil. My plants started thriving like never before. I was amazed to see the transformation in my garden. If you want healthier plants and a more sustainable way of gardening, making a DIY worm bin could be your best bet.
What is Vermicomposting?
At its core, vermicomposting is the act of feeding scraps of organic material, like your kitchen waste, to worms. These aren't just any worms, though. They are special composting worms, and they love to eat your leftover food. As they consume this waste, they produce castings, which is a fancy word for worm poop. These castings are a nutrient-rich, natural fertilizer that can do wonders for your garden.
Why Vermicompost?
The benefits of vermicomposting are many. For starters, it reduces the amount of garbage that ends up in landfills. Organic waste in landfills can build methane, a potent greenhouse gas. By composting, you're cutting down on methane emissions. Plus, the castings that worms produce are much more beneficial for your plants than chemical fertilizers, which can be harmful to the environment.
How Does It Help the Environment?
Vermicomposting is a win-win for you and the planet. It helps you recycle your kitchen waste, reducing your carbon footprint. It also builds a natural, organic product that improves soil health. Healthy soil absorbs more carbon from the atmosphere, which can help combat climate change.
Getting Started with Vermicomposting
Starting your own worm bin is easy and inexpensive. You'll need a bin, some bedding, the worms, and your organic waste. The bedding can be made from shredded newspaper or cardboard, which the worms will also eat. Keep the bin in a cool, shaded place, and you'll soon have a thriving mini-ecosystem.
Vermicomposting is an easy, eco-friendly method to handle waste and enrich your garden, showcasing a circular economy where everything is reused. Starting a worm bin contributes to a healthier planet.
Materials and Tools
To begin, you'll need the following materials, all of which I found at my local hardware store for under $200:
- Eight-foot long lumber for the sidewalls and inwalls
- Half-inch metal conduit
- 1x2 lumber for securing the conduits
- Screen mesh for the lid
- Hinges for the lid
- Screws of varying lengths
- Tools including a drill, saw, tape measure, and staple gun
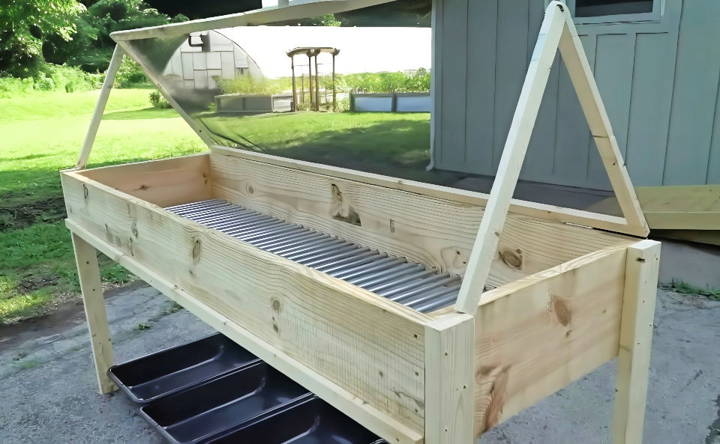
Each material was chosen for a specific purpose. The lumber constructs the frame of the bin, sturdy enough to hold the compost. The metal conduit acts as the base for the compost to sit on, allowing for easy harvesting. The screen mesh keeps pests out, and the hinges make it easier to add new scraps and mix the compost.
Step by Step Instructions
Learn how to build a DIY worm bin with step-by-step instructions. Perfect for composting and eco-friendly gardening. Easy, sustainable, and efficient!
Building the Frame
The frame is the backbone of your worm bin. I started by cutting the eight-foot lumber to the desired size of my bin, aiming for a width of two and a half feet to suit my space. Assembling the frame with screws, ensuring to pre-drill the holes to prevent the wood from cracking, laid the groundwork for the rest of the project.
Adding the Bottom Conduits
Given that this is a continuous flow-through system, the bottom conduits play a crucial role. They support the compost and allow for easy harvest of worm castings. Drilling holes along the bottom of the sidewalls to fit the half-inch conduits involved careful measurement to ensure even spacing. Once installed, securing them with 1x2 lumber prevented the conduits from moving.
The Legs and Screen Top
Adjusting the bin's height for easy access, especially when harvesting the compost, led me to choose a leg length that made the bin countertop height. The screened top, assembled from 1x2 lumber and mosquito screen, provides an additional layer of protection from pests while ensuring good air circulation.
Bedding and Worm Introduction
Before introducing the worms, making a hospitable environment was crucial. I started with a base layer of sifted compost, added moisture to build a welcoming bedding, and then introduced my starter worm population. While I began with a small batch of worms obtained from a friend, I had already arranged for a thousand more to arrive the following week.
Continuous Flow-Through Design
The essence of this system lies in its simplicity. The conduits at the bottom allow me to rake through the worm castings, which fall into a collection bin at the bottom, ready to be used in the garden. This design means I never have to empty the bin entirely, making it a truly sustainable solution for ongoing composting needs.
Maintenance and Care
Maintaining the worm bin is surprisingly straightforward. Monitoring moisture levels, adding new kitchen scraps, and occasionally checking on worm health are the primary tasks. The clear plastic on top helps deter the worms from crawling out, abiding by their preference for dark spaces.
Advanced Vermicomposting Techniques
Vermicomposting is a fantastic way to turn your kitchen scraps into rich soil for your garden. But if you're ready to take your composting to the next level, advanced techniques can help you produce even more compost faster and with less effort. Here's how you can do it.
Continuous Flow-Through Systems
One of the most efficient methods for vermicomposting on a larger scale is the continuous flow-through system. This technique involves a bin where the bottom layer of compost can be harvested regularly without disturbing the worms at the top. The worms naturally move upwards as they finish composting the lower layers, leaving their castings behind. This system is great because it's less labor-intensive and provides a steady supply of compost.
Pre-Composting
Another technique to enhance your vermicomposting is pre-composting. This means letting your organic waste start to break down before adding it to your worm bin. By doing this, you make it easier for the worms to process the waste and prevent issues like odors and pests.
Balanced Feeding
Feeding your worms a balanced diet is crucial. Just like us, worms need a mix of ‘greens' (nitrogen-rich materials like vegetable scraps) and ‘browns' (carbon-rich materials like dried leaves or paper). Keeping a good balance helps maintain the health of your worm bin and speeds up the composting process.
Monitoring and Adjusting
Keep an eye on your worm bin's conditions. If it's too wet, add more browns. If it's too dry, add some water or greens. The right moisture level is like a wrung-out sponge. Also, make sure the temperature stays between 55°F and 77°F (13°C to 25°C), which is the ideal range for composting worms.
Harvesting Castings
When it's time to harvest your worm castings, move the finished compost to one side of the bin and add fresh bedding and food to the other side. The worms will migrate to the new food source, making it easier to collect the castings.
Use advanced techniques to build an efficient vermicomposting system that reduces waste, aids the environment, and produces great garden compost for thriving plants.
Troubleshooting in Vermicomposting
When you're nurturing a worm bin, you might run into a few hiccups along the way. Don't worry; it's all part of the process. Here's a straightforward guide to solving some common issues you might encounter in vermicomposting.
Odor Control
If your worm bin starts to smell, it's usually a sign that something is off balance. It could be too much food, not enough air, or excess moisture. Here's what you can do:
- Too Much Food: Cut back on the amount of food you're adding. Let the worms catch up.
- Air Flow: Mix the contents gently to let air reach all parts. This helps prevent bad smells.
- Moisture: If it's too wet, add dry bedding like shredded newspaper to soak up the extra moisture.
Managing Moisture
A worm bin that's too wet can cause problems. Here's how to fix it:
- Drainage: Make sure the bin's drainage holes aren't blocked. Clear them out if needed.
- Absorb Excess Water: Add more dry bedding to the top layer to help absorb moisture.
Worms on the Move
If your worms are trying to escape, they're telling you they're not happy. It could be due to:
- Overfeeding: Reduce the amount of food you're giving them.
- Temperature: Keep the bin out of direct sunlight and maintain a cool environment.
Unwanted Guests
Sometimes flies and other pests can find their way into your bin. To keep them out:
- Cover Food: Always bury food scraps under bedding to hide them from flies.
- Proper Bedding: Use a thick layer of bedding on top to act as a barrier.
Harvest Time
If your bin is well-maintained but worms are still unhappy, it might be time to harvest the compost. Here's a quick tip:
- Separate Castings: Move the finished compost to one side and add fresh bedding to the other. The worms will move to the new side, making it easier to collect the castings.
Troubleshooting is all about observing and adjusting. Keep an eye on your bin, and with a little patience, you'll have a happy worm farm and rich compost for your garden.
Maintaining Optimal Conditions
Creating the perfect home for your composting worms is key to successful vermicomposting. Here's how to keep conditions just right, so your worms can thrive and turn your kitchen scraps into garden gold.
Temperature: The Comfort Zone
Worms are not too picky, but they do like their surroundings to be cozy. The sweet spot for their home is between 20°C and 25°C (68°F to 77°F). If it gets hotter, up to 30°C (86°F), they'll grow faster but might get a bit too warm for comfort.
Moisture: Just Damp Enough
Think of the moisture in your worm bin like a wrung-out sponge. It should be damp but not dripping wet. Aim for 80% to 85% moisture to keep your worms happy. If you're not sure, give the bedding a gentle squeeze. If a few drops of water come out, that's perfect.
Bedding: A Worm's Blanket
Your worms need a comfy bed, and shredded newspaper or cardboard works great. It should be fluffy and moist, allowing the worms to wiggle through easily. This bedding also helps control moisture and provides more food for your worms.
Feeding: A Balanced Diet
Worms love fruit and veggie scraps, but too much at once can upset the bin's balance. Feed them a little at a time, and always bury the food under the bedding to avoid attracting flies.
Air Flow: Breathe Easy
Good air circulation is vital. It helps prevent odors and keeps the bin healthy. Every now and then, fluff up the bedding to let air in, but be gentle—worms don't like a lot of disturbance.
pH Level: Not Too Sour or Sweet
Worms prefer a neutral pH around 7. If your bin is too acidic, add a bit of crushed eggshell or lime to bring it back to neutral.
By maintaining these optimal conditions, you'll have a flourishing worm bin that produces rich compost for your garden. It's a simple way to give back to the earth and grow beautiful plants.
FAQs About DIY Worm Bin
Discover essential faqs about DIY worm bin. Learn how to build, maintain, and troubleshoot your own worm composting system effortlessly.
A DIY worm bin is a simple container where you can compost your kitchen scraps with the help of worms. It’s a form of vermicomposting. Using a worm bin is great because it reduces waste and builds nutrient-rich compost for your garden.
To set up a worm bin, you’ll need a container, bedding material like shredded newspaper or coir, worms (red wigglers are best), and kitchen scraps. Drill holes in the container for aeration, add moist bedding, introduce your worms, and start feeding them small amounts of scraps.
Worms love fruit and vegetable scraps, coffee grounds, eggshells, and tea bags. Avoid feeding them meat, dairy, oily foods, and citrus peels, as these can attract pests and cause odors.
Keep the bin in a cool, shaded place, and make sure the bedding is moist but not soggy. Feed your worms regularly, but don’t overfeed. Harvest the compost, also known as worm castings, every few months.
A healthy worm bin shouldn't smell bad. If it does, it might be too wet or you might be overfeeding. Cut back on feeding and add dry bedding. If pests are a problem, make sure you're not adding forbidden foods and keep a tight lid on the bin.
Concluding Thoughts:
In conclusion, making your DIY worm bin for rich soil is an easy and rewarding project. It helps reduce waste, enriches your garden, and promotes a sustainable lifestyle. By following simple steps, you can build a thriving DIY worm bin that provides valuable compost for your plants.


