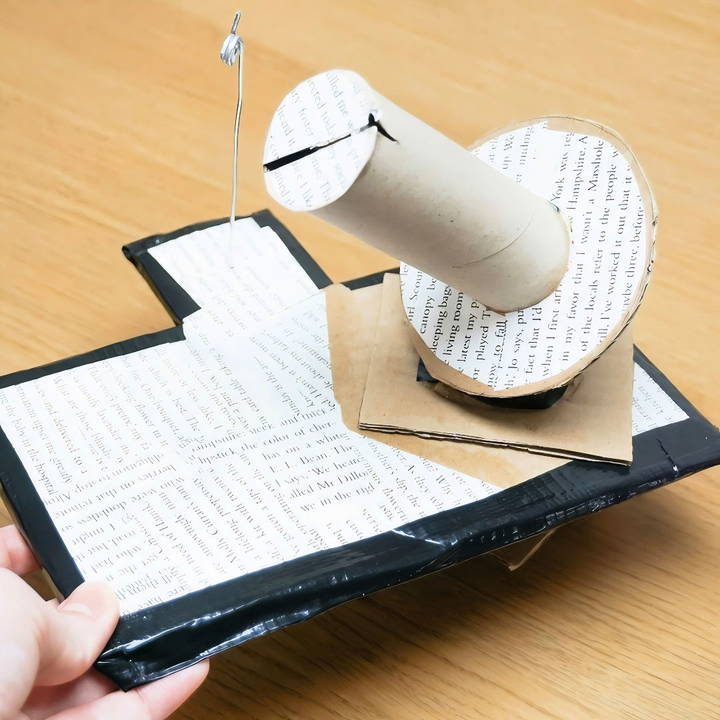
I love engaging in DIY projects, finding immense satisfaction in making something useful with my own hands rather than buying it. One of my recent projects was making a yarn winder from cardboard. Yarn winders can be quite pricey, ranging from £10 to £100, but I made mine for just pennies! Plus, I love using center-pull balls of yarn because they sit still while I knit, without rolling around.
In this narrative, I'll guide you through crafting your own DIY yarn winder. It might require some time and patience, but I assure you, it's a rewarding project. Let's dive in step-by-step.
Why Make a DIY Yarn Winder?
Before diving into the construction, let me explain the reasons behind making a DIY yarn winder.
- Economical: Craft store yarn winders can be expensive, especially the fancier ones. Making your own is not only cost-effective but also a fun craft project.
- Practical: Center-pull balls eliminate the frustration of runaway yarn while knitting or crocheting. It's efficient and neat.
- Creative: Crafting your own tools can personalize your knitting experience and give you a sense of achievement.
This project took me a few hours but was a fulfilling weekend activity that left me with a practical tool I now use regularly.
Materials You'll Need
Here's what you'll need to make your own yarn winder:
- Cardboard: Essential for construction. Use sturdy pieces like those from cereal boxes and corrugated cardboard.
- Two Toilet Roll Tubes: They form the central structure for your yarn winder.
- PVA Glue: It's strong and dries clear, perfect for cardboard crafts.
- Utility Knife: Essential for making precise cuts in the cardboard.
- Modeling Wire: Required for making a guide for the yarn.
- Ruler: To measure and cut cardboard accurately.
- Duct Tape: For reinforcing areas and aesthetic improvements.
Step by Step Instructions
Learn how to make a DIY yarn winder with our step-by-step instructions, from preparing toilet roll tubes to troubleshooting common issues.
Step 1: Preparing the Toilet Roll Tubes
Firstly, let's prepare the toilet roll tubes to make the core components of the yarn winder.
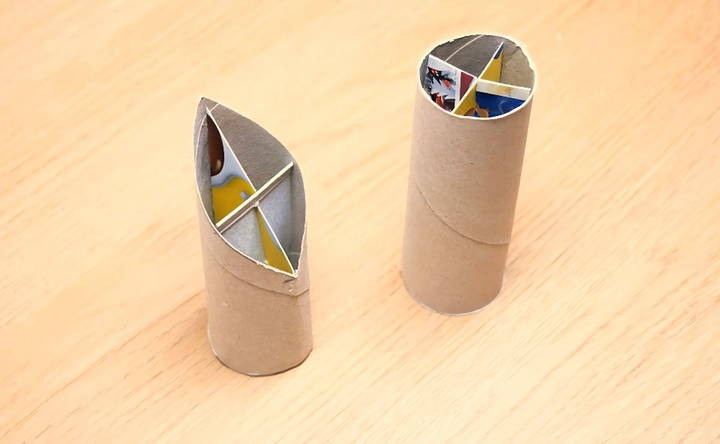
- Cutting for Diagonal Fit: Take one of the tubes and press it flat. Measure from the top and mark a 45-degree angle. Cut along this diagonal line. This will ensure a snug fit inside the winder.
- Strengthening the Tubes: Measure the diameter of your tubes (mine was 3.8 cm). Cut strips of cereal box cardboard that fit snugly inside. For stability, make slots halfway up on each strip and interlock them to form a cross inside each tube. Glue them in place to prevent movement.
Step 2: Making the Base
Next, you'll make a strong base for your yarn winder.
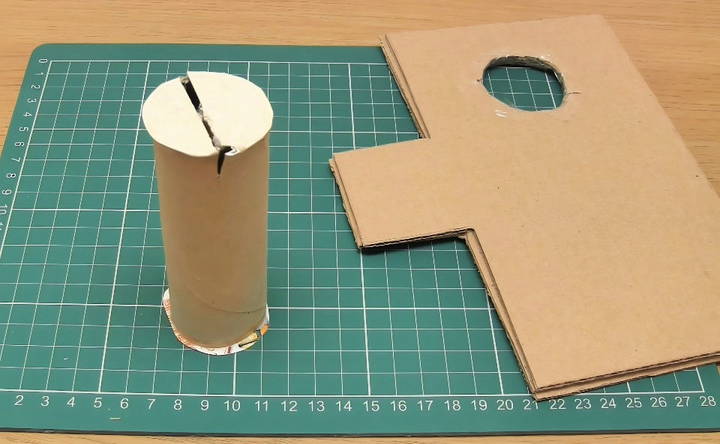
- Cutting the Base: Out of corrugated cardboard, cut two identical pieces and one rectangle. Glue them together, ensuring the rectangle is at the bottom.
- Cut a Hole for the Cylinder: Use your utility knife to cut a circle in the base, slightly larger than a toilet roll tube so that it can rotate freely.
Step 3: Assembling the Yarn Holder
Now, we'll assemble parts needed to hold and wind the yarn.
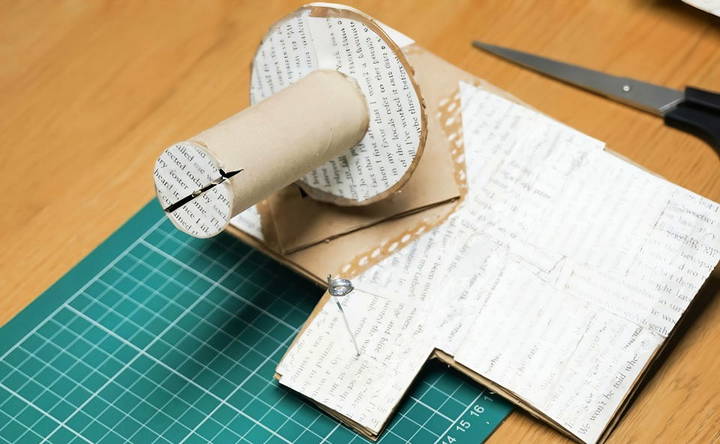
- Making Support Circles: Cut a circle out of corrugated cardboard to support your yarn. Attach the angled end of your first tube to the circle's center with glue.
- Adding Slots for Yarn: In the non-diagonal tube, cut a small slit at the top to hold the yarn's end and prevent it from slipping.
Step 4: Adding the Wire Guide
One of the key components is the wire guide, which maintains the yarn's tension and direction.
- Making the Guide: Use modeling wire to fashion a small spiral at one end. Push it through the base so that the spiral sits underneath for stability. Measure the desired height above the base and make a coil. The coil should be large enough for yarn to pass through easily.
Step 5: Final Assembly and Adjustments
Now, it's time to bring all the pieces together.
- Assembling the Pieces: Insert the tube through the base and secure with a cardboard square cut earlier. This will hold everything in place as you wind the yarn.
- Reinforcing and Decorating: Wrap duct tape around joints for reinforcement. Add decorative elements if desired, but avoid areas that need to rotate or move.
Step 6: Testing Your Creation
Let's see your DIY yarn winder in action:
- Setting Up: Clamp the base securely to a table to prevent movement.
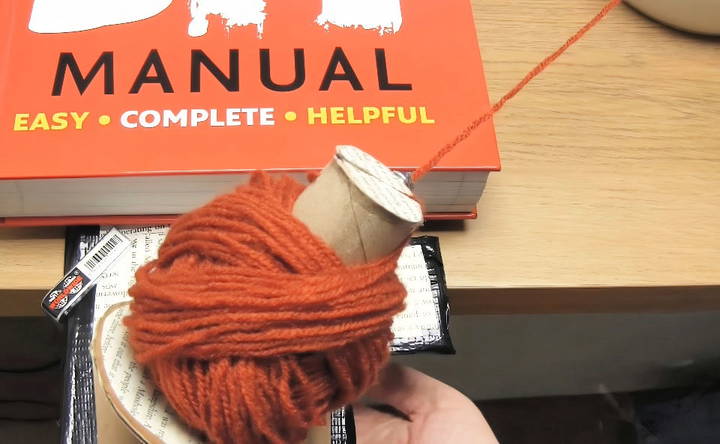
- Loading the Yarn: Place the yarn in a bowl, feed it through the wire guide, and down into the tube's slot.
- Winding the Yarn: Rotate the tube by hand to begin winding. As the ball forms, ensure even tension and adjust the yarn bowl to maintain consistency. Occasionally, rotate the yarn itself to achieve an even distribution on the tube.
Troubleshooting Common Issues
Here are a few solutions to common problems you might face:
- Uneven Yarn Tension: Use your free hand to maintain an even tension if the yarn starts to slack.
- Wobbly Base: Ensure the base is weighted down effectively. Heavy books or clamps can solve this issue.
- Stuck Yarn: If the yarn binds or sticks, check for rough edges along the cardboard or wire guide and smooth them out.
Customization Ideas
Customizing your DIY yarn winder can make it more personal and functional. Here are some easy and creative ideas to help you enhance your yarn winder:
Personalization Tips
- Paint and Decorate: Use acrylic paint to add colors and patterns to your yarn winder. Add stickers or decals for a fun and unique look. Consider using stencils to make intricate designs.
- Add Labels: Label different parts of the yarn winder for easy identification. Use waterproof markers or label makers for a clean finish.
- Use Washi Tape: Wrap washi tape around the handles or base for a colorful touch. Choose tapes with different patterns to make a vibrant design.
Functional Enhancements
- Add a Handle: Attach a small handle to make it easier to carry your yarn winder. Use a sturdy material like wood or plastic for durability.
- Improve Stability: Add rubber feet to the base to prevent slipping. Use a heavier base material to keep the yarn winder steady during use.
- Adjustable Parts: Make the yarn guide adjustable to accommodate different yarn sizes. Use screws or clamps to allow for easy adjustments.
- Storage Solutions: Attach small hooks or clips to hold extra yarn or tools. Add a small drawer or compartment to store accessories.
Creative Ideas
- Themed Designs: Customize your yarn winder to match your craft room theme. Use colors and decorations that reflect your personal style.
- Eco-Friendly Options: Use recycled materials for a sustainable project. Decorate with natural elements like twine or wooden beads.
- Interactive Elements: Add a small chalkboard section to jot down notes or project details. Incorporate a small clock or timer to keep track of winding time.
Tips for Customization
- Plan Ahead: Sketch your design ideas before starting to ensure a clear vision. Gather all materials and tools needed for customization.
- Test Modifications: Test any functional enhancements to ensure they work properly. Make adjustments as needed to improve usability.
- Safety First: Ensure all added elements are securely attached. Avoid using materials that could damage the yarn or winder.
By following these customization ideas, you can make a yarn winder that is not only functional but also uniquely yours.
Common Issues and Troubleshooting
When making and using a DIY yarn winder, you might encounter some common issues. Here are some problems you might face and how to solve them:
Yarn Slipping Off
- Problem: The yarn keeps slipping off the winder.
- Solution: Check tension: ensure the yarn is wound with consistent tension. Too loose or too tight can cause slipping. Adjust the guide: ensure the yarn guide is properly aligned and not too far from the winder. Secure the end: tie the yarn end securely to the winder before starting.
Uneven Winding
- Problem: The yarn winds unevenly, making lumps or gaps.
- Solution: Maintain steady speed: wind the yarn at a steady speed to avoid uneven tension. Guide the yarn: use your hand to guide the yarn evenly onto the winder. Check the winder: ensure the winder is rotating smoothly without any jerks.
Winder Jamming
- Problem: The yarn winder jams or stops rotating.
- Solution: Lubricate moving parts: apply a small amount of lubricant to the moving parts to ensure smooth operation. Clear obstructions: check for any yarn or debris caught in the winder and remove it. Check alignment: ensure all parts are properly aligned and not causing friction.
Yarn Breaking
- Problem: The yarn breaks while winding.
- Solution: Reduce tension: loosen the tension to prevent the yarn from breaking. Check yarn quality: use high-quality yarn that is less likely to break. Inspect the winder: ensure there are no sharp edges on the winder that could cut the yarn.
Winder Unstable
- Problem: The yarn winder is unstable and moves around.
- Solution: Secure the base: use a non-slip mat or rubber feet to keep the winder stable. Heavier base: consider adding weight to the base to prevent movement. Clamp down: use clamps to secure the winder to your work surface.
Yarn Tangling
- Problem: The yarn tangles while winding.
- Solution: Pre-wind the yarn: loosely wind the yarn by hand before using the winder to prevent tangles. Use a yarn swift: a yarn swift can help keep the yarn untangled and feed it smoothly to the winder. Guide the yarn: keep a gentle hand on it to guide it and prevent tangles.
Handle Issues
- Problem: The handle is hard to turn or uncomfortable.
- Solution: Lubricate the handle: apply a small amount of lubricant to make turning easier. Add padding: wrap the handle with a soft material like foam or cloth for a more comfortable grip. Check for obstructions: ensure no obstructions prevent the handle from turning smoothly.
By addressing these common issues, you can ensure your DIY yarn winder works efficiently and lasts longer.
FAQs about DIY Yarn Winders
Discover essential FAQs about DIY yarn winders, covering tools, techniques, and tips for efficient yarn winding. Get started now!
A yarn winder is a handy tool that helps you neatly and quickly wind yarn into center-pull balls or cakes. This makes your yarn easier to store and use, preventing tangles and knots. Making your own yarn winder can be a fun and cost-effective project, allowing you to customize it to your needs.
A simple DIY yarn winder typically consists of a base, a rotating spindle to hold the yarn, and a handle or crank to turn the spindle. The base can be made from various materials like wood, cardboard, or even repurposed items.
There are many creative ways to make a yarn winder at home. You can use a cardboard box, a toilet paper roll, or even a power drill as the base. The spindle can be a wooden dowel, a metal rod, or a pencil.
To use a yarn winder, attach the end of your yarn to the spindle and start turning the handle or crank. The yarn will wind neatly onto the spindle, forming a ball or cake. You can adjust the tension of the yarn by varying the speed at which you turn the handle.
Make sure your yarn winder is stable and secure before you start winding.
Be careful not to wind the yarn too tightly, as this can damage it.
If you're using a power drill as a yarn winder, make sure it's unplugged when you're not using it.
Personal Thoughts and Reflections
Making this DIY yarn winder was both an exercise in innovation and a lesson in patience. Each step required precision, and while it may not be as quick and effortless as a commercial yarn winder, the sense of accomplishment and usefulness was unmatched. Plus, it was a wonderful way to upcycle materials I already had at home!
The process taught me the importance of planning and precision—ensuring each piece fit perfectly and each glue joint held strong. I also improved my crafting skills, especially in working with cardboard, a deceptively versatile material.
Enjoy Your Handmade Yarn Winder!
And there you have it—a charming, functional yarn winder made with simple materials. It's a reminder that with a bit of imagination and effort, we can make solutions with our own hands. Give it a try, and enjoy the efficiency and beauty of a well-wound center-pull ball of yarn for your next knitting project.


