Fall is the perfect season to get creative with your home décor, and what better way to do it than with an affordable, beautiful wreath that adds a touch of autumn charm to your front door? This DIY dollar tree fall wreath is a fantastic project for anyone, whether you're a seasoned crafter or someone looking to try their hand at a new hobby. The best part? Most of the materials are budget-friendly and can be found at Dollar Tree!
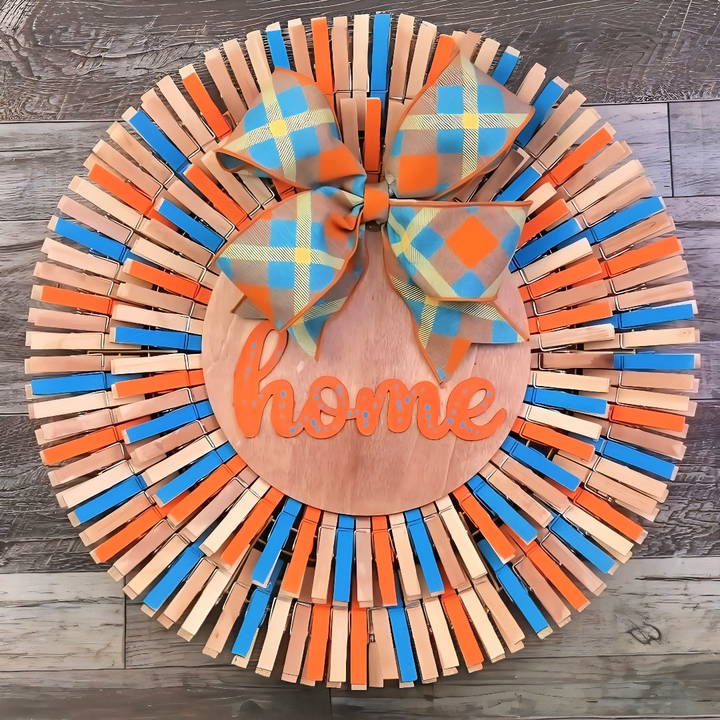
In this guide, we'll cover everything you need to know to make your very own Fall wreath using simple materials, including clothespins, a wire frame, acrylic paint, and a bit of ribbon. Follow these detailed steps to make a wreath that will bring warmth and color to your home for the entire season.
Materials Needed
Before diving into the step-by-step instructions, let's gather everything you'll need for this project:
- 14" Wire wreath frame – Found at Dollar Tree
- Wooden clothespins (5 packages of 32 clothespins per pack) – Also from Dollar Tree
- Decorative wooden round sign – Choose one with a design like “Home” from Dollar Tree
- 2.5" Wired ribbon – Approximately 78 inches; available at Michael's or other craft stores
- Acrylic paints – Blue from Dollar Tree, and orange and brown from Dollarama
- Cable ties or pipe cleaners – To secure your bow
- Glue gun and glue sticks
- Scissors
- Measuring tool (optional for precise measurements)
Now that you have all your supplies ready, let's begin crafting!
Step by Step Instructions
Make a stunning DIY fall wreath with dollar tree items! Follow our easy 5-step guide to craft a unique seasonal decoration at home.
Step 1: Prepping the Wooden Round Sign
We'll start with the wooden round sign that will serve as a focal point for the wreath. Here's how to paint and decorate it:
- Mix the Paint: Start by mixing a bit of brown acrylic paint into your orange paint. This makes a lovely rustic orange color, perfect for fall.
- Paint the Sign: Carefully paint the “Home” lettering on the wooden sign using the orange paint. Leave the sides and other areas untouched for a minimalist look.
- Add a Stain Effect: To give the wooden sign a rustic, weathered look, mix some brown acrylic paint with water to make a thin, stain-like wash. Use this to coat the background of the wooden round. This will emphasize the lettering and give the sign a cozy, vintage feel.
- Dot the Edges: Once the paint is dry, dip the end of your paintbrush into blue paint and carefully dot around the edges of the sign to tie in the blue color we'll be using on the clothespins. This adds a whimsical touch that unifies the design.
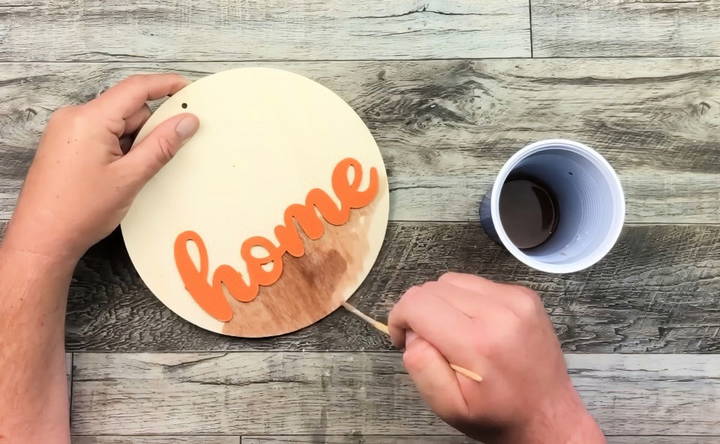
Set the sign aside to dry while we move on to painting the clothespins.
Step 2: Painting the Clothespins
Painting the clothespins is an essential part of this project, as they form the colorful “petals” of the wreath. Here's how to do it:
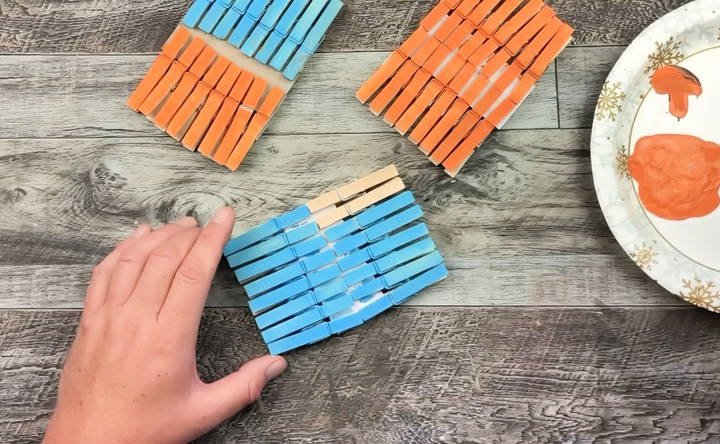
- Select Your Colors: For this wreath, we're going with a mix of orange, blue, and natural wood tones. You'll need to paint:
- 32 clothespins in blue
- 32 clothespins in orange
- 32 clothespins in natural brown stain (using the brown paint and water mixture from earlier)
32 clothespins left unpainted for a natural wooden look
- Paint Only the Tops: Unlike previous projects where the entire clothespin might be painted, for this wreath, we're only painting the tops. This helps save time while giving the wreath a more textured and layered appearance.
- Double-Coating: Apply two coats of paint to each clothespin to ensure the colors pop. Let them dry completely before assembling.
Step 3: Assembling the Wreath Frame
Now that your painted clothespins and wooden sign are dry, it's time to assemble everything:
- Prepare the Wire Wreath Frame: Flip the 14-inch wire wreath frame so the front faces down. You'll be working from the back to attach the clothespins.
- Attaching the Clothespins (Outer Layer)
- Take your first set of painted clothespins (15 per section) and start attaching them to the two outermost wires of the wreath frame.
- Each clothespin has two holes. The smaller hole should fit snugly onto the outer wire, and the larger hole will fit on the inner wire.
- Alternate between blue, orange, stained, and natural clothespins to make a visually interesting pattern. Continue this process for all six sections of the wreath.
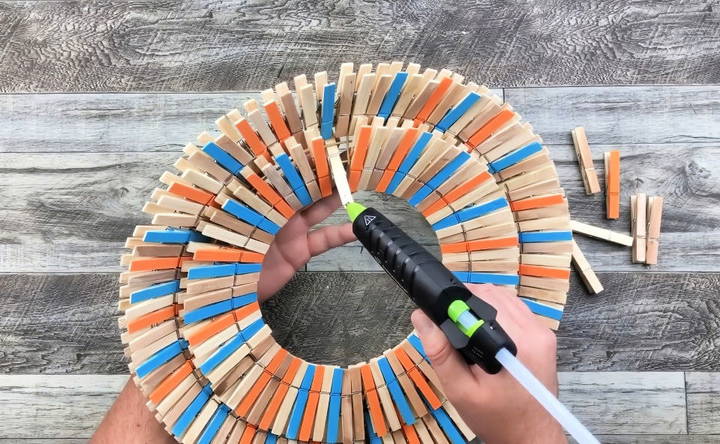
- Attaching the Clothespins (Inner Layer): For the inner layer, use 11 clothespins per section. This time, only attach the clothespins using the smaller hole, securing them to the innermost wire of the wreath frame.
- Be sure to vary the colors as you did with the outer layer.
- Securing the Clothespins: The inner clothespins may feel loose. To secure them, simply apply a dab of hot glue to the ends and press them firmly into place. This step ensures they don't shift or fall off over time.
Step 4: Making the Bow
No fall wreath is complete without a beautiful bow! Here's how to make a simple yet elegant bow for your wreath:
- Cut the Ribbon: Start by cutting a 48-inch piece of your 2.5-inch wired ribbon for the bow and a 30-inch piece for the tails. Dovetail the ends of the tails by folding the ribbon in half and cutting a small triangle from the edge to make a professional, finished look.
- Make the Bow Loops: Fold the 48-inch ribbon in half to find the center, then fold each end back to the center, making two loops on each side (an infinity or figure-eight shape).
Pinch the center with your fingers to hold the shape.
- Attach the Bow: Use a cable tie or pipe cleaner to secure the middle of the bow. Don't tighten it all the way just yet, as you'll need to feed the ribbon tails through before closing it completely.
- Cover the Cable Tie: To hide the cable tie, cut a small strip of ribbon, fold it in half, and wrap it around the center of the bow. Secure it with hot glue.
- Fluff the Bow: Adjust the loops and tails to your liking. The wired edges will help the bow maintain its shape.
Step 5: Final Assembly and Attaching the Bow
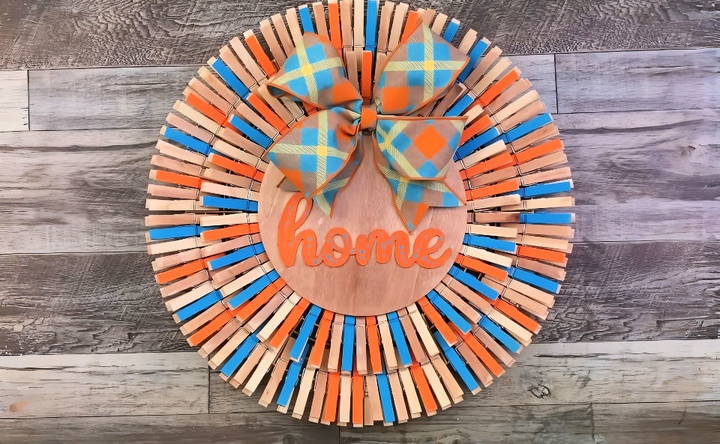
- Attach the Wooden Sign: Now that your wreath is fully assembled, it's time to attach the wooden sign. Generously apply hot glue to the back of the sign and press it firmly onto the wreath where you want it to sit. Hold it in place until the glue sets.
- Add the Bow: Attach the bow to the top or bottom of your wreath, depending on your preference. Use the pipe cleaner or cable tie to secure it to the wire frame. Be sure to position the tails so they don't cover the wooden sign.
- Make Adjustments: Once everything is in place, step back and make any necessary adjustments. Trim the ribbon tails if needed and ensure the clothespins are evenly spaced.
Conclusion
And there you have it—your very own DIY Dollar Tree Fall Wreath! This project is not only budget-friendly but also a beautiful way to welcome the fall season. The combination of natural and painted clothespins, along with the rustic wooden sign and bow, makes a unique wreath that stands out from traditional fall décor.
Whether you hang it on your front door or inside your home, this wreath will bring a touch of autumn warmth to any space. Plus, it's a fun project that you can customize with different colors, ribbons, or signage to suit your personal style.
Happy crafting, and enjoy your stunning new wreath!
FAQs About DIY Dollar Tree Fall Wreath
Discover expert tips and answers to common questions about making a DIY dollar tree fall wreath for an affordable autumn home decor project.
If the clothespins feel loose, especially on the inner layer, use a hot glue gun. Apply a small dab of glue to the end of each clothespin and press it firmly into place. This will help secure them and prevent them from moving around.
Yes, but it may not always provide better results. Spray paint can be faster but may lead to uneven coverage. Painting just the tops with acrylic offers more control and can create a cleaner look.
Clothespins can sometimes be in high demand. If you can’t find enough, try visiting multiple Dollar Tree locations, or consider purchasing bulk clothespins online. Some stores like Walmart or craft stores may also carry them.
To avoid the bow covering the sign, measure the ribbon tails before attaching them to the wreath. Dovetail the ends of the ribbon and trim them as needed so that the sign remains visible.
If you can’t find a wooden “Home” sign, consider using other fall-themed embellishments, such as mini pumpkins, leaves, or wooden letters from craft stores. Personalize your wreath with seasonal decorations that suit your style.
A helpful tip is to leave the clothespins on the cardboard they are packaged with while painting. This keeps your hands clean and makes painting more efficient. Just paint the tops while they’re still attached, then let them dry before removing them.
Absolutely! You can easily customize this wreath with different colors for different seasons or personal preferences. For instance, a black-and-white color scheme or even a red, white, and blue combination for patriotic holidays would work beautifully.
If your bow looks flat, make sure to use wired ribbon, which holds its shape better. Fluff the loops by gently pulling them apart and adjusting the wire for a fuller, more voluminous bow. Adding extra loops can also enhance the bow's appearance.
Allow the paint on the clothespins to dry for at least 30 minutes to an hour between coats. Two coats are recommended for a vibrant, even finish. Drying time may vary depending on the type of paint and the environment.
Yes, you can make a wreath using natural wood clothespins if you prefer a more rustic, neutral look. You can also alternate painted and unpainted clothespins for added texture and contrast.


