Building DIY steps on a slope seemed challenging at first, but it was easier once I followed a step-by-step guide. I gathered my tools, measured the slope, and planned each step. My family helped, making it a fun team effort. Soon, we had sturdy outdoor steps that looked great and worked well.
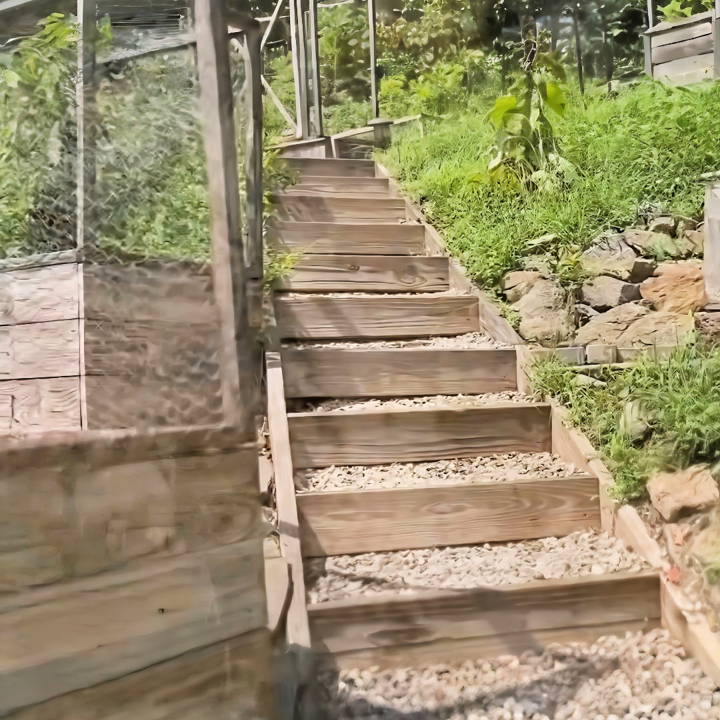
These hillside DIY steps added value and beauty to our yard. We used wood and gravel for the project, which saved money. Each step turned out solid and safe. This experience showed me that anyone can tackle such projects. I'm helping with this guide below; it will make your work easier and more enjoyable.
Building steps on a slope can transform your outdoor space. Let this guide inspire and assist you. Here's how you can begin:
Choosing the Right Materials
The first step in any DIY project is selecting the appropriate materials. For outdoor stairs on a slope, durability, and resistance to weather conditions are key. I opted for ground contact pressure-treated lumber, specifically 2x6s, for the main structure due to its strength and longevity. Pressure-treated lumber is essential for any outdoor project as it withstands moist soil and decays much better than untreated wood.
Tools Needed
- Tape measure
- Level
- Circular saw
- Drill
- Hammer
- Mallet
- Shovel
- Staples and staple gun
- Outdoor screws (3.5 to 4 inches long)
Each tool serves a specific purpose. The tape measure, level, and circular saw ensure your cuts and placements are precise. The drill, hammer, and mallet will be used for assembling the steps and securing them into the ground, while the shovel is necessary for preparing the ground where your stairs will be placed.
Step by Step Instructions
Learn easy DIY steps on a slope with our step-by-step instructions. Perfect for landscaping and gardening. Boost your outdoor space today!
Step 1: Planning and Preparation
Before diving into building, planning your stair layout is crucial. Measure your slope and decide on the number of steps you'll need. A good rule of thumb is ensuring each riser (the vertical part of the step) is no higher than seven inches for comfortable stepping.
Step 2: Building the First Box
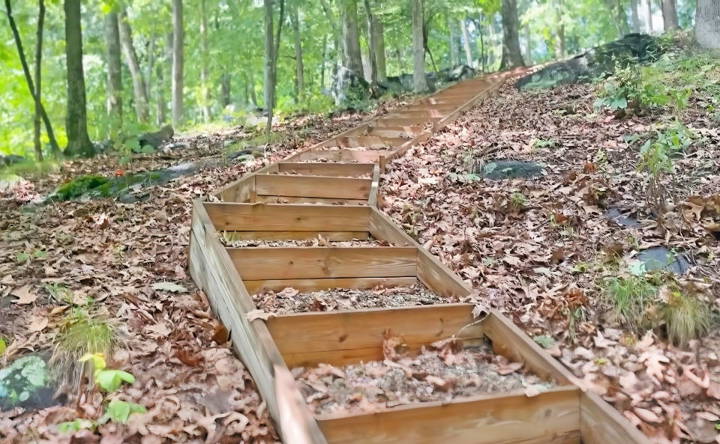
The stairs are constructed using box frames for each step, which are then anchored into the ground. Start by cutting your lumber to build the sides and tops of your box-frame. Use your drill to pre-drill holes to prevent splitting, and then screw the pieces together. Ensure the top of each riser is level to build evenly flat steps.
Step 3: Adding Weed Barrier
A crucial yet often overlooked step is attaching a weed barrier to the bottom of your box frame. This will prevent weed growth and ensure that your stairs remain neat and maintainable. Simply cut the barrier to size and staple it to the underside of your frame.
Step 4: Building and Placing Stakes
For added stability, I recommend cutting additional pieces of lumber into stakes. Make a small cut in the weed barrier where you'll insert the stake. Use a mallet to drive these stakes deep into the ground at the corners of your stair box-frame until they are slightly below the top of the riser. Secure these with screws from the outside.
Step 5: Setting the Steps and Repeating
After the first box is securely in place, you can begin setting your steps. Fill each box with gravel to ensure solid footing and prevent any future weed growth. It's imperative to use gravel instead of sand or dirt for longevity and maintenance reasons. Continue building box frames and follow the same process until you've reached the top of your slope.
Troubleshooting Common Issues
When constructing DIY steps on a slope, you may encounter several challenges. Here's how to troubleshoot common issues in a straightforward and understandable manner:
Steps Are Uneven
- Cause: Inaccurate measurements or shifting soil.
- Solution: Double-check measurements before cutting materials. For shifting soil, compact the ground properly before construction.
They Are Not Level
- Cause: Uneven foundation or incorrect placement of steps.
- Solution: Use a spirit level during installation to ensure each step is perfectly horizontal. Adjust as necessary before securing the steps.
Steps Are Slippery When Wet
- Cause: Smooth materials or lack of tread.
- Solution: Choose materials with natural texture or add anti-slip treads. Ensure proper drainage to prevent water accumulation.
Steps Are Too Steep
- Cause: Incorrect riser height or insufficient tread depth.
- Solution: The rise of each step should be between 4-7 inches, and the tread around 11-12 inches. Adjust the design if outside these ranges.
Water Erosion Around Steps
- Cause: Inadequate drainage or runoff management.
- Solution: Install drainage systems like French drains or gutters. Use landscaping to redirect water flow away from the steps.
Materials Deteriorating Quickly
- Cause: Poor quality materials or exposure to harsh weather.
- Solution: Invest in high-quality, weather-resistant materials. Apply sealants or protective coatings as needed.
Steps Do Not Complement Landscape
- Cause: Design mismatch or inappropriate material choice.
- Solution: Plan the aesthetics in advance. Choose materials and designs that blend with the natural surroundings.
Patience and careful planning are key to resolving these issues. Always prioritize safety and durability over aesthetics.
Safety Considerations
Ensuring the safety of your DIY steps on a slope is paramount. Here's how to approach this task with the utmost care:
Sturdy Construction
- What to do: Use strong, durable materials and secure connections.
- Why it's important: Robust construction prevents collapse and withstands weather conditions.
Proper Measurements
- What to do: Adhere to standard measurements for riser height and tread depth.
- Why it's important: Correct dimensions reduce the risk of tripping and falling.
Slip Resistance
- What to do: Incorporate textured surfaces or anti-slip materials.
- Why it's important: This minimizes accidents, especially in wet or icy conditions.
Handrails
- What to do: Install handrails on both sides of the steps.
- Why it's important: Handrails provide stability and support, particularly for children and the elderly.
Visibility
- What to do: Ensure each step is visible, possibly by using contrasting colors or lighting.
- Why it's important: Good visibility helps prevent missteps and falls.
Drainage
- What to do: Design the steps to allow for proper water drainage.
- Why it's important: Preventing water accumulation reduces slip hazards and structural damage.
Regular Maintenance
- What to do: Inspect and maintain the steps regularly.
- Why it's important: Ongoing upkeep ensures the steps remain safe over time.
By prioritizing safety, you'll ensure the steps are both functional and secure. Always make safety the priority in any DIY project. Doing things correctly from the start pays off with reliable and safe steps.
FAQs About Easy DIY Steps on a Slope
Discover essential FAQs about easy DIY steps on a slope. Learn simple, effective methods to effortlessly enhance your outdoor space.
You can measure the slope by:
Placing a stake at the top of the slope.
Tying a mason’s string around the bottom of the stake.
Running the string to the bottom of the slope where another stake is placed.
Using a line level to ensure the string is level.
Measuring from the string to the ground at the bottom.
Dividing the height in inches by 6 to 8 to determine the number of steps.
Yes, you can build steps on a slope without concrete by using alternative methods such as:
Building box steps with lumber and filling them with gravel.
Using landscape timbers and rebar for stability.
Stacking stones and flagstone chips for a natural look.
To ensure safety and stability:
Use ground contact pressure-treated lumber.
Secure the steps with rebar or wood cleats.
Make sure each step is level and properly aligned.
Fill gaps with decomposed granite or rocks.
Consider adding a handrail for additional support.
To make sure your steps blend seamlessly with your garden, consider:
Using materials that match your garden’s aesthetic, like natural stone or wood.
Incorporating surrounding plants and shrubs to soften the edges of the steps.
Choosing colors that complement the existing elements in your garden.
The easiest type of DIY steps to build on a slope are:
Concrete block steps: They are straightforward to arrange and can be easily fitted into the landscape's design.
Wooden box steps: These can be constructed with minimal tools and filled with gravel for stability.
Conclusion
Don't be intimidated by building DIY outdoor stairs for slopes. Start with these easy DIY steps, and you'll have a beautiful staircase in no time.


