When it comes to DIY home projects, sometimes things don’t go as planned. This is especially true when dealing with older, weathered surfaces like a porch or deck. One Reddit user recently shared their experience of trying to help their grandpa fix a weathered porch using some unconventional methods. The result? An unintended disaster that needed a lot of fixing. In this article, I’ll walk you through the steps to correct common deck stain mistakes based on their experience and provide some expert tips to ensure your deck looks great and stands up to the elements.
Understanding the Problem: When DIY Goes Wrong
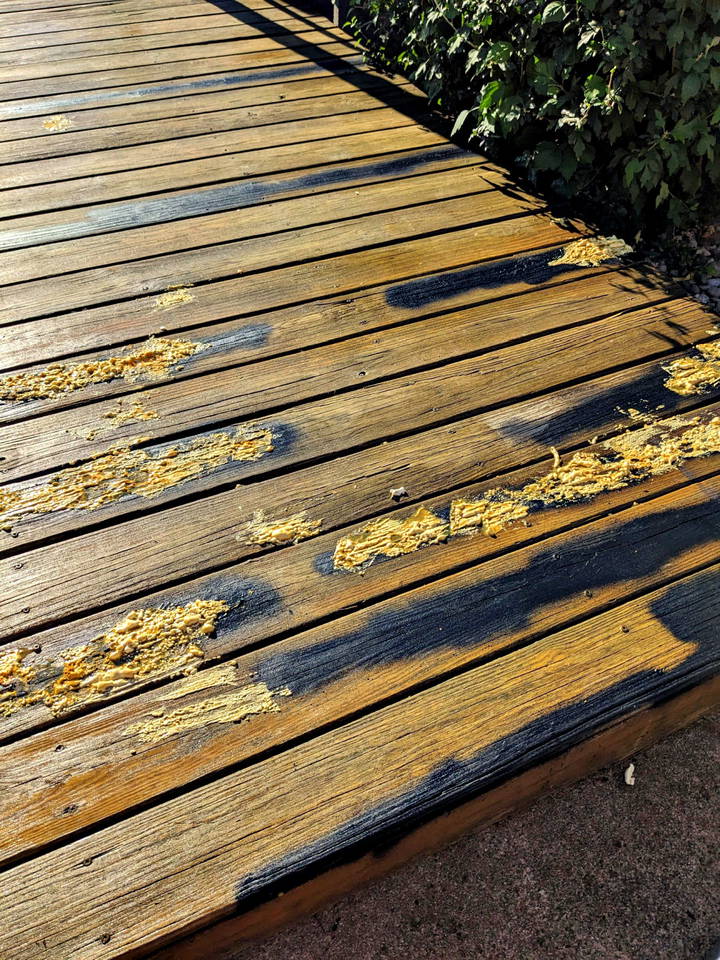
In the shared story, the user’s grandpa decided to fill cracks in his aging deck using Gorilla Glue's rubberized sealant spray, believing it would dry clear. Unfortunately, it didn’t. Instead, it dried black, causing an unsightly mess. To make matters worse, the cracks were filled with an unidentified wood filler, which wasn’t smoothed out properly. Then, a wood stain was applied over the filler, resulting in a patchy, uneven finish that highlighted every mistake.
Mistakes like these are more common than you might think. Many people rush into DIY projects without fully understanding the materials they’re using or the proper steps involved. Here’s how to fix these mistakes and prevent them from happening in the future.
Step-by-Step Guide to Fixing Deck Stain Mistakes
1. Assess the Damage and Gather Necessary Tools
First, evaluate the extent of the damage. If there are areas where the sealant or filler is heavily built up or where the stain is blotchy and uneven, you may need to remove these layers before applying a new finish. Here’s what you’ll need:
- Deck sander or belt sander
- Sandpaper (coarse and fine grits, like 60-grit and 220-grit)
- Scraper or putty knife
- Pressure washer
- Quality wood filler (like Durham's Rock Hard Putty)
- Deck cleaner or wood brightener
- Stain or paint
- Safety gear (respirator, gloves, and eye protection)
Make sure to have all your materials ready before starting. Preparation is key to minimizing mistakes and ensuring a smooth process.
2. Remove the Old Sealant and Filler
Before you start sanding, scrape off as much of the Gorilla Glue rubberized sealant as you can. A sharp scraper or putty knife will help remove the bulk of it. This is crucial because if the sealant is left on the surface, it will quickly gum up your sanding belts, costing you time and money.
Pro Tip: If the sealant is stubborn, consider using a heat gun to soften it, making it easier to scrape off. Always take safety precautions when working with heat.
3. Sand Down the Surface
After scraping, it’s time to sand. Renting a deck sander is often the most efficient method, especially for large areas. Start with a coarse 60-grit sandpaper to remove the old stain, filler, and remaining sealant residue. Once you have a relatively smooth surface, switch to a finer 220-grit paper to create a smooth finish ready for staining.
Make sure to sand evenly to avoid creating low spots or uneven surfaces. If you're working on pressure-treated wood, wear a respirator to avoid inhaling harmful dust.
Pro Tip: If any nails or screws are sticking up, hammer them down or countersink them slightly to avoid tearing your sanding belts.
4. Replace Severely Damaged Boards
If some boards are beyond repair or require excessive filling, consider replacing them entirely. Removing a damaged board and replacing it with a new one can save time and ensure a more durable, professional finish. Unscrew the damaged board, measure and cut a new one, and screw it in place.
Pro Tip: New boards should be stained or treated to match the existing deck for a uniform look. Consider treating the ends with a wood preservative to prolong the life of the wood.
5. Clean the Deck Thoroughly
Before applying any new finish, make sure the deck is clean. Use a pressure washer to remove dust, debris, and any remaining bits of old stain. Follow up with a deck cleaner or wood brightener to restore the wood's natural color and pH balance. This step ensures the new stain adheres properly and evenly.
Pro Tip: Be careful not to use too much pressure when washing, as it can damage the wood fibers, leading to a rough surface that needs additional sanding.
6. Apply Wood Filler Where Needed
For minor cracks or holes that don't require board replacement, use a high-quality wood filler like Durham’s Rock Hard Putty. Mix it to a slightly runny consistency for easier application. Fill the cracks, making sure to overfill slightly, and allow it to dry completely. Once dry, sand it smooth to blend with the surrounding wood.
7. Choose the Right Finish: Stain or Paint?
Once the deck is prepped, decide whether you want to stain or paint it. Stains come in different opacities, from semi-transparent to solid. A semi-transparent stain allows the wood grain to show through, while a solid stain offers more protection and a longer-lasting finish but hides the grain.
If you decide to paint, choose a product designed for decks, such as a Porch & Floor Enamel. Add a non-slip additive like Shark Grip for added safety, especially in wet conditions.
8. Apply the Stain or Paint
Apply the stain or paint using a brush, roller, or sprayer, following the manufacturer's instructions. Be sure to work in manageable sections and maintain a wet edge to prevent lap marks. Allow the finish to dry thoroughly between coats, and apply a second coat if needed for enhanced durability and coverage.
Pro Tip: Staining should ideally be done when the temperature is mild, and the humidity is low to ensure even drying and optimal results.
9. Regular Maintenance
To keep your deck looking great, perform regular maintenance. Clean the deck annually and reapply stain or paint as needed, depending on the wear and weather conditions. This will help protect the wood and keep your deck looking fresh for years to come.
Key Takeaways
Fixing a poorly stained deck requires patience and attention to detail. By properly removing old finishes, sanding evenly, replacing damaged boards, and choosing the right stain or paint, you can turn a DIY disaster into a deck that adds beauty and value to your home. Remember, preparation is key, and always test products in a small, inconspicuous area first to ensure they deliver the results you expect. With these steps, you’ll be able to correct those mistakes and achieve a professional-looking finish that lasts.
FAQ: Fixing DIY Deck Stain Mistakes
Here’s a concise FAQ section to address any lingering questions or provide additional clarity for those tackling DIY deck repair and staining projects.
If sanding doesn’t completely remove the black Gorilla Glue sealant or if it’s embedded deeply, consider using a deck paint instead of a stain. Deck paint can provide a solid, uniform finish that covers any remaining discoloration. Additionally, deck paint can be mixed with traction grit for extra safety, which is especially helpful for elderly family members to prevent slips.
Yes, flipping the boards can be a viable option if the underside is in good condition. This can save you from having to sand extensively or replace the boards entirely. However, ensure the flipped side is thoroughly cleaned and prepared before staining or painting. This is a good solution if only the top surface is damaged or weathered.
For decks, you need a wood filler that finishes hard and can withstand foot traffic and weather conditions. A product like Durham’s Rock Hard Putty is ideal because it creates a durable surface that won’t wear down quickly. Avoid soft fillers like caulk or general-purpose sealants, as they won’t last long under constant use.
To prevent rusting, use a rust-blocking spray primer on all exposed screw or nail heads. This helps slow down oxidation and prevents ugly rust stains from developing over time. Rust stains can ruin the look of a freshly stained or painted deck, so it’s worth the extra step to protect your work.
Yes, when using a pressure washer, avoid using too high a pressure setting. A medium setting is usually sufficient to clean the wood without damaging it. Too much pressure can gouge the wood, causing more issues that would require additional sanding or filler. Always test on a small, inconspicuous area first.
The frequency of resealing or repainting depends on the type of finish you choose. For semi-transparent stains, plan to reapply every 3-5 years, depending on the weather exposure and foot traffic. Solid stains or deck paints can last 5-7 years or more. Regular cleaning and maintenance will help prolong the life of your finish.
If your deck is made from pressure-treated wood, be aware that sanding can remove the treatment that protects against rot. Always wear a respirator while sanding to avoid inhaling potentially harmful dust. After sanding, consider applying a wood preservative to any exposed areas to maintain protection against moisture and decay.


