Building your own raised garden bed is a great way to enhance your gardening experience. Not only do raised beds provide better drainage, but they also offer easier access and control over the soil. In this comprehensive guide, we will show you how to build a DIY galvanized steel raised garden bed for less than $75. This project is ideal for beginners or experienced gardeners looking to add a durable, rot-resistant bed to their garden.
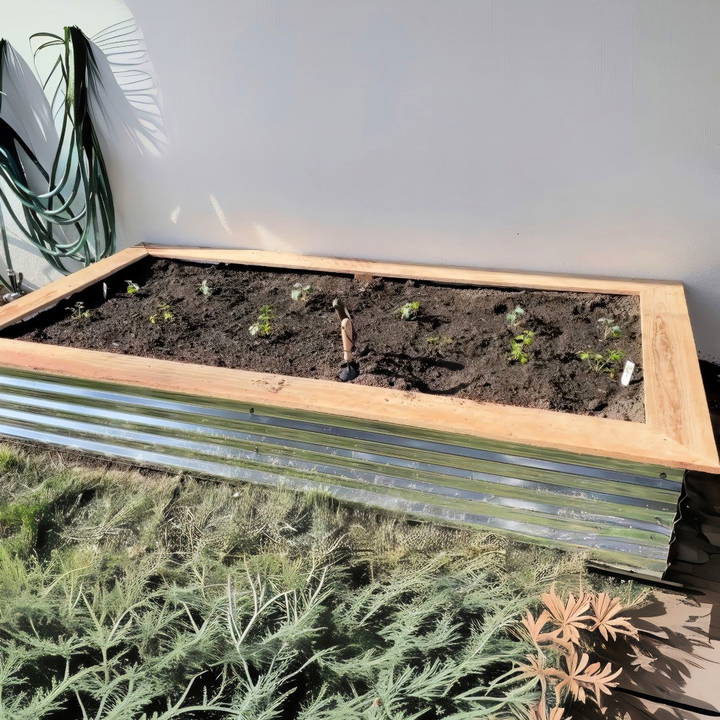
Why Choose a Galvanized Steel Raised Garden Bed?
Galvanized steel raised beds have several advantages over traditional wooden or plastic raised beds. Here are some key benefits:
- Durability: Unlike untreated wood, galvanized steel does not rot. It can withstand harsh weather conditions and resist corrosion, making it a long-lasting option for your garden.
- Cost-Effective: Using galvanized steel roofing panels is an affordable alternative to more expensive raised bed kits. You can build a large 4x8 garden bed for under $75.
- Aesthetics: Galvanized steel has a modern, sleek look that fits well in both urban and rural garden settings.
- Sustainability: Steel is recyclable, and by using redwood for the frame, you're choosing an environmentally friendly option that can be replaced sustainably over time.
Now, let's dive into the step-by-step instructions.
Materials and Tools You Will Need
Discover essential materials and tools for your project. Get prepared with this comprehensive checklist to ensure success every step of the way.
Materials:
For a standard 4x8 raised garden bed, you will need the following materials:
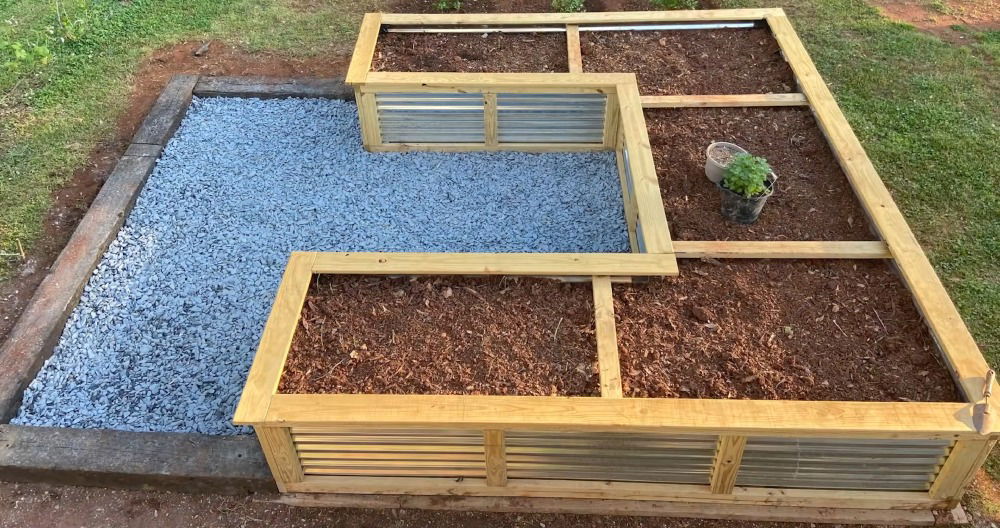
- (1) 26” x 12' Corrugated Galvanized Steel Roof Panel: This will be used for the sides of your garden bed.
- (1) 4”x4”x8' Redwood Post: You'll cut this post into six sections to provide corner and side support.
- (3) 1”x6”x8' Redwood Boards: These will be used for the caps, adding a finishing touch to the top of the bed.
- (10) 1.5” Exterior Wood Screws: For securing the redwood caps.
- (20) 1” Steel Roofing Screws: To attach the galvanized steel panels to the redwood posts.
Tools:
- Miter Saw or Circular Saw: Used for cutting wood to size.
- Screw Gun or Impact Driver: To drive screws into the metal and wood.
- Angle Grinder with a Metal Cut-Off Wheel: Essential for cutting the galvanized steel roofing panels.
- Tape Measure: To ensure precise measurements.
- Speed Square: Helps to make accurate cuts and angles.
- Pen or Pencil: For marking cut lines.
- Safety Goggles and Hearing Protection: To protect yourself while cutting steel and wood.
Step by Step Instructions
Learn how to build a DIY galvanized steel raised garden bed with our step-by-step guide. Enhance your garden's design and maintenance today!
Step 1: Cutting the Redwood Posts
Start by cutting your 4x4 redwood post into six equal sections of 14 inches each. These will serve as the support posts for the sides and corners of the raised bed. You will place one post in each corner of the bed and one in the middle of the long sides to add stability.
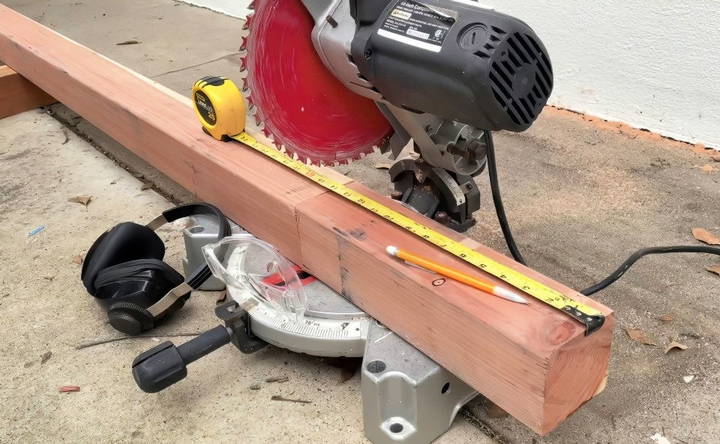
- Pro Tip: Use a miter saw for clean and accurate cuts. If you don't have one, a circular saw will also work.
Step 2: Cutting the Galvanized Steel Panels
Next, you'll need to cut your 26” x 12' galvanized steel roofing panel into two sections. Each half will form the long sides of the bed. The panel's width (26 inches) is ideal for a bed height of approximately 13 inches, which is deep enough for most vegetables and plants.
- Measure and mark the steel panel at 13 1/8 inches along the length. This gives you two halves of equal height.
- Use an angle grinder with a metal cut-off wheel to make the cut. Be sure to wear safety goggles and hearing protection, as cutting metal can be noisy and build sparks.
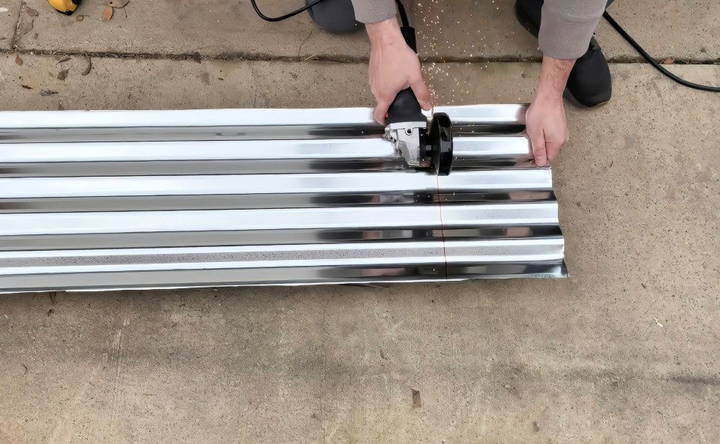
Pro Tip: Rest the steel panel on top of scrap wood (such as leftover 4x4 posts) while cutting to avoid damaging your work surface and to make the cutting process easier.
Step 3: Assembling the Sides
Once your galvanized steel panels are cut, you're ready to start assembling the sides of the bed. You'll attach the steel panels to the 4x4 posts using the 1” steel roofing screws.
- Lay out your posts: One at each corner and one in the middle of the long sides.
- Place the cut side of the steel panel toward the ground. This overhang will add extra support when buried slightly in the soil.
- Attach the steel panels to the posts using two screws per post: one near the top and one near the bottom. Make sure to leave a small gap of about 1/8 inch at the top to allow the metal to flex and fit flush against the post.
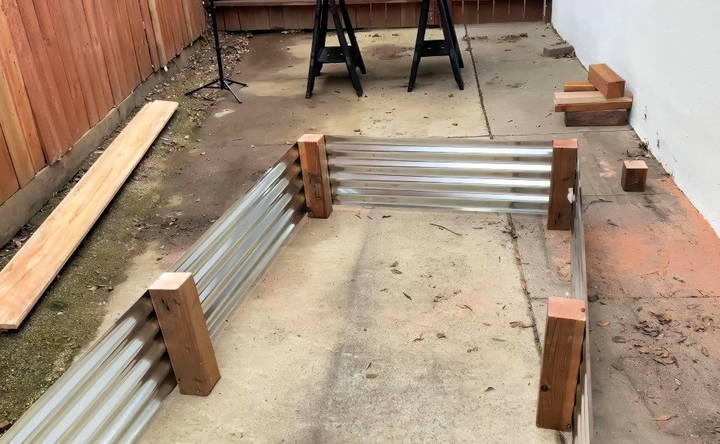
Pro Tip: You don't need to pre-drill holes, as the steel roofing screws are self-tapping. This will save you time and effort during assembly.
Step 4: Adding the Redwood Caps
To finish the bed and give it a polished look, you'll add redwood caps along the top edges of the bed.
- Cut the 1x6 redwood boards into four pieces. The long sides should be cut to 92 inches, and the short sides should be 44 inches. You can make these cuts with a circular saw or miter saw.
- For a seamless fit, cut the ends of each board at 45-degree angles using a speed square to guide your cuts.
- Attach the caps to the top of the bed using the 1.5” exterior wood screws. Ensure that the caps are aligned with the inner edge of the 4x4 posts for a clean look.
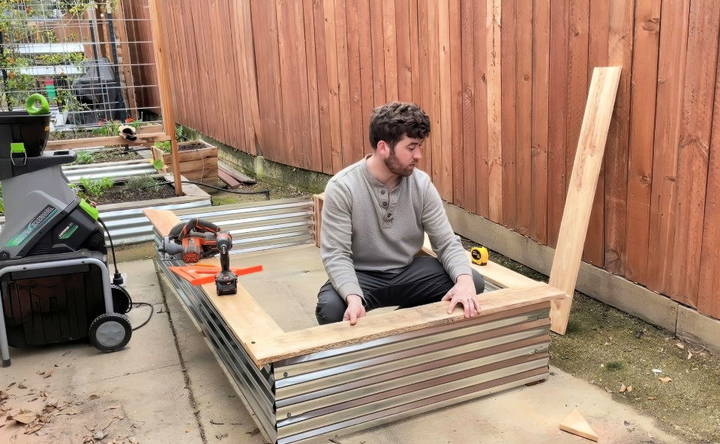
Pro Tip: Install the long caps first, then cut and measure the shorter pieces for a perfect fit. If the caps don't fit flush, check that your frame is square, and make small adjustments as needed.
Design Considerations and Improvements
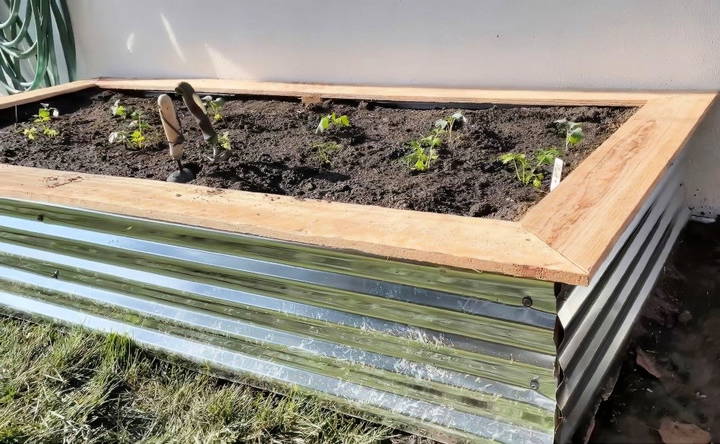
When first constructing this bed design, some improvements were made after the initial build. Here's what was adjusted for better performance and aesthetics:
- Adjusting for Caps: Initially, the bed was built as a true 4x8 structure, but it was found that this left too much overhang under the caps, resulting in wasted growing space and more soil usage. Reducing the bed's dimensions slightly ensures the caps fit snugly and minimize wasted soil.
- Enhanced Stability: By adjusting the cap design, the bed becomes sturdier, providing a better surface to lean on and preventing the sides from bowing outward.
- Aesthetics: The improved design not only looks cleaner but also maximizes the available planting space.
Tips for Filling and Maintaining Your Raised Bed
- Soil Mix: Fill your raised bed with a high-quality garden soil mix. A blend of 50% topsoil, 30% compost, and 20% peat moss is ideal for most gardens.
- Mulch: Consider adding a layer of mulch on top to retain moisture and reduce weeds.
- Watering: Raised beds tend to drain faster than in-ground beds, so be sure to water regularly, especially during dry spells.
- Seasonal Maintenance: Every year, replenish the soil with fresh compost and check for any signs of wear on the wood caps or metal panels.
Conclusion: Start Your DIY Garden Today
Building a galvanized steel raised garden bed is an excellent way to build a durable, cost-effective, and beautiful addition to your garden. The design is simple yet effective, providing a sturdy structure that resists both rot and rust. In just a few hours and with basic tools, you can build a functional 4x8 raised bed for under $75.
Whether you're a novice or an experienced gardener, this DIY project is a fantastic way to improve your growing space and ensure healthy, productive plants. Happy gardening!
FAQs About DIY Galvanized Steel Raised Garden Bed
Discover quick answers to common questions about DIY galvanized steel raised garden beds, a durable and stylish gardening solution.
Using sturdy materials like galvanized steel panels minimizes bowing. The 4x4 posts placed in the middle of the long sides provide additional stability. Properly securing the metal with roofing screws into the posts helps prevent any significant movement of the sides.
Yes, as long as the metal is in good condition. Galvanized or coated metal, such as leftover roofing, works well. Just ensure it's not too rusted to maintain durability and longevity in the garden bed.
It’s optional. You can place cardboard or landscape fabric at the bottom if you’re concerned about weeds. This also helps prevent grass or weeds from growing through the bed while still allowing for good drainage.
No, galvanized steel does not retain heat excessively. Even in hot temperatures, the metal remains cool to the touch and won’t overheat the soil, so it’s safe for your plants.
The galvanized steel panels are cut in half, making the garden bed 13 inches deep. This depth is sufficient for most vegetables, flowers, and herbs.
Galvanized steel is highly resistant to rust, especially in a garden environment. These panels should last 15-20 years with minimal maintenance. However, if you live in a particularly humid or coastal area, inspect periodically for any early signs of corrosion.
Redwood and cedar are naturally rot-resistant woods. While not completely rot-proof, they should last 15-20 years, especially if kept out of constant moisture. Avoid using pressure-treated wood, which can leach chemicals into the soil.
Use metal roofing screws to attach the galvanized steel panels to the posts. These screws are self-tapping, so there's no need to pre-drill holes. Ensure you have a hex bit for your drill to fit the screws properly.
Absolutely! While this guide focuses on a 4x8 bed, you can adjust the length or width to suit your garden space. Just ensure you maintain adequate support with 4x4 posts along the sides to prevent bowing.
Fill your bed with a high-quality garden soil mix. A combination of topsoil, compost, and peat moss works well for most plants. If you want to save on soil, consider using hugelkultur, which involves placing logs or branches at the bottom to fill space and promote slow decomposition.


