If you're a guitarist and suddenly find yourself without a capo, don't worry—you can make one right at home with just a few common household items. This guide will walk you through making a homemade DIY capo using items that are likely within arm's reach: a pen or pencil, a rubber band or hair tie, and optional masking tape. This DIY capo won't be as polished as a store-bought one, but it works surprisingly well for practice sessions or in a pinch during live performances.
What is a Capo, and Why Use One?
A capo is a clamp-like tool that presses down on all the strings of a guitar across a particular fret, effectively raising the pitch of the guitar. It's especially useful for changing the key of a song without altering chord shapes. If you've misplaced or forgotten your capo, you can make this quick and simple DIY version to get back to playing right away.
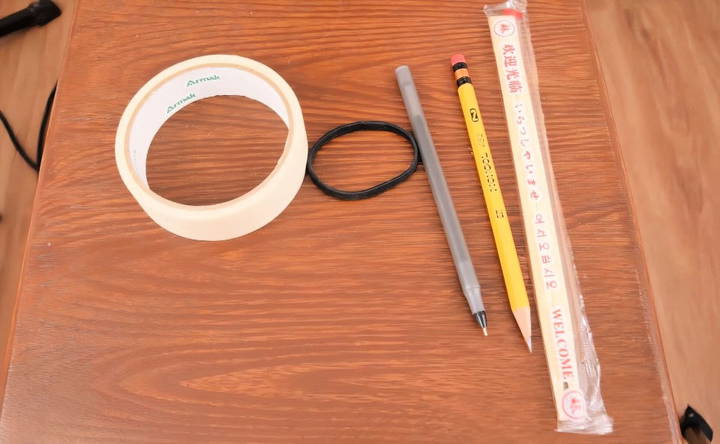
Materials You'll Need for Your DIY Capo
Here's what you'll need:
- Pen or Pencil: Preferably smooth and round, to avoid damage to your guitar strings.
- Rubber Band or Hair Tie: Choose one that's strong but elastic enough to wrap around the guitar neck.
- Masking Tape (Optional): This protects the guitar neck from scratches or pressure marks from the rubber band.
These items make up a basic DIY capo that's easy to assemble and effective for most standard playing situations.
Step by Step Instructions
Learn how to make a DIY capo with easy step-by-step instructions. Ideal for guitarists seeking a simple, cost-effective solution.
Step 1: Choose the Right Tools
- Pen or Pencil: A ballpoint pen with a smooth surface works best, as it reduces friction with the strings and won't leave behind splinters or marks.
- Alternative Options: In place of a pen, you could also use a pencil or even chopsticks if they're within reach.
Choose a tool that's long enough to span all six strings of your guitar at the fret where you want to place the capo.
Step 2: Protect Your Guitar Neck (Optional but Recommended)
- Use Masking Tape: Flip your guitar over and apply a piece of masking tape to the back of the neck at the fret where you'll place the capo. This tape serves as a buffer, protecting your guitar's finish from any potential wear from the rubber band.
- For instance, if you're placing the capo on the third fret, apply the masking tape just behind that fret.
Using masking tape isn't strictly necessary, but it's a good precaution, especially if you plan on using this DIY capo frequently.
Step 3: Prepare the Rubber Band or Hair Tie
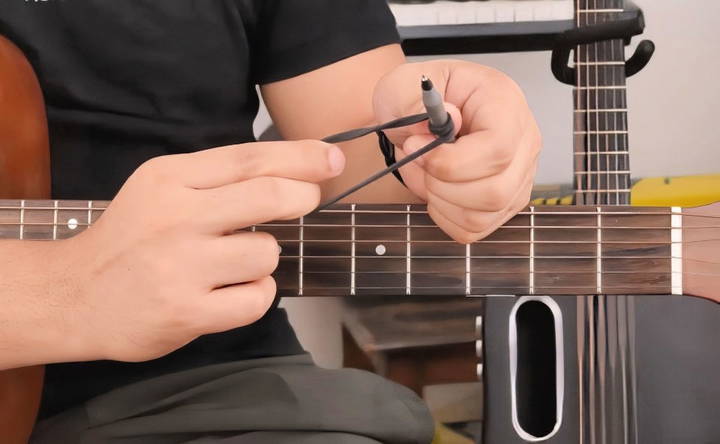
- Wrap the Rubber Band: Begin by wrapping one end of the rubber band around the pen or pencil.
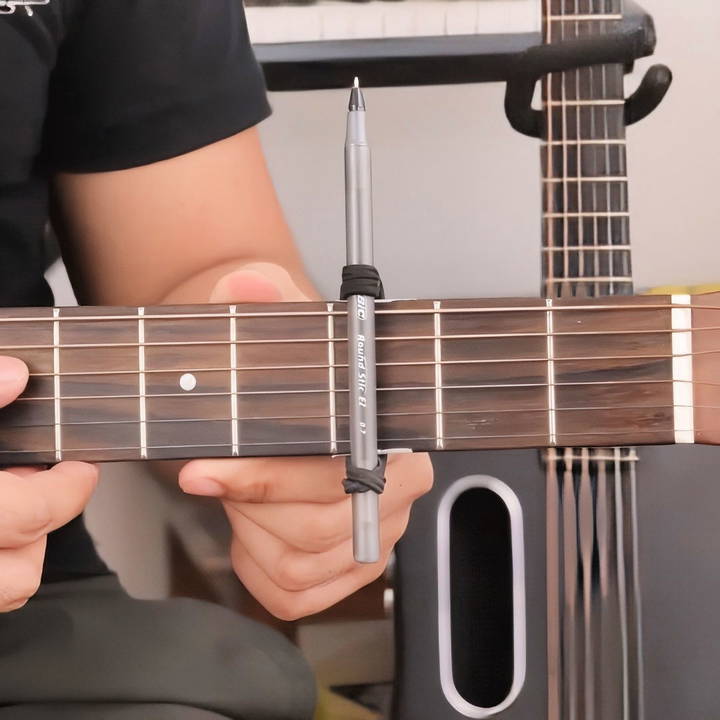
- Make a Secure Loop: After making a loop on the pen, place it across the fret you want to use as your capo (for example, the third fret). The pen should be positioned just behind the metal fret bar for the best sound and stability.
Step 4: Attach the DIY Capo to the Guitar Neck
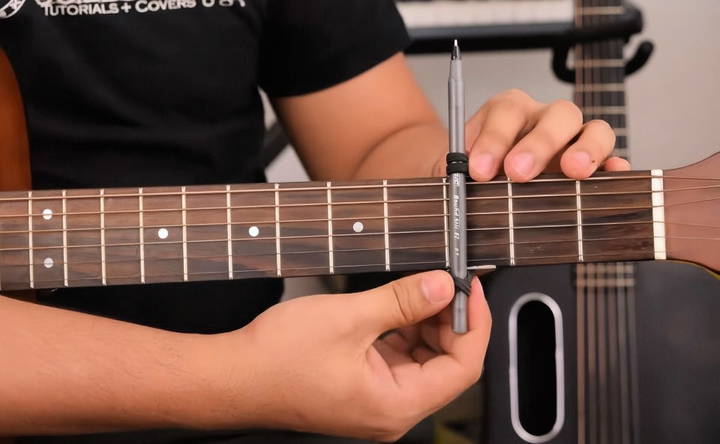
- Position the Pen on the Fret: Place the pen over the fret where you want to make a capo effect. Keep it as close to the metal fret wire as possible for optimal tension on the strings.
- Secure the Rubber Band: Wrap the rubber band around the guitar neck, then secure it by hooking it under the bottom of the pen. This tension should clamp the pen onto the strings, effectively acting as a capo.
Step 5: Adjust the Tension for Better Sound Quality
- Add Loops for More Pressure: If the rubber band isn't tight enough to press down all the strings uniformly, try twisting the rubber band to make additional loops around the pen. Each extra loop adds more tension, ensuring the strings are properly clamped.
- Test the Sound: Strum each string individually to ensure they all ring clearly. If some strings aren't ringing out, add another loop or reposition the rubber band to increase the tension.
Step 6: Move the DIY Capo to Different Frets
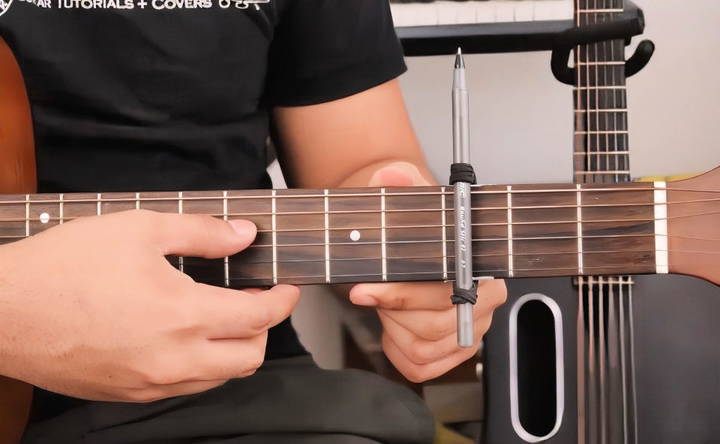
- Flexibility of the DIY Capo: One of the benefits of this DIY capo is that you can easily move it up or down the fretboard, just like a store-bought capo. If you want to switch to a different fret, simply remove the capo, add masking tape if needed, and reattach it on the new fret.
Tips and Tricks for Using a DIY Capo
- Use Strong Rubber Bands: Thin or weak rubber bands might not provide enough tension, leading to buzzing or muted strings. Opt for a stronger band if you can.
- Test the Sound on Each Fret: This DIY capo can work on any fret, but it's helpful to test the sound quality each time you move it. Higher up the neck, you may need more loops to ensure the strings are fully clamped.
- Experiment with Different Objects: If a pen doesn't work perfectly, try a pencil, a chopstick, or any similarly shaped object. The key is finding something long enough to press down on all strings evenly.
- Avoid Permanent Markers: While it might seem like a suitable choice, permanent markers can leave marks on your strings or fretboard. Stick to a pen with a smooth, neutral surface.
Benefits and Limitations of a DIY Capo
Explore the benefits and limitations of a DIY capo for guitars, including cost-saving, custom fit, and potential durability concerns.
Benefits
- Convenience: You can make this capo anywhere with minimal materials.
- Cost-Effective: No need to buy a capo if you only need it temporarily.
- Customizable: You can adjust the rubber band's tension to fit your guitar's needs.
Limitations
- Inconsistent Tension: A DIY capo may not provide the same even tension as a professional capo, leading to slight differences in sound quality.
- Less Durable: Rubber bands and hair ties can snap or wear out more quickly than a store-bought capo.
- Limited Reliability for High-Action Guitars: If your guitar has high action (a larger distance between strings and fretboard), this DIY capo may struggle to press down the strings sufficiently.
Conclusion: Make Music Anywhere with a DIY Capo
Learning to make a DIY capo can be a lifesaver, allowing you to keep playing even if you lose or forget your capo. With just a pen, a rubber band, and a bit of tape, you have everything you need to make this handy little tool. This DIY solution may not replace a professional capo entirely, but it's an effective and budget-friendly option for practice or spontaneous jam sessions.
So next time you're in a bind, don't worry—grab a pen and a rubber band, and you'll have your guitar capo in minutes.
FAQs About DIY Capo
Get answers to all your DIY capo questions. Discover how to make and use them easily, enhancing your guitar playing skills.
Yes, you can also use a hair tie, which may offer a bit more durability than some rubber bands. Try to find one that’s elastic yet strong enough to hold tension.
If you use masking tape on the back of the neck, the risk of damage is minimal. However, without tape, frequent use could leave slight marks on the neck from the rubber band.
While a DIY capo is a fantastic temporary solution, a store-bought capo is generally more reliable for consistent tension, especially in complex playing situations. However, for practice sessions or casual use, this DIY capo is often sufficient.
If you don’t have masking tape, try any non-adhesive material like a thin cloth or a tissue to wrap around the guitar neck. This prevents damage from the rubber band without leaving sticky residue.
Try doubling or tripling the rubber band around the pen for more tension. Adding extra loops around the neck can increase pressure and prevent buzzing on the strings.
Yes, items like chopsticks or a similar-sized object can work as long as it’s smooth and doesn’t damage your strings.
Adjust the position of the rubber band and the pen to ensure they sit close to the fret metal. This often helps distribute pressure more evenly across all strings.
Yes, but classical guitars have wider necks, so ensure the pen or pencil spans the full width. You may need a larger or stronger rubber band to maintain proper tension.
Buzzing typically occurs when the rubber band isn't tight enough. Try adding more loops or using a thicker band to increase the pressure on the strings.
While effective for short-term use, frequent DIY capo use may wear out the rubber band and can leave impressions on your guitar. Consider using it only as a temporary solution until you can get a standard capo.
Yes, some users find that tying a shoelace tightly around the pen can work, though it may take extra effort to get enough tension for a clear sound.


