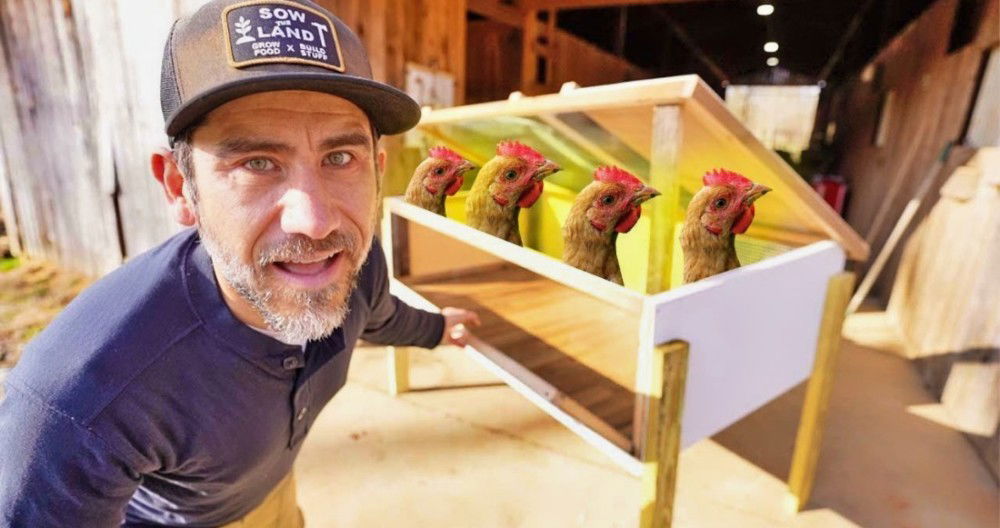
Starting a DIY project felt overwhelming at first. I had never really built anything by myself. When my backyard chickens needed new nesting boxes, I decided it was time to try. I spent hours researching the best materials and designs. It turned out that making the nesting boxes was not as hard as I thought. With some patience and basic tools, I started seeing my project take shape.
My chickens seemed happier with their new space, and I felt proud of my work. Building these nesting boxes gave me the confidence to tackle more projects. I learned a lot about how to plan and execute a DIY project from start to finish. If you're thinking about homemade DIY chicken nesting boxes, I'm here to share my experience and tips. Starting this project can be a fun and rewarding experience.
I hope my story encourages you to give building your own chicken nesting boxes a try. Remember, it's all about taking that first step and learning as you go. You might be surprised at what you can accomplish with a little effort and some basic knowledge.
Materials Needed and Their Purpose
- One piece of 4x8 plywood: This is the core material for the boxes. It's cost-effective and readily available.
- Protective eyewear: Essential for safety to prevent sawdust from getting into your eyes while cutting.
- Straight edge guide and clamps: Ensures straight cuts and stability during the process.
- Screws and drill: To secure the plywood pieces together.
- Corner clamps: These are game changers for keeping the plywood corners at a right angle during assembly.
- Nesting pads: For comfort and to encourage laying in the boxes.
Step by Step Instructions
Learn how to make homemade DIY chicken nesting boxes with our step by step instructions. Build a cozy spot for your hens to lay eggs easily.
Step 1: Cutting the Plywood
After watching a helpful walkthrough on Bock Bock Bouquet, I went to Lowe's, bought my 4x8 plywood, and had them cut it into the dimensions needed to fit my car—a lifesaver, really. At home, I made further cuts to build panels for the four sides of each box, dividers, and the back. Remember, always wear protective eyewear to avoid sawdust in your eyes.
Step 2: Assembling the Base and Sides
With my pieces cut, I started assembling. The side and base panels were first. I used corner clamps to hold everything at a 90-degree angle—these tools are incredibly handy for a one-person job. Pre-drilling holes before driving in the screws helped avoid splitting the wood.
Step 3: Attaching the Back Panel
The back panel's installation gave the construction much-needed stability. Again, those corner clamps proved invaluable, keeping everything aligned while I secured the panel with screws.
Step 4: Dividing the Space
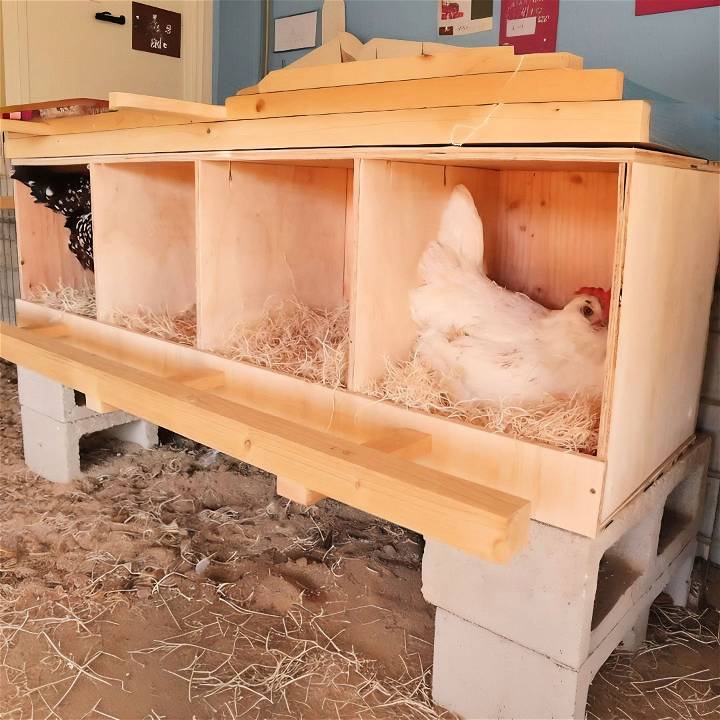
Dividers were next, transforming the large box into four cozy, equal-sized nesting boxes. I measured carefully to ensure each space was 12 inches wide, then secured the dividers with screws. It was shaping up nicely, and I couldn't help but feel a bit proud.
Step 5: Adding the Lip and Roost Bar
To keep the nesting material in place and provide an area for the hens to perch, I added a lip to the front of the boxes. A trip back to Lowe's was necessary to cut a piece for the lip and the roost bar—essential additions for functional nesting boxes.
Step 6: The Finishing Touches
Once everything was assembled, it was time for nesting pads. I ordered mine from my favorite chicken supply website, adding a level of comfort and cleanliness to the boxes. As I placed the nesting pads into each box, my project felt complete.
The Verdict: Hen Approved!
As if on cue, one of my hens waddled over to inspect my handiwork. Watching her hop into one of the newly minted boxes, I felt a wave of satisfaction. It was more than just building nesting boxes; it was about building a safe and comfortable space for my chickens.
Tips and Insights
- Measure Twice, Cut Once: Double-checking measurements can save you a lot of time and material.
- Safety First: Never underestimate the importance of protective gear.
- Corner Clamps Are Your Friends: Seriously, they make a world of difference.
- Patience Pays Off: Take your time with each step to ensure quality construction.
Understanding Your Chickens' Needs
When building a space for your chickens to lay eggs, it's essential to understand their natural behaviors and preferences. Chickens seek a nesting area that feels safe and secluded, as this is where they feel most comfortable to lay their eggs. Here are some key points to consider:
- Privacy is Paramount: Chickens prefer a quiet and private spot to nest. They tend to avoid areas that are too open or exposed. By providing a nesting box that mimics the cozy and sheltered spaces they seek in nature, you encourage regular laying patterns.
- Comfort is Crucial: The inside of the nesting box should be comfortable and inviting. Soft bedding, such as straw or wood shavings, can provide the necessary cushioning. The bedding should be changed regularly to keep it clean and dry, which helps prevent the eggs from getting dirty or damaged.
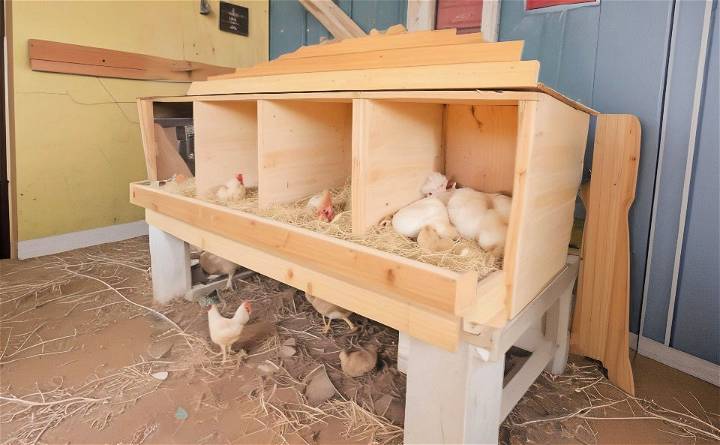
- Accessibility Matters: Nesting boxes should be easily accessible, but not so low that predators can reach them. A good rule of thumb is to place them at least a few feet off the ground. This also helps to keep the boxes dry and free from parasites.
- Size and Space: The size of the nesting box should accommodate the chicken comfortably, allowing it to turn around and settle in without difficulty. For most breeds, a box that's 12 inches by 12 inches by 12 inches is suitable. If you have larger breeds, you may need to adjust the dimensions accordingly.
- Ventilation: Good airflow is important to keep the nesting area fresh and to help regulate temperature and humidity. However, make sure the ventilation doesn't build drafts, as this can be uncomfortable for the chickens.
By considering these aspects, you can build a nesting environment that meets the needs of your chickens, encouraging them to lay eggs consistently and safely. Remember, happy and comfortable chickens are more likely to be productive layers.
Common Mistakes to Avoid
When it comes to building and placing chicken nesting boxes, there are several common pitfalls that can negatively impact the health and laying habits of your chickens. Here's a straightforward guide to help you steer clear of these errors:
- Not Providing Enough Nesting Boxes: Each chicken doesn't need its own nesting box, but having too few can lead to competition and stress among your flock. The general rule is to have one box for every three to four hens.
- Placing Boxes Too High or Low: Nesting boxes should be off the ground to protect from predators and dampness, but not so high that chickens have difficulty accessing them. A height of 2 to 3 feet is typically ideal.
- Ignoring Cleanliness: Dirty nesting boxes can lead to egg contamination and the spread of diseases. Regular cleaning and replacing bedding is crucial for a healthy flock.
- Forgetting to Secure the Boxes: If nesting boxes aren't firmly attached, they can move or tip over, causing stress and potential injury to your chickens. Ensure they are securely fastened to a wall or stable structure.
- Using Inappropriate Materials: Some materials can be harmful or uncomfortable for chickens. Avoid using treated wood, which can contain chemicals, and opt for natural, untreated materials.
- Lack of Ventilation: Good air circulation is important, but too much draft can be harmful. Ensure your boxes are well-ventilated without exposing chickens to strong winds.
By avoiding mistakes, you build a better environment for chickens to lay eggs. Happy chickens need a clean, secure nesting space.
FAQs About Homemade DIY Chicken Nesting Boxes
Discover everything you need to know about homemade DIY chicken nesting boxes in this comprehensive FAQ guide. Get expert tips for building the perfect nesting space for your hens.
How big should a chicken nesting box be?
A standard nesting box should be about 12 inches by 12 inches by 12 inches. This size is comfortable for most chicken breeds. If you have larger breeds, like Jersey Giants, you might need to increase the size to about 14 inches by 14 inches by 14 inches.
How many nesting boxes do I need for my flock?
A good rule of thumb is to have one nesting box for every three to four hens. Having enough boxes prevents competition and stress, which can affect egg-laying.
Where should I place the nesting boxes in the coop?
Nesting boxes should be placed in a quiet, dimly lit area of the coop to provide privacy and encourage egg laying. They should be elevated off the ground but not higher than the roosting bars to prevent hens from sleeping in them.
What kind of bedding should I use in the nesting boxes?
Soft, absorbent materials like straw, pine shavings, or hay are ideal for nesting box bedding. These materials are comfortable for the chickens and easy to replace during cleaning.
How often should I clean the nesting boxes?
Clean the nesting boxes at least once a week to maintain hygiene. Remove soiled bedding, wipe down the surfaces with a mild disinfectant, and add fresh bedding. Regular cleaning helps prevent parasites and keeps the eggs clean.
When you answer these questions, you help readers make DIY chicken boxes for their hens' well-being and egg quality.
Conclusion
In conclusion, building homemade DIY chicken nesting boxes is a practical and fun project for poultry enthusiasts. By following these simple steps, you can provide a cozy and comfortable space for your feathered friends to lay eggs. Happy crafting!


