As an avid DIY enthusiast and a little bit of a tinkerer, I've always been fascinated by the capability to make something functional out of seemingly simple components. This interest recently led me to embark on a rather unique project: crafting a homemade DIY humidifier using ultrasonic misters. The journey was filled with trial and error, valuable learnings, and, ultimately, success. Here, I aim to guide you through the process step-by-step, imbuing the narrative with my personal experiences and insights to hopefully inspire and assist you in your own DIY endeavors.
Why Build a Homemade Humidifier?
Before diving into the nitty-gritty, let's talk about why one would consider building a homemade DIY humidifier. For me, it was the combination of the love for DIY projects, the need for a cost-effective solution to maintain optimal humidity levels for my indoor plants, and the sheer curiosity to see if I could replicate a commercially available product with a more hands-on, personalized touch.
Materials Needed
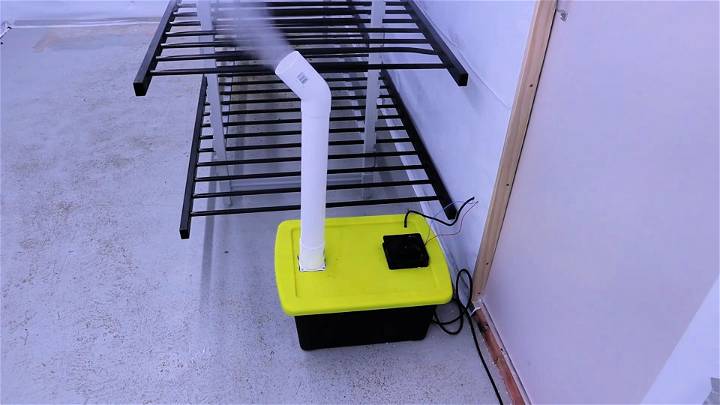
- Plastic Storage Box - Acts as the case for your homemade humidifier. I chose it for its durability, ease of handling, and the flat surface it offered.
- Ultrasonic Mister/Fogger - The heart of the humidifier, responsible for generating the mist. Purchased online, its performance exceeded my expectations.
- Fan (IP 68 Rated) - Ensures distribution of the mist. The high ingress protection rating was crucial due to the high humidity environment.
- Ink Bird Controller - To regulate the functioning of the mister and fan, ensuring they operate only when needed.
- Various Fittings & Tubing - For the water supply to the mister and the distribution of the mist.
- Tools & Supplies - Including screws, glues (though they were not quite successful for me), cutting tools, and plumbing components for water connection.
The Process
Assembling the Case
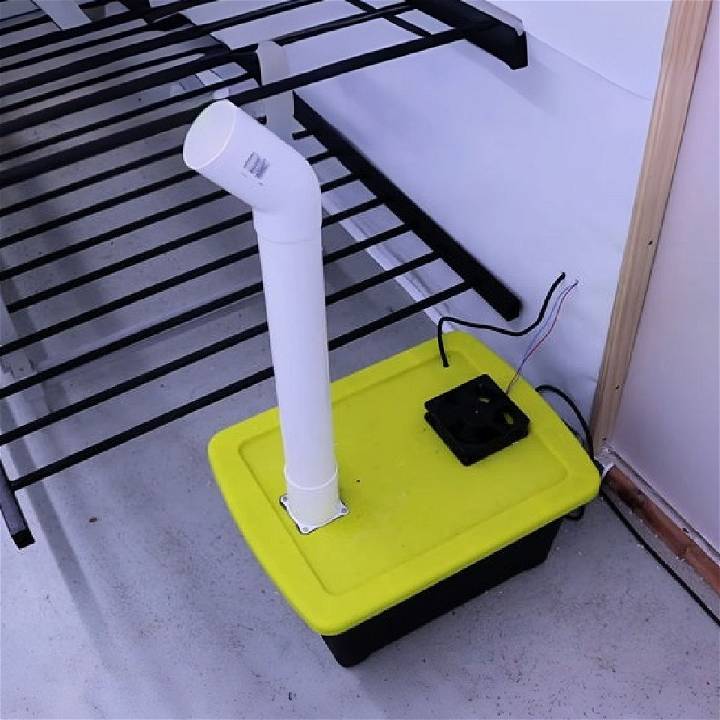
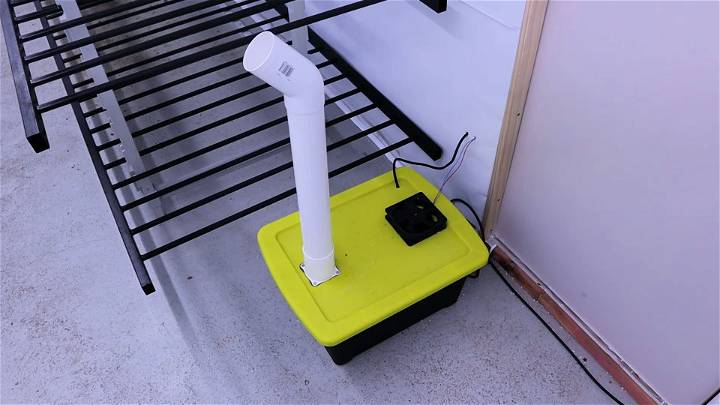
Starting with the plastic storage box, I cut a hole on the top for the mist outlet. Fixing the outlet securely required a bit of ingenuity, given the challenges with getting adhesives to work on the storage box's material. Eventually, securing it with screws became the go-to solution. Ensuring a tight seal around these components was crucial to prevent leaks and maintain efficiency.
Setting Up the Ultrasonic Mister
Positioning the ultrasonic mister was straightforward. It needed to be submerged, so I placed it at the bottom of the box, ensuring the water level would cover it adequately but not too high to risk water ingress into parts where it wasn't wanted.
Incorporating the Fan and Controller
The fan was attached atop the case to help distribute the mist coming through the outlet. Connecting it alongside the ultrasonic mister to the Ink Bird controller allowed for synchronizing their operation, optimizing mist production and distribution.
Water Supply System
A continuous water supply to the mister is crucial for uninterrupted operation. I used a float valve connected to a constant water source, ensuring the water level remains constant. This setup bypasses the need for frequent manual refilling.
Challenges and Solutions
The journey wasn't without its challenges. Adhering components to the box was a trial in patience due to the material's resistance to most adhesives. Mechanical fasteners came to the rescue. Similarly, managing the water level precisely required a bit of plumbing work and some trial and error to get the float valve positioned correctly.
Humidifier Maintenance and Safety
Maintaining your DIY humidifier is crucial for ensuring it runs efficiently and safely. Here's a guide to help you keep your humidifier in top condition:
Regular Cleaning
Clean your humidifier regularly to prevent mold and bacteria growth. Empty the water tank, wash it with mild soap and warm water, and rinse thoroughly at least once a week.
Water Quality
Use distilled or demineralized water to reduce mineral buildup and the release of these minerals into the air. Tap water can contain higher mineral content, leading to “white dust” and potentially harming your appliance's performance.
Filter Replacement
If your humidifier has a filter, follow the manufacturer's instructions on how often to replace it. This can vary, but it's typically every 1-3 months.
Proper Storage
When not in use, especially during warmer months, clean the humidifier thoroughly and store it in a dry place. This helps prevent mold and bacteria from settling in.
Safety Precautions
Keep your humidifier out of reach of children and pets to avoid accidents. Also, ensure it's placed on a stable, level surface to prevent any spills or falls.
Monitoring Humidity Levels
Too much humidity can be just as problematic as not enough. A hygrometer is used to monitor room humidity levels, aiming for an ideal range of 30-50%.
Energy Efficiency
Consider the energy consumption of your humidifier. Opt for energy-efficient models or adjust the settings to lower levels to conserve energy when possible.
Future Trends and Innovations in DIY Humidifiers
As we look towards the future, the trend in homemade DIY humidifiers is leaning towards sustainability and smart technology. Here's what you can expect:
Eco-Friendly Materials
The use of recycled and biodegradable materials is on the rise. People are getting creative with upcycled items, turning everyday household objects into functional humidifiers. This not only reduces waste but also adds a personal touch to your home.
Smart Integration
With the advent of smart homes, DIY enthusiasts are integrating IoT technology into humidifiers. This allows for remote monitoring and control, ensuring optimal humidity levels even when you're away from home.
Energy Efficiency
The focus on energy-saving practices continues to grow. Future DIY humidifiers may incorporate solar panels or other renewable energy sources to minimize the environmental footprint.
Health and Wellness
As awareness of air quality increases, so does the demand for humidifiers that can improve health and well-being. Innovations may include built-in air purifiers or aromatherapy diffusers to enhance the benefits of humidification.
Community Sharing Platforms
Online communities are becoming a hub for sharing DIY plans and experiences. These platforms encourage collaboration and provide a wealth of knowledge for both beginners and experts.
Advanced Monitoring Systems
Developments in sensor technology could lead to more sophisticated humidity and air quality sensors that are easy to incorporate into DIY projects, giving you precise control over your environment.
FAQs About DIY Humidifiers
Discover everything you need to know about DIY humidifiers in this comprehensive FAQ guide. Learn how to make your own humidifier at home today!
What materials do I need to make a DIY humidifier?
To make a basic DIY humidifier, you'll need a container, a wick or filter (like a sponge, cloth, or cotton), and clean water. Optionally, you can add essential oils for fragrance.
Can I use tap water in my homemade DIY humidifier?
It's best to use distilled or demineralized water to prevent mineral buildup and potential white dust. However, if tap water is your only option, it can be used but may require more frequent cleaning of the humidifier.
How often should I clean my DIY humidifier?
You should clean your humidifier at least once a week. This involves rinsing out the container and replacing the wick or filter material to prevent mold and bacteria growth.
Is it safe to add essential oils to my DIY humidifier?
Yes, you can add a few drops of essential oils to the water in your DIY humidifier for a pleasant aroma. Just make sure to clean the humidifier regularly to avoid oil buildup.
How can I ensure my homemade humidifier is effective?
To ensure effectiveness, place your humidifier in an area where air circulates well. Also, use a hygrometer to monitor humidity levels and adjust your humidifier as needed to maintain a comfortable indoor environment.
Final Thoughts
Building my own humidifier was not only a fulfilling project but it also endowed me with a piece of equipment perfectly tailored to my needs. It was an exercise in problem-solving, patience, and creativity. For those embarking on this DIY journey, remember, the key lies in planning, patience, and perseverance. Every challenge is an opportunity to learn and improve. Your homemade DIY humidifier might not rival commercial models in looks, but it will likely match them in performance and exceed them in personal satisfaction.


