Making a homemade DIY drag harrow is simpler than it seems. When I first needed to level my yard and manage the gravel on my driveway, buying a commercial harrow wasn't an option. So, I decided to make one myself. With just a few basic tools and materials I already had at home, I was able to build an effective and durable drag harrow that got the job done.
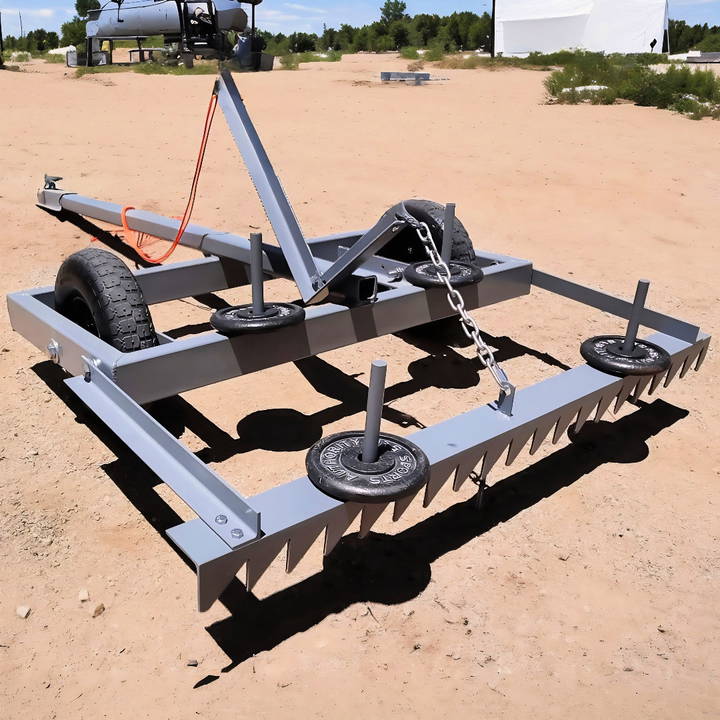
If you're looking to save money and tackle your land maintenance yourself, this method will help. Building your own drag harrow gives you control over the design and size, depending on your specific needs. With this guide make sure you have a simple and affordable way to keep your yard or driveway in good shape.
Materials Needed and Why
- Rectangular Steel Frame: This served as the foundational structure for the drag. I repurposed some steel I had on hand, aiming for resilience and durability.
- Wheelbarrow Tires: Opted for Harbor Freight run-flat wheelbarrow tires for mobility. You need your drag to be easily maneuverable across different terrains.
- Steel Tubing and Coupler: For crafting the rake mechanism and the hitch. Durability and strength are key here for handling rugged ground.
- Welding Equipment: No metal project goes without welding. It's vital for securing and constructing the parts of the drag together.
- Gussets: To reinforce the joints and ensure the frame can handle the stress of dragging.
- Weights (Cinder Blocks): I used these to add weight to the drag for better soil penetration. The ability to adjust weight is crucial depending on the soil type you're working with.
- Rake Mechanism and Smoother (Scraper): I engineered these for the actual ground grooming. The rake agitates and loosens the soil, while the smoother distributes and levels it.
Step by Step Instructions
Make your own DIY drag harrow with step-by-step instructions, from building the frame to finishing touches. Perfect guide for any project enthusiast.
Step 1: Frame Building
The adventure began with crafting a rudimentary trailer frame. I welded a rectangular frame and attached wheelbarrow tires for easy towing behind an ATV. The frame needed to be both sturdy and lightweight for ease of mobility.
Step 2: Adding the Rake Mechanism
My initial plan was to include both a rake mechanism and a smoother as part of the drag, but soon realized simplifying would be more effective. I focused first on making a robust rake mechanism that could be attached to the back of the trailer frame. The raking action is crucial for breaking up soil, uprooting weeds, and preparing the land for smoothing.
Step 3: Design Modification
After some brainstorming and practical testing, I decided to separate the smoothing function (akin to a Gannon box or arena drag) into a different piece that could be easily attached or detached from the main frame. This flexibility meant I could customize the drag's setup based on the specific task at hand.
Step 4: Field Testing and Adjustments
Not everything works perfectly on the first try. During the testing phase in the horse round pen, it became apparent that some adjustments were necessary – from welding washers onto the bars to prevent them from slipping through to adding makeshift wheels for easier transportation without dragging the mechanism everywhere.
Step 5: Final Touches
After a few tweaks, including grinding off old paint from the pins for smoother operation and adding a simple handle mechanism for better control, my ATV drag was ready for regular use. These final touches were instrumental in ensuring efficiency and longevity.
Customization Options for Your DIY Drag Harrow
Customization is key when it comes to making a DIY drag harrow. You want a tool that not only does the job but also fits your specific land and needs. Here are some ways you can tailor your drag harrow for optimal use:
- Adjustable Width: Depending on the size of your land, you might need a wider or narrower harrow. Design your harrow with adjustable side panels so you can easily change its width.
- Removable Tines: Soil conditions can vary greatly. By making the tines removable, you can replace them with different shapes or sizes to suit various soil types or tasks.
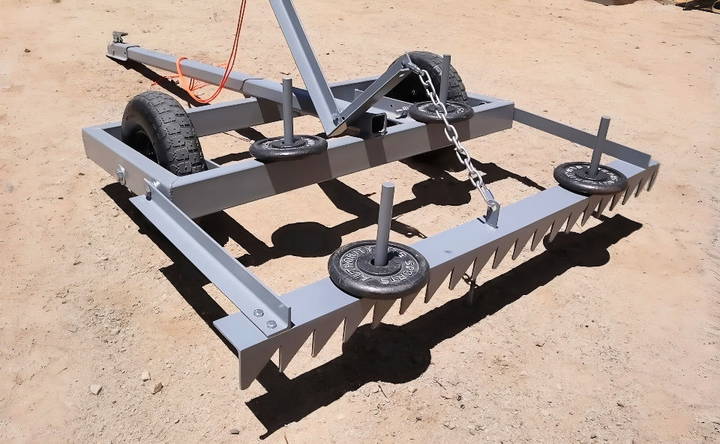
- Weight Options: The effectiveness of a drag harrow often depends on its weight. Add hooks or brackets to your frame so you can attach weights as needed for deeper penetration in hard soil.
- Folding Mechanism: If storage space is an issue, incorporate a folding mechanism into your design. This will make your harrow more compact and easier to store when not in use.
- Tow Bar Adjustability: The angle of the tow bar affects how aggressively the harrow works the soil. An adjustable tow bar allows you to set the best angle for your conditions.
- Material Choices: Different materials can affect the durability and weight of your harrow. Consider using galvanized steel for rust resistance or aluminum for a lighter option.
Incorporate these options to craft an effective, versatile drag harrow tailored to your needs. By adapting your DIY project accordingly, you aim to simplify your work and boost efficiency.
Troubleshooting Common Issues with Your DIY Drag Harrow
Even the best DIY projects can encounter issues from time to time. Here's how to troubleshoot common problems with your DIY drag harrow:
Tines Not Penetrating Soil
- Solution: Check if the soil is too dry or compacted. If so, moisten it before harrowing. Ensure the harrow is weighted correctly for your soil type.
Uneven Harrowing
- Solution: Make sure the harrow is level. Adjust the tow bar or add weight evenly across the harrow. Inspect the tines for uniformity in length and shape.
Harrow Vibrating Excessively
- Solution: This could be due to loose parts. Tighten all bolts and connections. Also, check the balance of the harrow and redistribute weight if necessary.
Tines Bending or Breaking
- Solution: Tines may be too thin or the wrong material for your soil. Replace with thicker or more durable tines suited to your specific soil conditions.
Difficulty in Maneuvering
- Solution: If the harrow is hard to turn or manage, consider reducing its width or changing the towing method. A three-point hitch may offer better control than a tow bar.
Harrow Leaving Tracks
- Solution: Tracks are often caused by wheels or a frame that's too narrow. Widen the frame or add guide wheels at the edges to distribute the weight more evenly.
Address these common issues to keep your DIY drag harrow running smoothly and maintain work quality.
FAQs About DIY Drag Harrow
Discover answers to common FAQs about DIY drag harrow, including benefits, construction tips, and maintenance advice for your homemade harrow.
A DIY drag harrow is a homemade version of a traditional farming tool used to smooth out soil, cover seeds, and break up clumps of earth. It’s typically made from materials like chain-link fence sections or metal bars, and it’s dragged over the ground by a tractor or ATV. You would use one to prepare your land for planting, to incorporate seed into the soil, or to level out an area of your garden or field.
DIY drag harrows are best suited for light to medium soil work. They’re great for leveling out loose soil, covering seeds, or breaking up small clumps. However, they’re not designed for deep tillage or heavy-duty soil preparation. If your soil is very compacted or has large clumps, you might need a commercial-grade harrow or additional equipment.
After each use, inspect your harrow for any damage or wear. Tighten any loose connections and replace any broken parts. Store your harrow in a dry place to prevent rusting. Periodically check the weights to ensure they’re secure, and if you’ve used metal parts, you may want to apply a coat of paint or rust protector to extend its life.
Adjusting the weight on your DIY drag harrow is crucial for effective soil preparation. For lighter soil work, such as smoothing out seedbeds or breaking up small clods, minimal weight may be needed. However, for tougher soil conditions, you may need to add more weight to ensure the harrow penetrates the soil adequately. You can add weight by placing heavier objects like concrete blocks or metal weights on top of the harrow. Ensure the weights are securely fastened to prevent them from shifting or falling off during operation.
Safety is paramount when using any DIY equipment, including a drag harrow. Here are some key safety tips:
Wear protective gear: Always wear sturdy boots, gloves, and eye protection when operating the harrow.
Check connections: Before use, double-check that all ropes, chains, and weights are securely attached.
Be aware of your surroundings: Make sure the area is clear of people, pets, and obstacles before starting.
Operate at safe speeds: Don't drive too fast; a moderate pace will ensure better control and prevent accidents.
Regular maintenance: Inspect your harrow regularly for any signs of wear or damage, and make repairs as needed.
Learnings and Insights
With the steps and tips I'll share, you'll have a reliable tool for your property care. These will help you get started easily, saving time and effort. Ready to give it a try?


