Making a homemade phone stand can be a simple and fun project. It is not just a tool to prop up your phone but can also add an extra touch to your desk. This DIY project requires basic materials and can be completed in a short amount of time. Making your own phone holder allows you to customize it to suit your needs and style.
A DIY phone holder can be a practical addition to your workspace. Whether you are following a tutorial or coming up with your design, this project can enhance both function and aesthetics. Get ready to explore creative ways to organize your desk and make it more efficient.
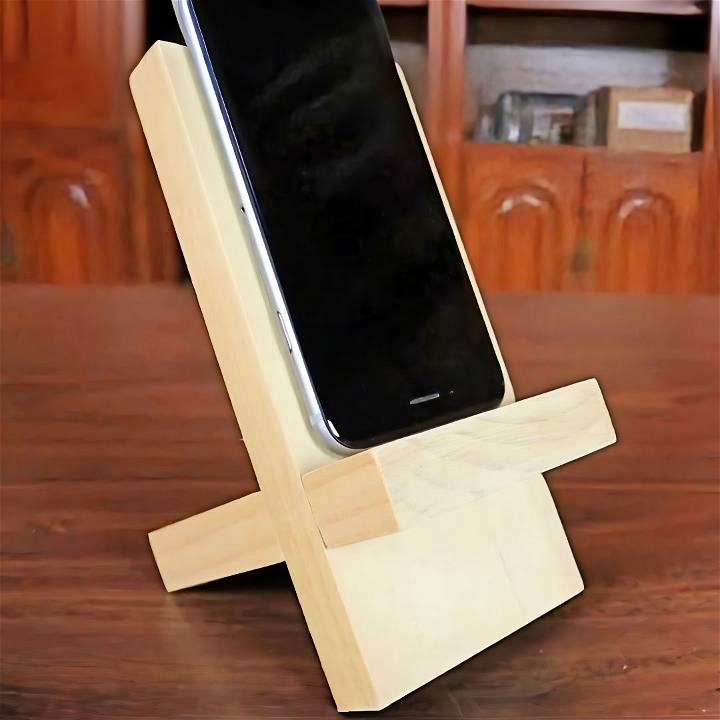
Now that you know the basics, let's dive into the materials and steps to make your very own homemade phone stand in the following section.
Materials Needed:
- Wood: I chose a sturdy piece of wood measuring 7 inches in height for the main structure and 5 inches for the support. I prefer using hardwood for its durability and aesthetic appeal.
- Saw: A miter box and a hand saw were my tools of choice for making precise cuts. They’re beginner-friendly and do a fantastic job.
- Coping Saw: This was essential for cutting out the notches accurately. Its blade is perfect for intricate tasks.
- Sandpaper: Sandpaper is indispensable for smoothing out rough edges and cut notches. It’s crucial for giving your stand a polished look.
- Measuring Tape and Pencil: Precision is key in this project. These tools helped me mark accurate measurements before cutting.
Step by Step Instructions
Learn step-by-step instructions to make a homemade phone stand. From measuring to personalizing, create your perfect phone stand effortlessly.
1. Measuring and Marking:
I started by marking my wood according to the dimensions; 7 inches for height and 5 inches for the base. The clarity of your marks is vital for accuracy. Notches are essential for this project; I marked an inch and a quarter up from the bottom for the base and two inches up for the upright piece.
2. Cutting the Notches:
Before anything else, making precise cuts for the notches was my priority. These notches ensure the pieces interlock seamlessly. Cutting them halfway across the wood's width and just over three-quarters of an inch wide allows for a perfect fit.
3. Sawing the Pieces:
Using my miter box and hand saw, I cut along the marked lines. This step requires patience and a steady hand. I made sure to cut both notches before sawing the pieces apart, as working with a larger piece is easier and safer.
4. Finalizing the Notches:
To cut the bottom part of each notch, I switched to my coping saw. This tool allowed me to make detailed cuts without compromising the wood's integrity. Ensuring the bottom of the notches was flat resulted in a more stable and visually appealing stand.
5. Sanding for Smoothness:
After cutting, I spent ample time sanding every edge and the interior of the notches. This step transformed the rough-cut wood into a sleek, touchable object. Sanding is not just about aesthetics; it also removes any splinters, making the stand safe to handle.
6. Assembly:
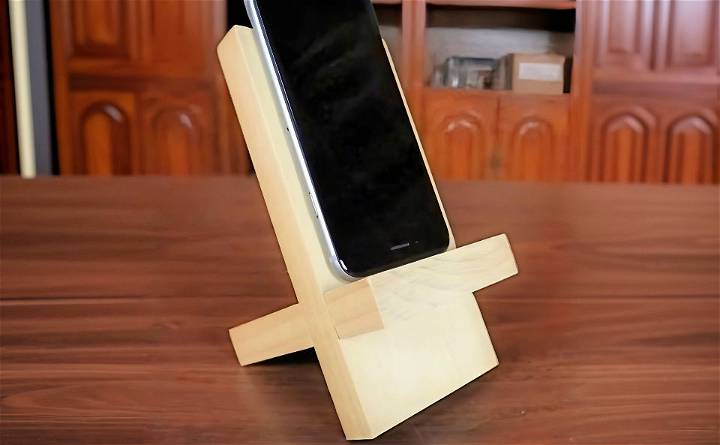
Fitting the pieces together was the most satisfying part. The precision of earlier steps paid off, as the notches aligned perfectly, and the stand took shape effortlessly. No glue or nails were needed, thanks to the snug fit.
7. Personalizing:
I chose to leave my stand with a raw finish to appreciate the natural beauty of the wood. However, this is where you can get creative—stain, paint, or varnish your stand to match your style or decor.
Reflections and Tips:
- Precision is Crucial: Take your time measuring and marking. Every inch matters for the final fit.
- Choose the Right Wood: Hardwoods are more durable and provide a premium feel but work with what's accessible and suits your aesthetic.
- Patience with Sanding: It might seem tedious, but thorough sanding is what makes your stand look professional and feel luxurious.
- Personal Touch: Whether it's through the wood you choose or how you finish your stand, adding a personal touch makes the project even more rewarding.
Customization Ideas for DIY Phone Stands
When it comes to creating a DIY phone stand, customization is key to making a piece that’s not only functional but also personal and unique. Here are some ideas to inspire you to customize your phone stand:
- Choose Your Material Wisely: Start by selecting a material that resonates with your style. Wood can give a classic look, while acrylics can add a modern touch. Even simple cardboard can be transformed into something special with a bit of creativity.
- Paint and Color: Give your phone stand a splash of color with paint. Whether you prefer bright and bold hues or soft and pastel shades, painting your stand is an easy way to personalize it. Use non-toxic paint for an eco-friendly option.
- Decoupage Art: If you’re into patterns, try decoupage. This involves gluing decorative paper cutouts onto your stand and then sealing them with varnish. It’s a simple way to add intricate designs without needing advanced artistic skills.
- Add Textures: Textures can add depth to your phone stand. Consider wrapping rope or fabric around parts of the stand or use embossing techniques to create raised patterns.
- Incorporate Functionality: Think about what additional features could enhance the usability of your stand. Maybe add a slot for charging cables, or create a space to hold earphones.
- Personal Touches: Engrave your initials, or use stencils to add quotes or messages that inspire you. These personal touches make your stand truly one-of-a-kind.
- Mix and Match: Don’t be afraid to combine different customization techniques. A wooden stand with painted accents and a decoupaged base could be the perfect expression of your personal style.
The goal is to create a phone stand that not only holds your device but also reflects your personality and meets your needs. Have fun with the process and let your creativity shine!
Troubleshooting Common Issues
When crafting a DIY phone stand, you might run into a few snags along the way. Here’s a helpful guide to troubleshoot common issues:
The Stand is Unstable
- Solution: Check the base of your stand; it should be wide enough to support the phone’s weight. Add weight or widen the base if necessary.
Phone Slips Off
- Solution: Ensure there’s a lip or edge at the bottom of the stand. Adding a piece of rubber or silicone can provide extra grip.
- Problem: Stand Doesn’t Fit Phone with Case
- Solution: Measure your phone with the case on and adjust the dimensions of your stand accordingly.
Materials are Hard to Work With
- Solution: Research and find the right tools for your material. For example, use a sharp blade for cardboard or a proper saw for wood.
Difficulty in Cutting Straight Lines
- Solution: Use a ruler and a pencil to mark your cut lines. A craft knife or box cutter can help achieve straight cuts.
Paint or Finish Doesn’t Look Right
- Solution: Sand the surface before painting and apply a primer. Use multiple thin coats of paint rather than one thick coat.
Stand is Not Portable
- Solution: Design your stand to be foldable or disassemble into flat pieces for easy transport.
Can’t Find the Right Materials
- Solution: Be creative with substitutions. For example, if you can’t find wood, thick cardboard or old book covers can be alternatives.
Tools are Unavailable
- Solution: Look for local maker spaces or community centers where you can access the necessary tools.
By anticipating these common issues and knowing how to solve them, you’ll be better prepared to create a successful DIY phone stand. Patience and creativity are your best tools in DIY projects.
Maintenance and Care for Your DIY Phone Stand
Taking care of your DIY phone stand is essential to ensure it lasts long and stays looking great. Here are some straightforward tips for maintaining and caring for your phone stand:
- Regular Cleaning: Dust and dirt can accumulate on your stand, especially if it has intricate designs or carvings. Use a soft, dry cloth to wipe the surface gently. For tougher stains, a damp cloth with mild soap can be used, but make sure to dry it completely afterward.
- Avoid Water Damage: If your phone stand is made from materials like wood or cardboard, it’s important to keep it away from water. Place it in a dry area and use a coaster if you’re placing a drink nearby.
- Protect the Surface: Consider applying a clear sealant or varnish to protect the stand from scratches and wear. This is especially useful for painted or decorated stands.
- Check for Wear and Tear: Over time, parts of your stand may become loose or worn out. Regularly inspect your stand and tighten any screws or reinforce any parts as needed.
- Storage: When not in use, store your phone stand in a safe place where it won’t get knocked over or damaged. If it’s foldable, keep it in its collapsed form to save space and protect its structure.
- Handle with Care: Always handle your DIY stand gently. Avoid throwing it into bags or drawers where it could get damaged.
- Update as Needed: As phones change in size and shape, you might need to adjust your stand. Keep it adaptable by designing it with modifiable parts or add-ons.
By following these simple maintenance and care tips, you’ll keep your DIY phone stand in top condition, making it a reliable and stylish accessory for your home or office.
FAQs About DIY Phone Stand
Find answers to the most common questions about DIY phone stands, including materials, design ideas, and step-by-step guides.
Stability is key for a good phone stand. Make sure the base is wide enough to support your phone. If you’re using wood, cut a groove and angle it so the phone tilts without tipping over. For lighter materials like paper or cardboard, ensure the stand has a low center of gravity and distribute weight evenly.
Yes, you can integrate a charging function into your DIY phone stand. For example, you can create a stand with a space to thread your charging cable through, or design a stand around a wireless charging pad. Just ensure there’s no risk of overheating and that the stand doesn’t cover any necessary ports.
Absolutely! Using recyclable materials like paper cups, cardboard, or wood from sustainable sources can make your phone stand eco-friendly. You can also repurpose items like binder clips or old utensils, which reduces waste and gives new life to items you already own.
Get creative by taking inspiration from things around you. You can make a mini chair out of popsicle sticks, a stand that looks like a little man from spoons and forks, or even an origami stand from a single sheet of paper. The possibilities are endless, and you can personalize your stand with paint, tape, or other decorations.
Creating an adjustable DIY phone stand allows you to change the viewing angle to suit different activities, like watching videos or video chatting. One simple way to achieve this is by using binder clips. You can connect two large binder clips together to form a base and adjust their arms to hold your phone at various angles. Another option is to use lego pieces to build a customizable stand, which you can easily reconfigure for different angles and heights.
Conclusion:
Embarking on this DIY wooden cell phone stand project was an enriching experience. It sharpened my woodworking skills, taught me the importance of precision, and reminded me of the joy of making something functional and stylish. This simple yet practical project is perfect for beginners looking to dive into the world of woodworking. Follow this guide, and you’ll end up with a cell phone stand you’re proud to display and use daily.


