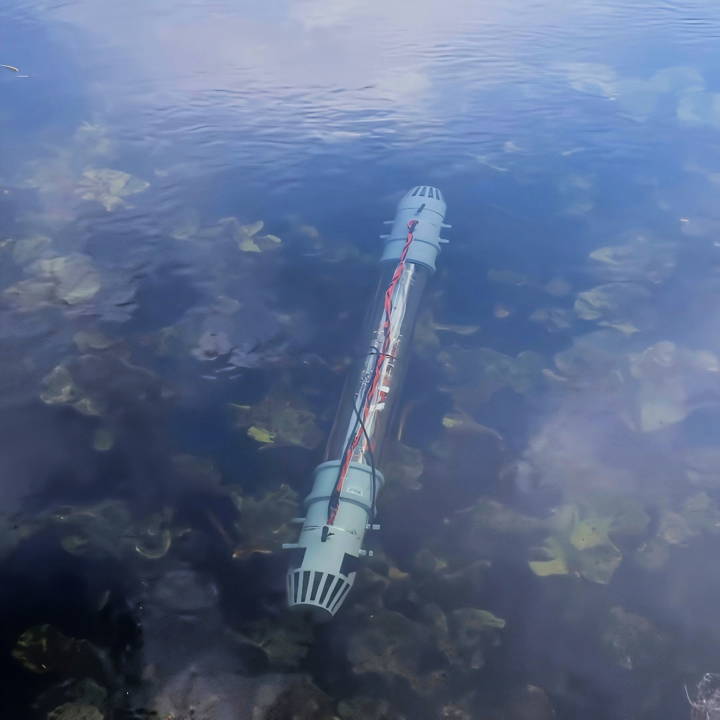
Building my own homemade DIY submarine was an exciting project. I spent months researching different materials and designs. With each step, I felt more confident and eager to see my creation come to life. It wasn't just about building but also about understanding the engineering and physics behind it. This project taught me more than I could have imagined.

Finally, the day came to test my homemade submarine. Seeing it submerge and resurface was immensely satisfying. The experience was both challenging and rewarding, and I learned valuable skills throughout. If you follow the steps I've outlined, you'll find that building a DIY submarine is an achievable and fun endeavor. This guide will provide you with the insight and knowledge to get started.
Reading my guide will help you embark on this exciting DIY submarine project. Get started and see where your creativity takes you!
Introduction to Submarine Principles
Submarines are fascinating vessels that navigate the depths of the oceans. They operate under principles that allow them to dive, travel underwater, and resurface. Let's explore these principles in a way that's easy to understand.
- Buoyancy and Ballast Tanks: Submarines float or sink based on buoyancy—the force that makes objects like boats float on water. Submarines have special tanks called ballast tanks that can be filled with water to increase weight, making the submarine sink. To rise back to the surface, the water is pumped out, and air is let in, making the submarine lighter.
- Pressure and Hull Design: The deeper a submarine goes, the greater the water pressure around it. Submarines are built with strong, rounded hulls that can withstand this pressure. The shape is important because it evenly distributes the force over the entire surface, preventing the submarine from being crushed.
- Propulsion: Underwater, submarines use propellers powered by engines. These engines can be electric, diesel, or even nuclear. The propellers push water backward, which moves the submarine forward. It's similar to how you push water back with your hands when you swim.
- Navigation: Navigating underwater is tricky because you can't see landmarks. Submarines use sonar—sending out sound waves and listening for echoes—to detect obstacles and navigate. They also have compasses and other instruments to help them know their position and direction.
- Air Supply: Submarines carry a limited supply of air for the crew to breathe. They have the equipment to remove carbon dioxide and add oxygen, ensuring the air inside stays breathable for extended periods underwater.
Knowing these principles helps you appreciate submarine engineering. They're feats of engineering exploring underwater.
Gathering Materials and Their Purpose
To bring my vision to life, I started by collecting essential materials, each chosen for its unique properties and contribution to the project:
- Acrylic Discs: Chosen for their ease of manipulation and transparency, allowing a glimpse into the submarine's inner workings.
- Hexagonal Pillar Supports: Used to link the acrylic discs in layered sections, providing structure and support.
- 18650 Rechargeable Lithium Cells: These formed the submarine's power core due to their high power and capacity.
- Magnetically Activated Reed Switches: To operate the submarine externally without the need for waterproof switches, enhancing the design's waterproof integrity.
- Massive Syringes: These were critical for simulating the ballast tanks of a real submarine, allowing for controlled descent and ascent by taking in or expelling water.
Each material was meticulously chosen not just for its functionality but its contribution toward a reliable and visually appealing prototype.
Step by Step Instructions
Learn how to build a DIY submarine with our step-by-step guide. From the framework to the remote control, find detailed instructions for each component.
Starting with the Framework
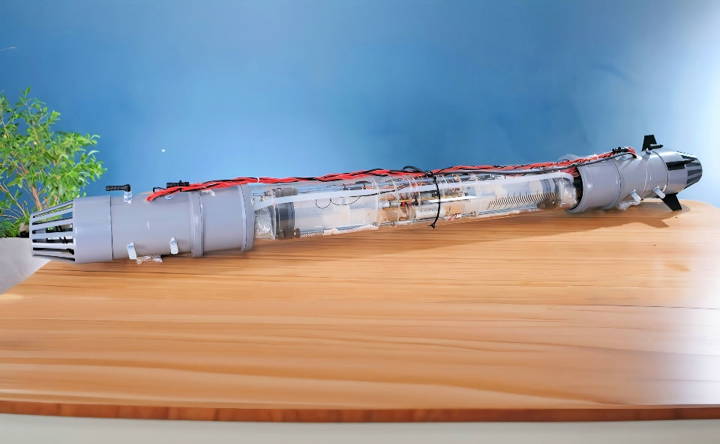
The construction began with the acrylic discs and pillar supports, forming a rigid and transparent framework. The transparency was a design choice that paid off, allowing me to observe the internal mechanisms at work, which was both insightful and visually striking.
Power Core Assembly
Next was the assembly of the power core. The lithium cells were carefully wired and secured, ensuring a stable and potent energy source. I incorporated a protection circuit for safety, guarding against over-discharge.
Innovative On/Off Mechanism
The use of magnetically activated reed switches to control the power was a stroke of ingenuity. This method eliminated potential leakage points, ensuring that my submarine remained watertight—a crucial feature for its underwater endeavors.
Buoyancy Control System
The centerpiece of my project was the buoyancy control system, which relied on manually-operated syringes modified to be controlled by motors. Through intricate mechanical setups, these syringes would mimic real submarine ballast tanks, allowing the submarine to descend or ascend by adjusting its buoyancy.
Trials and Adjustments
Testing was an exhilarating stage, fraught with moments of both triumph and setback. Initial water tests revealed issues with buoyancy control that required on-the-spot problem-solving. Adjustments were made, such as adding weights and refining the buoyancy control for neutral buoyancy. Seeing the submarine submerge for the first time was an indescribable moment, a blend of relief, achievement, and pure exhilaration.
Controlling the Submarine Remotely
To operate the submarine remotely, I utilized a standard RC transmitter and receiver set. This allowed me to control the motors for the syringes and subsequently, the submarine's buoyancy from a distance. It was a simple yet effective solution that brought the project to life.
Maintenance and Upkeep
Maintaining a DIY submarine is crucial for safety and performance. Here's a guide to keeping your submarine in top condition:
- Regular Inspections: Check your submarine regularly for any signs of wear and tear. Look for cracks, rust, or leaks, especially after each dive. It's like giving your car a check-up to ensure everything's working right.
- Cleaning: Keep your submarine clean. Saltwater can corrode metal, so rinse your submarine with fresh water after dives. Think of it as giving your submarine a good bath to keep it from getting rusty.
- Battery Care: If your submarine uses batteries, make sure they are charged and stored properly. Batteries are the heart of your submarine's electrical system, so treat them well.
- Seal Checks: Submarines have seals and O-rings to keep water out. Check these often and replace them if they show any sign of damage. It's like making sure the doors and windows in your house are properly sealed to keep the rain out.
- System Tests: Test all your submarine's systems on land before taking it underwater. This includes controls, propulsion, and life support systems. It's like testing all the lights and brakes in your car before a long drive.
- Professional Servicing: Have a professional look at your submarine from time to time. They can spot issues you might miss and help keep your submarine safe. It's similar to visiting a doctor for a regular health check-up.
- Record Keeping: Keep a log of all maintenance activities. This helps you track when parts were last replaced or serviced. It's like keeping a diary for your submarine.
By following these maintenance tips, you can enjoy many safe and exciting underwater adventures in your DIY submarine.

Safety Precautions
When embarking on the ambitious project of building a DIY submarine, safety must be your top priority. Here's a comprehensive guide to the safety precautions you should take:
- Understand the Risks: Before starting, recognize the risks involved in submarine construction and operation. It's a complex task that requires careful planning and respect for the dangers of underwater environments.
- Education and Training: Gain a solid understanding of submarine mechanics and underwater navigation. Consider taking courses in marine engineering and scuba diving to prepare yourself for emergencies.
- Design Review: Have your submarine design reviewed by experts. This can help identify potential issues before they become dangerous. It's like having an architect look over your house plans.
- Quality Materials: Use materials proven to be safe and durable for underwater use. Avoid cutting corners with cheaper alternatives that might not withstand the pressure or corrosive elements.
- Emergency Protocols: Develop clear emergency protocols. This includes having escape routes, communication plans, and backup systems in place. Practice these regularly with anyone who will join you in the submarine.
- Regular Drills: Conduct regular safety drills for scenarios like fires, breaches, or system failures. Drills help ensure that everyone knows what to do in an emergency.
- Safety Gear: Equip your submarine with essential safety gear, including life vests, first aid kits, fire extinguishers, and oxygen tanks. Make sure everything is easily accessible and in good working order.
- Communication Systems: Install reliable communication systems to stay in contact with the surface. Test these systems thoroughly to ensure they work over the distances you plan to travel.
- Weather and Water Conditions: Always check weather forecasts and water conditions before a dive. Avoid going underwater during adverse weather or when water conditions are unpredictable.
- Insurance: Consider getting insurance for your submarine. This can protect you financially in case of accidents or damage.
Adhering to these safety tips greatly minimizes DIY submarine risks. Prioritize safety over any underwater adventure.
FAQs About DIY Submarine
Explore FAQs about DIY submarines: get answers on building, safety tips, and materials needed for your homemade underwater adventure.
Buoyancy control in a DIY submarine typically involves the use of ballast tanks that can be filled with water to increase weight and sink or filled with air to decrease weight and rise. Some DIY submarines use syringes, motors, and pumps connected to a remote control system to manage buoyancy effectively.
Building and operating a DIY submarine comes with significant risks, particularly related to pressure, oxygen supply, and navigation. It's crucial to have a thorough understanding of submarine engineering and safety protocols. Testing should be done in controlled environments, and emergency procedures must be in place.
The depth a DIY submarine can safely reach depends on its design and construction quality. Most homemade submarines are designed for shallow depths, but some have been tested up to 60 feet. Going deeper requires advanced knowledge of engineering and pressure management.
Yes, there may be legal considerations depending on where you plan to operate your DIY submarine. It's important to check local laws regarding maritime vessels, navigable waters, and any permits or inspections required for homemade submarines.
Building a DIY submarine presents several challenges that must be carefully considered:
Pressure Resistance: The submarine must be able to withstand the immense pressure of the water at depth, which increases by 1 atmosphere for every 10 meters of descent.
Oxygen Supply: Ensuring a reliable and safe oxygen supply for the duration of underwater excursions is critical.
Waterproofing: All components, especially electrical systems, must be thoroughly waterproofed to prevent malfunctions.
Navigation: Underwater navigation can be complex due to limited visibility and the absence of GPS signals.
Communication: Establishing a method for communication with the surface is essential for safety and coordination.
Concluding Thoughts
Wrapping up, building a homemade DIY submarine can be an exciting and educational project. Building your own homemade submarine not only fuels your curiosity but also enhances your understanding of underwater engineering. Get ready to explore the depths in ways you've never imagined by taking on this DIY submarine challenge.


