Building a DIY go-kart can be a fun and rewarding project. It involves planning, gathering materials, and following step-by-step instructions. You'll need basic tools, such as wrenches and screwdrivers, and common materials like wood or metal for the frame. Safety should always come first, so make sure to wear protective gear and follow guidelines carefully.
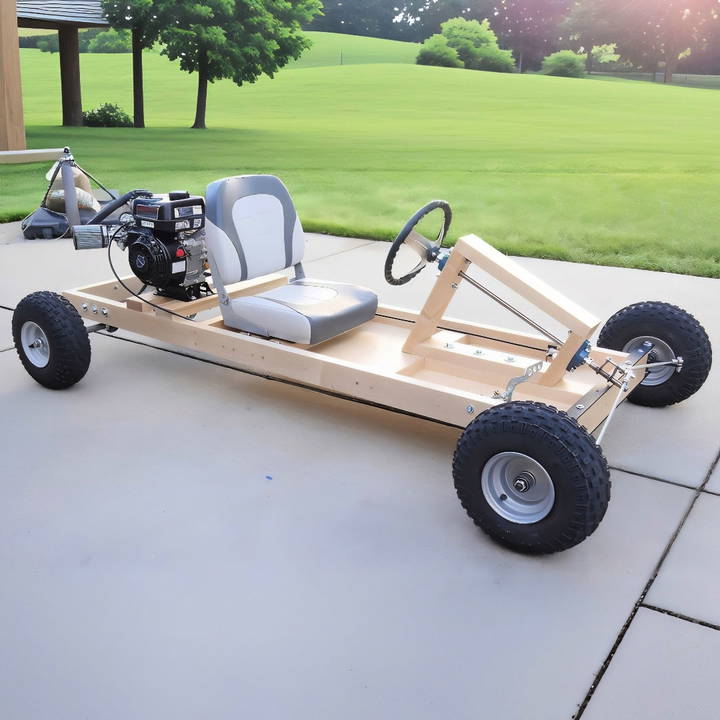
Making a homemade go kart starts with clear, detailed go kart plans. These plans will guide you through the process, from assembling the frame to installing the engine. By following these steps, you can ensure your go-kart is safe and functional.
Ready to dive into the next steps? Continue reading to learn more about building your own go-kart.
Materials Needed
- Soft Maple Wood: I opted for soft maple to make my own 2x4s for its durability and the stunning finish it offers. Alternatively, regular pine 2x4s from your local store will work just as well.
- Plywood (3/4 inch): For the base where you'll be sitting.
- Metal Brackets and Steel Bars: For mounting the engine and brake system.
- Fasteners: A variety of screws, bolts, nuts, and washers to hold everything together securely.
- Pillow Blocks: To support the axle and ensure smooth rotation.
- Cables and Springs: For the throttle and brake mechanisms.
- Engine (Predator 212 recommended): The heart of your go-kart.
- Wheels and Axles: Essential for making your kart mobile.
- Tools: While I used a variety of tools, the essentials include a drill, circular saw, sander, and a few mechanic hand tools like ratchets and wrenches.
Step by Step Instructions
Learn how to build a DIY go-kart with our step-by-step instructions. From preparing the wood to attaching the wheels, we've got you covered!
Step 1: Preparing the Wood
The journey began at my trusty table saw, sawing the soft maple down to size, making my own 2x4s. Each plank of wood was meticulously measured, marked, and cut, ensuring that when it came time to assemble, every piece would fit together perfectly. Remember, patience and precision are your best tools during this phase.
Step 2: Assembling the Frame
With my wooden 2x4s at the ready, I followed the plans to mark and cut each piece to its specific size. From the long side frames to the smaller pieces that would form the engine mounts and seating area, every cut was made with the final picture in mind. To connect these pieces, I utilized a combination of wood glue and screws, reinforcing each joint to ensure the frame could withstand the rigors of the road. The inclusion of dowels to cover the screw holes not only added strength but also a clean, professional appearance to the frame.
Step 3: Setting Up the Steering Mechanism
Arguably the most intricate part of this project was the steering mechanism. This required precise drilling of holes and the assembly of the steering column with pillow blocks for the shaft. I ensured the steering was as smooth as butter by taking my time to align everything correctly and using quality lubrication.
Step 4: Attaching the Wheels and Engine
Mounting the wheels was a straightforward process, but it was the placement of the engine that required my utmost attention. I chose a Predator 212 engine for its reliability and power. Using metal brackets and custom mounts, I secured the engine onto the frame, taking special care to align the sprocket and chain perfectly to avoid any potential mishaps during operation.
Step 5: The Finishing Touches
For the final touches, I focused on the seating area, applying a sturdy piece of plywood cut to fit the frame. I installed the seat, ensuring it was both comfortable and securely fastened. Following that, I added the throttle and brake systems, rigorously testing each to guarantee they responded swiftly and effectively.
Key Takeaways
- Planning is Crucial: Spend as much time as needed in the planning phase to avoid mistakes down the line.
- Quality Materials Matter: Opting for soft maple over pine was a decision that added both durability and aesthetic appeal to the go-kart.
- Precision and Patience: Take your time with each step, especially when working on the steering mechanism and engine mount.
Advanced Customization Tips
Customize your go-kart with these advanced tips to enhance its performance. Prioritize safety and ensure all modifications adhere to safety standards.
- Engine Upgrades: Upgrading your engine can give your go-kart a significant boost. Consider a higher horsepower engine for more speed, or switch to an electric motor for a quieter, eco-friendly option.
- Exhaust System: A new exhaust system can improve engine efficiency and power. Look for lightweight materials that can withstand high temperatures, like stainless steel or titanium.
- Tires: Tires are crucial for traction and handling. Soft tires provide better grip, while hard tires last longer. Choose based on the terrain where you'll be driving your go-kart.
- Suspension System: A good suspension system can improve ride comfort and handling. Adjustable shocks allow you to fine-tune the suspension to match your driving style and the track conditions.
- Braking System: For safety and performance, consider upgrading to disc brakes for better stopping power and control.
- Aerodynamics: Modifying the bodywork to reduce drag can increase speed and efficiency. Use materials like fiberglass or carbon fiber for a lightweight, streamlined design.
- Custom Paint and Decals: A custom paint job and decals can make your go-kart stand out. Use durable, high-quality paint, and apply a clear coat for extra protection.
- Performance Monitoring: Install gauges or a digital dashboard to monitor speed, engine temperature, and other performance metrics. This can help you make real-time adjustments and maintain your go-kart.
- Lighting: LED lights are a great addition for visibility and style. They're energy-efficient and can be added to the front, back, or underbody of your go-kart.
- Comfort Features: Don't forget comfort! Padded seats, adjustable pedals, and a steering wheel that suits your grip can make your go-karting experience more enjoyable.
Use these advanced customization tips to improve your go-kart's look, performance, and safety. Consult a professional if you're unsure, and enjoy making your go-kart uniquely yours.
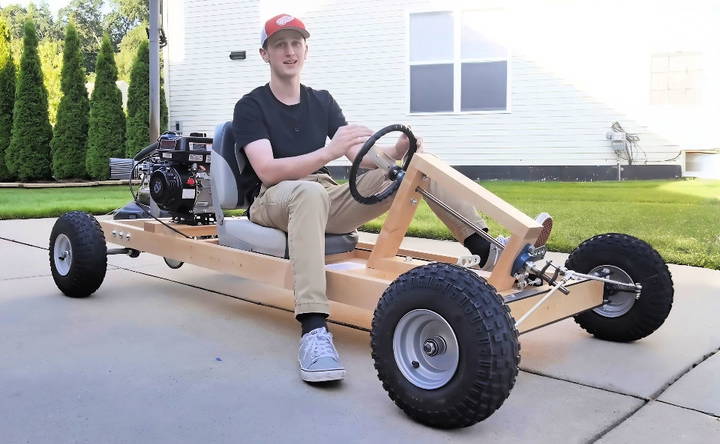
Technology Integration
In the world of DIY go-karts, integrating technology can take your build to the next level. Here's how you can blend modern tech with your go-kart for an enhanced experience:
- GPS Tracking: Install a GPS tracker to keep tabs on your go-kart's location. This is especially useful for safety and if you're racing in large, open spaces.
- Performance Monitoring Apps: Use apps to monitor your go-kart's performance. They can track speed, distance, and even suggest maintenance schedules.
- Electric Power: Consider converting your go-kart to electric. It's cleaner for the environment and can provide consistent power delivery.
- Smart Controls: Integrate a microcontroller like Arduino or Raspberry Pi to add smart features, such as automatic lights or a start/stop button that can be controlled from your phone.
- Data Logging: Equip your go-kart with sensors to log data like engine temperature, lap times, and G-forces. Analyzing this data can help you improve your driving and go-kart performance.
- Communication Systems: If you're racing with friends, a communication system can be a game-changer. Use helmet-mounted headsets to stay in touch during races.
- Safety Tech: Incorporate tech that enhances safety, like collision avoidance systems or automatic braking when obstacles are detected.
- Entertainment Systems: For those who enjoy a bit of music while driving, install a compact, vibration-resistant sound system.
- Lighting Upgrades: LED strips can add visibility and style to your go-kart. They're energy-efficient and can be programmed to change colors or patterns.
- Regenerative Braking: If you're using an electric motor, regenerative braking can help recharge the battery while slowing down, extending your ride time.
Integrating these technologies makes your DIY go-kart more fun, smarter, and safer. Remember, while tech is great, the fundamentals of design and safety are crucial.
Troubleshooting Common Issues
Building and maintaining a DIY go-kart can be a rewarding experience, but sometimes you might encounter issues that need troubleshooting. Here's a guide to help you solve some common problems in a straightforward and understandable way.
- Starting Troubles: If your go-kart won't start, check the spark plug first. It should be clean and in good condition. If it's worn out or dirty, it might need a replacement. Also, ensure there's enough fresh fuel in the tank.
- Acceleration Hiccups: When your go-kart doesn't accelerate smoothly, the problem could be with the engine or the clutch. Make sure the engine is running correctly and the fuel system is delivering fuel properly. Inspect the clutch for wear and tear; it might need lubrication or replacement.
- Steering Difficulties: If steering your go-kart feels off, look at the steering components for wear. Adjust the weight distribution if the go-kart isn't steering correctly, and make sure the front wheels are aligned properly.
- Braking Issues: For braking problems, check the brake pads and discs for wear. If they're worn out, they'll need replacing. Also, ensure the brake fluid is at the correct level and there are no leaks in the system.
- Power Loss: A sudden loss of power could be due to an overheating engine. Check for adequate coolant levels and make sure the air intake is not blocked. Overheating can also be caused by a clogged exhaust or a malfunctioning radiator.
- Unusual Noises: Strange noises often indicate something is loose or wearing out. Tighten all bolts and nuts, and replace any worn-out parts. Pay special attention to the engine mount and axle bearings.
- Electrical Glitches: Electrical issues can be tricky. Start by checking the battery and ensuring all connections are secure. Look for any frayed wires or loose connections that might need fixing.
- Torque Converter Troubles: If you're using a torque converter and it's not working well, the belt might be slipping or worn out. Check the belt and replace it if necessary. Also, inspect the pulleys for damage.
Start with simple solutions when troubleshooting. Maintain your go-kart to avoid issues and enjoy.
FAQs About DIY Go Kart
Explore essential faqs about DIY go kart: safety tips, building steps, and parts guide to help you build your own exciting go kart.
The right engine for your go kart depends on your desired speed, the weight of the kart, and your budget. Common choices include 4-stroke engines for reliability and ease of use, or 2-stroke engines for a lighter and potentially faster kart. Electric motors are also an option for a quieter, eco-friendly ride.
Yes, you can build a go kart without welding by using bolt-together frames and components. However, welding provides a stronger and more durable build. If you’re not experienced with welding, consider getting help from someone who is or opting for a pre-welded frame kit.
Safety features for your go kart should include a sturdy roll cage, seat belts, a kill switch, and proper brakes. It's also important to ensure all parts are securely fastened, the steering is responsive, and the wheels are aligned. Always wear a helmet when driving.
Parts and plans for building a go kart can be found online on DIY go kart forums, specialty websites, and retailers. You can also find comprehensive guides and tutorials that offer step-by-step instructions for various go kart designs.
Building an environmentally friendly go kart involves choosing the right power source and materials. Electric motors are a great option as they produce zero emissions. You can also use recycled materials for the frame and other parts to minimize environmental impact. Additionally, consider using biodegradable lubricants and maintaining your kart regularly to ensure it runs efficiently.
Conclusion
In conclusion, building a DIY go-kart can be an exciting and rewarding project. By following detailed go-kart plans and understanding how to build a go-kart process, you'll not only build a fun vehicle but also learn valuable skills. Enjoy the thrill of driving something you built with your own hands and share this fun experience with friends and family. Happy building!


