Setting up my own DIY root cellar was one of the most rewarding projects. During a tough winter, I noticed our vegetables were spoiling fast. A root cellar seemed like an old-fashioned, yet practical solution. I did some research and got started. Building it from scratch seemed daunting at first, but it turned out to be simpler than I thought.
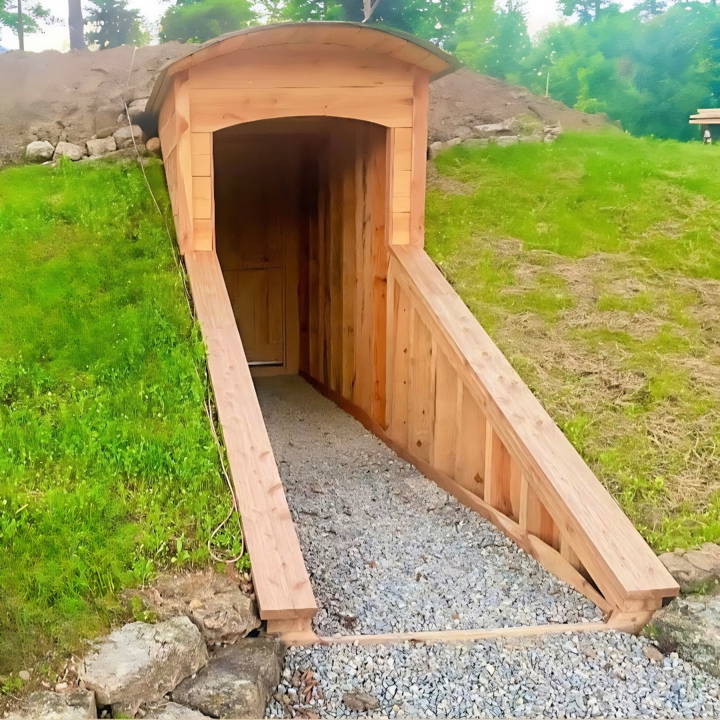
With a clear plan, simple tools, and some help from friends, my root cellar was ready in a couple of weekends. It's cool, dark, and the perfect spot to store our garden produce all year. This project taught me a lot, and now I want to help you.
This guide will make sure your own DIY root cellar comes together easily. Let's dive in and store those veggies right!
Understanding Root Cellars
Root cellars are traditional storage spaces used for preserving fruits, vegetables, and other perishables by leveraging the natural cooling, insulating, and humidifying properties of the earth. The concept of a root cellar is simple: it's an underground room or space that maintains a consistent, cool temperature all year round.
Why Root Cellars?
In the past, root cellars were essential for families to keep their produce fresh through the winter months. Today, they're experiencing a resurgence among those interested in self-sufficiency, sustainable living, and local food movements. They offer a way to store large quantities of produce without the need for electricity, making them environmentally friendly and cost-effective.
How Do They Work?
Root cellars work by taking advantage of the earth's natural insulation. Below the frost line, the earth maintains a consistent temperature that's cooler than the air above ground in summer and warmer in winter. When properly constructed, a root cellar uses this principle to build an environment ideal for storing produce.
What Can You Store?
A wide variety of fruits and vegetables can be stored in a root cellar, including but not limited to:
- Apples: They keep well for several months when stored in a cool, humid place.
- Potatoes: A staple in root cellars, they prefer cool, dark, and well-ventilated conditions.
- Carrots: When buried in damp sand or sawdust, carrots can last through the winter.
- Cabbage: Wrapped in newspaper and stored on shelves, cabbage can remain fresh for months.
Benefits of a Root Cellar
- Eco-Friendly: Root cellars use no energy, making them a green choice for food preservation.
- Cost-Effective: They reduce the need for refrigeration and can lower grocery bills by allowing you to buy in bulk and store.
- Emergency Preparedness: In times of power outages or disasters, a root cellar can keep your produce safe and fresh.
Understanding root cellars highlights their importance in sustainability, connecting to our past, and promoting self-sufficiency.
Planning and Preparation
Get insights on planning and preparation with a detailed list of materials needed and their importance. Learn why each material is essential.
Materials Needed:
- Eastern red cedar/juniper lumber: Known for its high rot resistance and aromatic properties. This was chosen to ensure the durability of the structure.
- Construction machinery (Kubota 161 excavator): Essential for digging the large hole required for the cellar. Its compact size was perfect for the scale of our project.
- ADS pipe, fabric, gravel, and turkey grit: These materials were crucial for making effective drainage around and beneath the structure to prevent water from infiltrating the cellar.
- Southern yellow pine: Used for sheathing due to its availability, although it has little rot resistance. Its application was planned in areas where it would not contact soil directly.
- Vapor barrier and 30-pound felt: These were laid down to prevent moisture from seeping into the cellar from the ground.
- Miscellaneous items: These included tools for woodworking, nails, ring shanks, and a turban vent for air circulation, among other construction supplies.
Why Each Material Was Needed
The choice of materials was guided by a few critical considerations: durability, cost-efficiency, and the practicality of construction. The Eastern red cedar and Southern yellow pine provided a sturdy framework at a reasonable cost.
The drainage system materials were essential in safeguarding the cellar from water damage, while the vapor barrier and felt added an extra layer of moisture protection. Each selected material played a pivotal role in ensuring the cellar's longevity and functionality.
Step by Step Instructions
Learn how to build a DIY root cellar with our step-by-step guide. From excavation to waterproofing, follow every stage for optimal food storage.
Step 1: Excavating the Site
The first step involved marking out and excavating the site with the Kubota 161. This mid-sized excavator was maneuverable yet powerful enough to handle the job efficiently. Removing the topsoil and setting it aside preserved the soil's integrity for later use.
Step 2: Laying the Drainage
Digging a trench within the excavated area, I laid down ADS pipe wrapped in fabric, covered it with gravel, and then added a layer of turkey grit. This buildd a reliable drainage system that would direct water away from the cellar, which was crucial for its effectiveness as a root cellar and storm shelter.
Step 3: Constructing the Walls
Opting to build the structure outside the hole and then lower it in was a decision made for safety and practicality, especially after experiencing some soil sloughing due to rain. We constructed the walls from the chosen lumber, paying close attention to dimensions and stability.
Step 4: Waterproofing and Insulating
Applying multiple layers of 30-pound felt topped with a heavy-duty plastic sheet buildd a waterproof barrier around the cellar. This was an essential step in protecting the wood structure from moisture, which is particularly critical given the partial underground nature of the cellar.
Step 5: Lowering the Structure
Using the excavator, we carefully lowered the constructed walls into the hole. This required precision and careful handling to ensure the structure remained intact and properly aligned.
Step 6: Backfilling and Final Touches
After placing the structure in the hole, we backfilled around it, gently compacting the soil to avoid exerting excessive pressure on the walls. We installed wing walls for additional soil retention and ensured positive drainage away from the building. Seeding the excavated area with grass and clover mix promoted soil stability and helped integrate the cellar beautifully into its natural surroundings.
Challenges and Solutions
Throughout this project, I faced several challenges, including weather-related delays and structural stability concerns. The unpredictable weather tested my patience and adaptability, as I had to wait for conducive conditions to proceed with excavation and construction. To address structural stability, I emphasized making a robust drainage system and carefully selected materials known for their durability and resistance to rot.
Advanced Features
When it comes to enhancing your root cellar, incorporating advanced features can significantly improve its efficiency and functionality. Here's a look at some sophisticated options you might consider:
Temperature and Humidity Control Systems
Modern root cellars can benefit from automated systems that monitor and adjust the temperature and humidity levels. This ensures that your stored produce remains in an ideal environment, even when outdoor conditions change.
Solar-Powered Ventilation
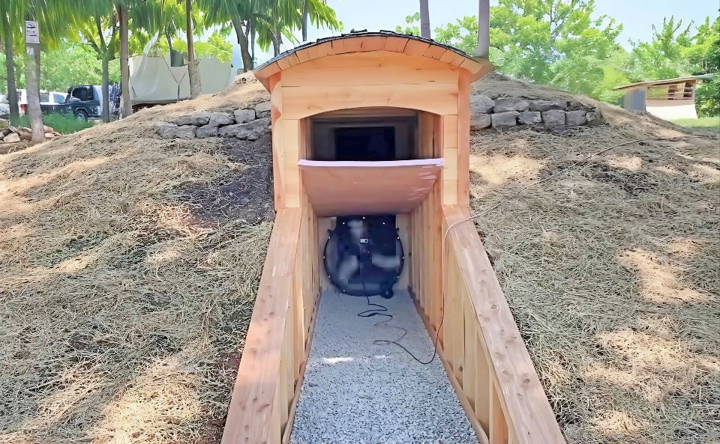
Solar-powered fans can be installed to provide consistent air circulation without relying on the electrical grid. This eco-friendly solution helps maintain the right balance of oxygen and carbon dioxide inside the cellar.
Ethylene Gas Management
Some fruits emit ethylene gas, which can accelerate the ripening process of other produce. Advanced root cellars can include ethylene scrubbers or absorbers to prevent premature spoilage.
Insulated Doors and Hatches
Proper insulation is key to maintaining the internal climate of a root cellar. Upgrading to insulated doors or hatches can prevent temperature fluctuations, especially during extreme weather.
Shelving and Storage Solutions
Custom shelving and storage bins designed for root cellars can maximize space and keep your produce organized. Materials like untreated wood can be used for their natural antibacterial properties.
Security Features
Security might be a concern for those storing large quantities of food. Installing sturdy locks or even a security system can protect your supplies from both wildlife and human intruders.
Water Collection Systems
Incorporating a system to collect and redirect rainwater away from your root cellar can help manage moisture levels and prevent flooding, ensuring the longevity of the structure.
To store your harvest safely and sustainably, build a root cellar with modern features to keep produce fresh, nutritious, and energy-efficient.
Storage Guidelines
Storing your harvest in a root cellar is an excellent way to extend the freshness of your produce. Here are some guidelines to ensure your fruits and vegetables remain in peak condition for as long as possible:
Fruits
- Apples and Pears: Wrap each fruit in a newspaper and place them in a single layer in a container. They require a cool, dry, and dark place.
- Ethylene Producers: Some fruits, like apples, produce ethylene gas, which can speed up ripening. Store them away from vegetables to prevent this.
Vegetables
- Root Vegetables: Carrots, beets, and potatoes thrive in root cellars. Store them in damp sand or peat moss to prevent them from becoming rubbery.
- Potatoes: Harvest on a dry day and cure in the sun to toughen the skin. Store in hessian or paper sacks in a dark place to prevent greening.
- Onions and Garlic: Dry thoroughly, then braid or hang in mesh to ensure good air circulation.
- Winter Squash: Cure at 80 to 85°F with 80 to 85 percent humidity before storing. They can last 2 to 6 months, depending on the variety.
General Tips
- Temperature and Humidity: Aim for a temperature of 32º to 40ºF and a humidity level of 85 to 95 percent. This slows down ripening and prevents moisture loss.
- Ventilation: Ensure good air circulation to prevent ethylene buildup and to keep the air fresh.
- Check Regularly: Inspect your stored produce regularly for signs of spoilage and remove any affected items promptly to prevent it from spreading.
Follow these storage tips to extend your harvest's shelf life and enjoy home-grown produce year-round. The key is maintaining the right environment and keeping a close watch.
Maintenance Tips
Keeping your root cellar in good condition is essential for the longevity of both the structure and the produce stored within. Here are some straightforward maintenance tips to ensure your root cellar remains a reliable food storage solution:
Regular Checks
- Temperature and Humidity: Monitor the temperature and humidity levels frequently. Aim to keep the temperature between 32º to 40ºF and humidity at 85 to 95 percent to slow down the ripening process and prevent moisture loss.
Ventilation
- Air Circulation: Ensure there's a way for fresh air to enter and stale air to exit. Good air circulation is vital to prevent the buildup of ethylene gas from certain fruits, which can cause other produce to spoil.
Cleanliness
- Organize and Inspect: Keep your produce well-organized and inspect it regularly. Remove any spoiled or decaying items immediately to avoid contamination or mold growth.
Structural Integrity
- Walls and Flooring: Check the walls and flooring for signs of damage or moisture. Use materials like concrete, wood, or earth bags for insulation and stability.
Storage Solutions
- Shelving and Bins: Use untreated wood for shelving and storage bins as it's naturally antibacterial and doesn't conduct heat as quickly as metal, which can help maintain a stable temperature.
By following these simple yet effective maintenance tips, you can ensure that your root cellar continues to provide a cool, dark, and humid environment that's perfect for storing your harvest throughout the year.
Legal Considerations
When you're planning to build a root cellar, it's important to be aware of the legal requirements that might affect your project. Here's a straightforward guide to help you navigate the legal landscape:
Check Local Regulations
Before you start digging or constructing, check with your local building department. You need to know about:
- Zoning Laws: Ensure that your property is zoned for the type of structure you plan to build.
- Building Codes: Comply with local building codes, which may dictate how deep you can dig and what materials you can use.
Obtain Necessary Permits
- Building Permits: You may need a permit before you can legally start construction. This ensures that your root cellar is safe and won't negatively impact your community.
Consider Utility Lines
- Underground Utilities: Verify there are no conflicts with underground utilities like water, gas, or electrical lines. Accidentally hitting one of these can be dangerous and costly.
Understand Property Lines
- Property Boundaries: Be clear on your property boundaries to avoid disputes with neighbors. Your root cellar should be well within your own property.
Plan for Safety
- Safety Regulations: Follow safety regulations to ensure that your root cellar is structurally sound and doesn't pose a hazard.
Paying attention to legal considerations can help avoid fines, disputes, or the need to alter your root cellar later.
FAQs About DIY Root Cellar
Discover answers to common questions about making and maintaining a DIY root cellar to store your produce effectively.
A DIY root cellar is a storage space you can build at home to keep fruits, vegetables, and other perishables fresh without electricity. It's typically built underground to use the earth's natural cool and moist conditions.
Ideally, your root cellar should be around 40°F (4.4°C), similar to a refrigerator. This temperature helps keep your harvest fresh for longer periods. However, the actual temperature may vary based on location and other factors.
Yes, a well-constructed root cellar can also serve as a storm shelter. When planning your root cellar, consider making it sturdy enough to provide protection during severe weather. Some people even get funding from FEMA for building a dual-purpose structure.
Proper ventilation is crucial to prevent spoilage and mold. Include at least one vent pipe for fresh air intake and another for stale air to exit. The pipes should be installed at different heights to facilitate natural air circulation. Additionally, make sure there's enough space around your produce to allow air to move freely.
Maintaining the correct humidity level is essential for a root cellar. Aim for 80-95% humidity to prevent your produce from drying out. You can achieve this by having a packed earth or gravel floor, which is better than concrete for keeping moisture levels high. Additionally, you can use damp sand, water trays, or even a humidifier to help maintain the desired humidity levels.
Conclusion
Building a DIY root cellar was a fun and useful project for me. I'm sure these steps will help you a lot. Start today and enjoy fresh produce all year round!


