Building a shower pan at home can transform your bath space efficiently. This DIY shower pan guide will assist you in each step, making the project manageable and rewarding. Understanding the right materials and procedures is crucial for a long-lasting result. This guide breaks down everything you need to know about how to build a shower pan, ensuring the process is smooth and successful.
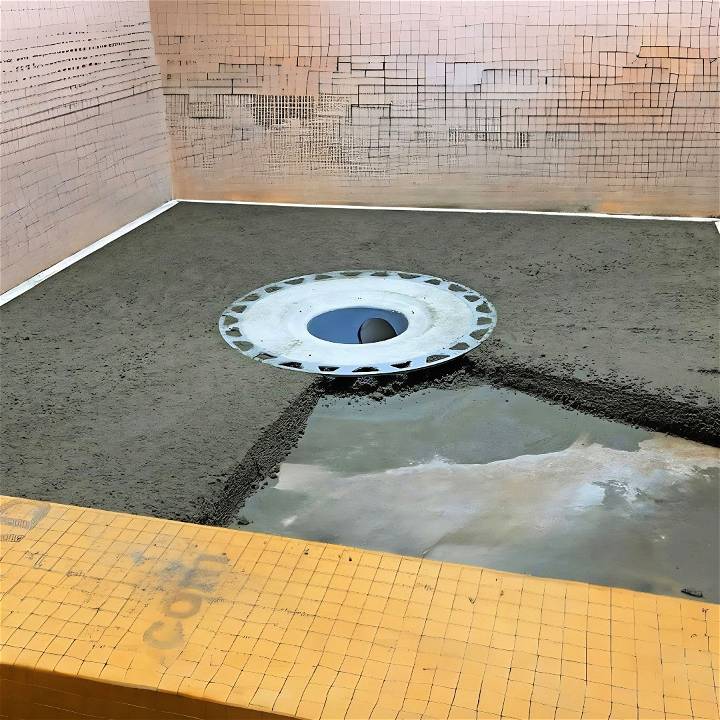
Starting with the right tools and accurate measurements, you will set a strong foundation for your shower pan. Follow these instructions closely to avoid common pitfalls and achieve a flawless finish. Installing a shower pan yourself not only saves money but also gives you a sense of accomplishment.
Why is a Shower Pan Important?
A shower pan serves as the base of your shower area. It’s designed to catch and direct water to the drain, keeping the rest of your bathroom dry. Without a proper shower pan, water can seep into the floor and walls, leading to mold, mildew, and structural damage.
The Basics of Building a Shower Pan
To build a shower pan, you’ll need to:
- Prepare the Area: Clean the space where the shower pan will go, ensuring it’s free of debris and dust.
- Build a Solid Base: Lay a pre-sloped mortar bed or use a prefabricated pan for a consistent slope toward the drain.
- Install the Drain: Place the drain assembly in the center of the shower area, connecting it securely to the plumbing below.
- Apply Waterproofing: Use a waterproof membrane or paint-on liquid to seal the pan and prevent leaks.
- Test for Leaks: Before tiling, fill the pan with water to ensure there are no leaks.
Tips for a Successful Shower Pan Construction
- Ensure Proper Slope: The pan should slope towards the drain at a gradient of about 1/4 inch per foot to ensure efficient water flow.
- Choose the Right Materials: Use quality materials that are designed for wet areas and can withstand constant exposure to moisture.
- Be Precise: Take accurate measurements and cut materials carefully to ensure a snug fit and watertight seal.
Follow these steps to build a reliable shower pan, keeping your bathroom dry and mold-free. Doing it right avoids future costly repairs. Be thorough, and your shower pan will last for years.
What You'll Need:
- Deck Mud: This sand and cement mixture is crucial for making the dry pack you'll use for the pre-slope.
- Straight Plywood or a Long Level: For screeding (leveling) the mud.
- Foam Screeds (or a DIY alternative): These will guide you to achieve an even slope. I'll share how you can make your own.
- Mortar Mix: This is used to bond the dry pack to the concrete if necessary.
- Water: To moisten the concrete subfloor and the dry pack mixture.
- Tools: Trowel, grout float, measuring tape, mixer, and a hoe for mixing.
Step by Step Instructions
Master shower pan installation with step-by-step instructions: from understanding pre-slope to finishing touches. Perfect for DIY enthusiasts.
Step 1: Understanding the Pre-Slope
The pre-slope is a slight incline in your shower floor that directs water towards the drain. Without this, water could pool and lead to mold or leakage. The aim is to build a quarter-inch slope per foot away from the walls towards the drain.
Step 2: Preparing the Subfloor
If your subfloor isn't perfectly level (which mine wasn't), skip foam pans that require absolute flatness. Instead, opt for the dry pack method which is more forgiving. In cases of a wooden subfloor, lay down tar paper and stucco lath to build a solid base for the dry pack.
Step 3: Building Your Screeds
Screeds are temporary guides placed around the perimeter of the shower to ensure your pre-slope is even. I used leftover foam board, cutting and beveling it to the required height determined by the slope calculation (a quarter-inch per foot). These were then glued and screwed into position, forming a frame around the shower area.
Step 4: Mixing and Laying the Dry Pack
Mix the deck mud with a bit of water – the mixture should hold together when squeezed but remain crumbly. Moisten the subfloor before you start to prevent it from absorbing water from the mud too quickly. Begin in the corner farthest from the drain, compacting the mud against your screeds and gradually working your way inwards.
Step 5: Screeding the Surface
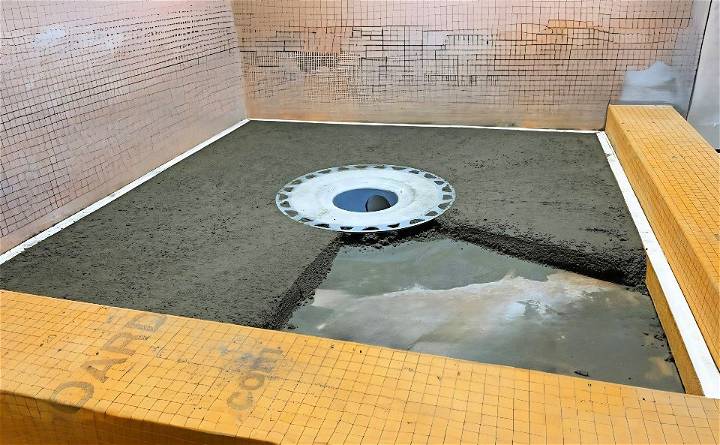
Using straight pieces of plywood or a level, I scraped across the top of the screeds, moving excess material towards areas that needed more. This action leveled the surface while maintaining the slope towards the drain. A floating motion helped smooth the surface without compacting it too much, leaving a finish similar to coarse sandpaper. This texture ensures a good bond when you later apply thinset for the tile.
Step 6: Finishing Touches
After screeding, I let the dry pack cure according to the product instructions. Once set, I removed the foam screeds and filled any voids with additional dry pack or thinset to prepare for waterproofing and tiling.
Additional Tips
- Waterproofing: After your pre-slope sets, apply a waterproof membrane before laying the tile. This will protect your hard work from water damage.
- Curing Time: Be patient and allow adequate time for the mud to cure completely. Rushing can compromise the integrity of your slope.
- Double-Check the Slope: Use a level to verify the slope in several places before the mud sets. Making adjustments after it hardens is a pain.
Advanced Techniques for Shower Pan Construction
Advanced techniques can enhance the functionality and aesthetics of your bathroom when constructing a shower pan. These methods are particularly useful for those looking to customize their shower space or tackle more complex projects.
Customizing the Shape
If your shower space is not a standard size or shape, you may need to customize your shower pan. This involves:
- Building a Template: Use cardboard or heavy paper to make a template of the shower floor, marking the location of the drain.
- Cutting the Base Material: Transfer the template onto the base material, such as a foam shower pan liner, and cut it to fit the space.
- Ensuring Proper Slope: Manually adjust the slope of the mortar bed to ensure water flows toward the drain, which may require a more hands-on approach.
Incorporating In-floor Heating
For added comfort, in-floor heating can be installed beneath the shower pan. This process includes:
- Selecting the Heating System: Choose a system suitable for wet environments and compatible with your flooring.
- Installing the Heating Elements: Lay the heating cables or mats according to the manufacturer’s instructions, ensuring even coverage.
- Embedding in Mortar: Cover the heating elements with a layer of mortar, being careful not to damage the wires.
Using Advanced Waterproofing Techniques
Waterproofing is critical in shower pan construction. Advanced techniques include:
- Liquid Waterproofing Membranes: Apply multiple coats of a liquid membrane, allowing each layer to dry completely.
- Fabric Membranes: Install a fabric membrane that bonds with the mortar, providing a seamless waterproof barrier.
Adding Aesthetic Touches
The shower pan can also contribute to the overall design of your bathroom:
- Decorative Tiles: Choose tiles that complement the bathroom’s design and install them on the shower pan floor.
- Accent Features: Consider adding a decorative border or accent tiles for a custom look.
Use these techniques to make a shower pan that works great and looks good. Follow manufacturer guidelines and local codes for safety.
Troubleshooting Common Issues
When building a shower pan, you might encounter a few common issues. Knowing how to identify and fix these problems is key to ensuring a long-lasting and functional shower pan.
Preventing Leaks
Leaks are the most common issue with shower pans. To prevent them:
- Check the Seal: Ensure the drain and the seal around it are watertight.
- Inspect the Waterproofing: Look for any gaps or cracks in the waterproofing membrane.
Avoiding Cracks in the Mortar
Cracks can form in the mortar bed if it’s not mixed or applied correctly. To avoid this:
- Follow the Mix Ratio: Use the correct ratio of sand to cement.
- Cure Properly: Allow the mortar to cure slowly, keeping it moist for at least 24 hours.
Ensuring Proper Slope
An incorrect slope can lead to water pooling. To ensure proper drainage:
- Use a Level: During installation, use a level to check the slope towards the drain.
- Adjust as Necessary: If the slope is off, adjust the mortar bed before it sets.
Dealing with Tile Adhesion Problems
Tiles may not stick if the surface isn’t prepared properly. To ensure good adhesion:
- Clean the Surface: The mortar bed should be clean and free of debris.
- Use the Right Adhesive: Select a tile adhesive that’s suitable for wet areas.
Addressing Grout Issues
Improper grouting can lead to water seepage. To address grout issues:
- Mix Correctly: Follow the manufacturer’s instructions for mixing grout.
- Apply Evenly: Use a grout float to press the grout firmly into the spaces between tiles.
Addressing these issues proactively ensures a durable and reliable shower pan. Troubleshooting during construction prevents future problems.
FAQs About How to Build a Shower Pan
Learn how to build a shower pan with our comprehensive faqs. Get expert tips and step-by-step guidance for a flawless installation.
After the initial mortar bed dries, install 2x6 blocking on the walls. Cut and nail a rubber membrane over the mortar bed and the blocking, ensuring there’s a gap for the drain. This membrane is crucial for waterproofing the shower pan.
The slope is buildd by the sand-based mortar. You’ll spread it over the wire mesh, making a slope from the edges to the drain. After the first layer dries, draw a level line around the walls and lay another layer of mortar, following the slope and the line.
Once the second layer of mortar dries, place small stones around the drain holes to prevent clogging. Then, let the mortar dry completely before installing tile board and tile on the shower pan and walls. This will give you a finished, tiled shower pan.
To install the drain, first ensure the subfloor is level and clean. Place the lower drain body into the floor opening and connect it to the waste pipe. Use a wrench to tighten the connection, but be careful not to over-tighten. Once the lower body is in place, lay the rubber membrane and clamp ring over it, then install the upper part of the drain.
After the mortar and waterproofing are complete, begin tiling by spreading thinset mortar on the shower pan. Start from the drain and work your way outwards, placing the tiles carefully and using spacers to maintain even gaps. Once the tiles are set, apply grout between them, wipe away any excess, and allow it to dry completely.
Conclusion
Wrapping up, learning how to build a shower pan can seem challenging, but with clear guidance and patience, it's achievable. This DIY shower pan guide equips you with the basics to transform your bathroom. With this knowledge in hand, you're ready to build a reliable and custom shower pan.


