Building a set of stairs for your deck might seem daunting, but with the right approach and materials, it's a project you can handle yourself. Well-built stairs are essential for the functionality and safety of your deck, and when constructed properly, they will last for years with minimal maintenance. In this guide, you'll find all the steps and tips required to build sturdy and long-lasting DIY deck stairs. We'll cover key materials, proper installation techniques, and the common mistakes you need to avoid.
Essential Tools and Materials
Before you get started, gather the necessary tools and materials to ensure a smooth process. Here's a list of what you'll need:
Tools:
- Tape Measure (like the Crescent Shockforce Nite Eye)
- Speed Square (Crescent Speed Square)
- Combination Square (useful for precise measurements)
- Cordless Drill or Screwdriver
- Hammer or Palm Nailer
- Circular Saw (for cutting boards if necessary)
- Safety Equipment (gloves, hearing protection, and safety glasses)
Materials:
- Treated Lumber (Prowood Lumber is highly recommended)
- Pre-cut Stair Stringers (Prowood pre-cut stringers save time and effort)
- Treads (Western Red Cedar or other weather-resistant lumber)
- Joist Tape (to prevent moisture damage)
- Spax Stainless Steel Screws
- Stair Stringer Hangers
Each of these tools and materials plays an essential role in ensuring the durability of your deck stairs. For instance, using joist tape is crucial for preventing moisture buildup that can weaken your stair frame over time.
Step by Step Instructions
Learn how to build DIY deck stairs with step-by-step instructions, from planning and site prep to attaching stringers, treads, and risers.
Step 1 – Planning Your Stairs
The first step to building your stairs is determining the height of the deck from the ground and calculating the number of steps you'll need. Here's how:
- Measure the Total Rise: The rise is the vertical distance from the ground to the top of your deck. You'll need this number to calculate the rise of each step.
- Calculate the Rise and Run: The rise (height) of each step typically ranges from 6 to 7¾ inches, while the tread (run) is usually 10 inches. Use an online stair calculator or manually divide the total rise by the desired rise of each step to determine how many steps you need. Example: If your deck is 36 inches off the ground and you want a rise of 7.2 inches per step, you would divide 36 by 7.2, giving you 5 steps.
- Ensure Code Compliance: Most building codes require that the maximum rise is no more than 7¾ inches, and the minimum tread width is 10 inches. Always check your local building codes for specific requirements.
Step 2 – Preparing the Site and Installing the Landing
Before installing the stairs, you'll need to prepare the site, especially if you're replacing an old set of stairs.
- Clear the Area: Remove any debris, rocks, or old materials that may be in the way.
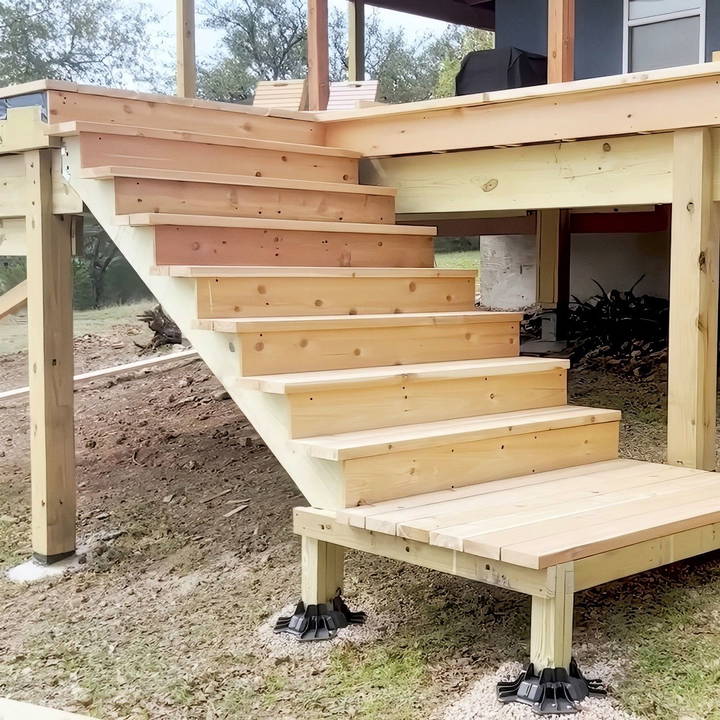
- Install a Landing: A proper landing at the bottom of the stairs is a building code requirement. It should extend at least 36 inches beyond the bottom step. Instead of pouring concrete, consider using footing pads like Tuffblocks for easy and secure installation.
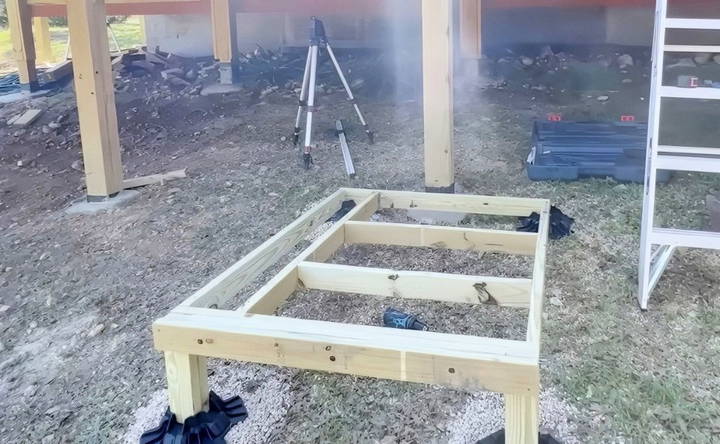
The landing provides stability and prevents soil erosion beneath your stairs. Skipping this step can lead to instability over time, which may cause your stairs to shift or sink into the ground.
Step 3 – Attaching the Stair Stringers
The stringers are the backbone of your stairs, so it's crucial to install them correctly. Here are the steps:
- Choose Your Stringers: You can either cut your own stringers or buy pre-cut ones, like the Prowood pre-cut stringers, which eliminate the hassle of measuring and cutting. If you choose to cut your own, ensure the cutouts leave at least 5 inches of uncut wood for strength.
- Install Joist Tape: Apply joist tape to the tops of the stringers to protect them from moisture. This is especially important for extending the life of the wood in outdoor conditions.
- Position the Stringers: Securely attach the stringers to the deck rim joist using stringer hangers. Add a layer of joist tape between the hanger and the wood to prevent corrosion.
- Secure with Screws or Nails: While some people use toenails to attach stringers, it's better to use hanger brackets with screws for a stronger, longer-lasting hold. Stainless steel screws are ideal because they resist corrosion better than standard nails.
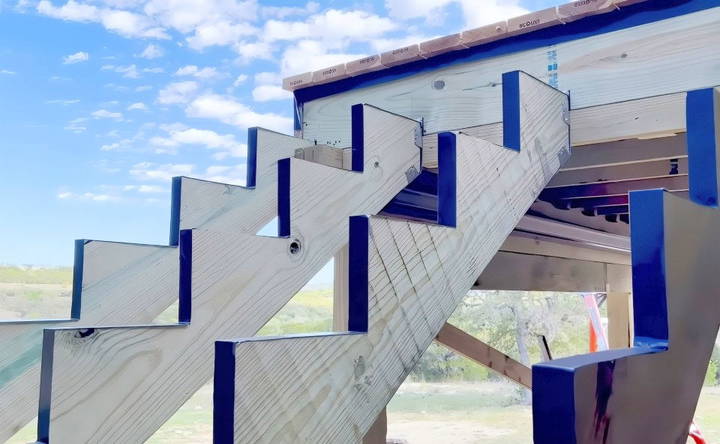
Make sure the stringers are spaced correctly — typically, 18 inches apart for a 36-inch wide staircase. However, if you want extra stability, you can add an additional stringer for extra support.
Step 4 – Installing the Treads
With the stringers in place, it's time to add the treads, the flat boards that you'll step on.
- Choose the Right Material: Western Red Cedar is an excellent choice for treads because of its natural rot- and insect-resistant properties. Alternatively, you can use pressure-treated lumber, which also holds up well against the elements.
- Add Nosing to the Treads: The treads should protrude slightly (about ¾ inch to 1¼ inches) beyond the risers. This is called nosing, and it helps prevent tripping by allowing your foot to clear the edge of the step more easily.
- Screw the Treads into Place: Use stainless steel screws to secure the treads to the stringers. Space the screws evenly and ensure that the treads are flush and level.
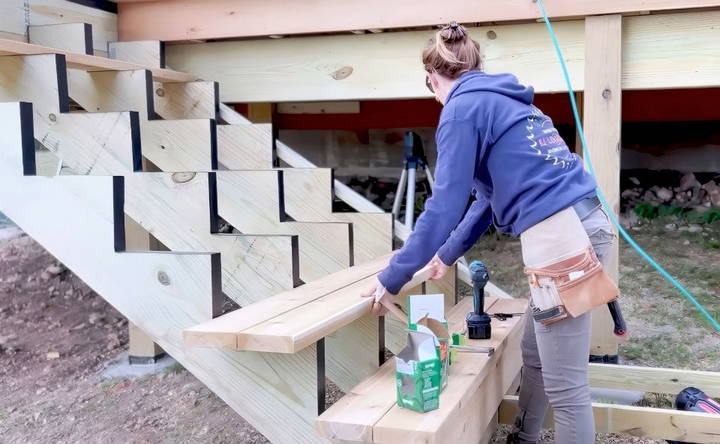
When installing treads, always check that the overhang is consistent across the entire width of the stairs for a neat and uniform appearance.
Step 5 – Installing the Risers
Risers are the vertical boards that close off the space between the treads. They aren't always required, but if building code requires them or you want a more finished look, follow these steps:
- Cut the Risers: Measure and cut riser boards to fit snugly between the treads. They should match the width of your treads for a seamless look.
- Install the Risers: Butt each riser against the underside of the tread above it, securing them in place with screws.
- Check for Gaps: Ensure there's no more than a 4-inch gap between any part of the riser and tread, as required by most building codes.
Step 6 – Securing and Finishing Touches
Once the main structure is complete, there are a few final steps to ensure your stairs are safe, durable, and look great.
- Add Railings (if necessary): Depending on the height and building codes in your area, you may need to add railings to your deck stairs. Follow local codes for the height and spacing of balusters.
- Protect the Wood: Applying a weatherproof finish to your stair materials will help them last longer. Western Red Cedar, for example, can be stained for additional protection.
- Use Post Sleeves: If your deck stairs include posts that are embedded in the ground, use post sleeves to prevent rot and water damage. These sleeves are easy to install and extend the life of the wood by preventing moisture from reaching the ground level of the post.
Common Mistakes to Avoid
Building stairs may seem straightforward, but there are a few common mistakes that can lead to premature wear or safety hazards:
- Skipping the Landing: As mentioned earlier, not having a landing at the bottom of your stairs can lead to instability. Always include one!
- Improper Stringer Attachment: Simply nailing stringers to the deck frame won't provide enough support. Use stringer hangers and screws for a secure fit.
- Not Using Joist Tape: Moisture is the biggest enemy of wood, especially for outdoor stairs. Always use joist tape on your stringers to prevent rot.
- Using the Wrong Fasteners: Regular nails can loosen over time as wood expands and contracts. Opt for corrosion-resistant screws, like stainless steel, to ensure a long-lasting hold.
Conclusion
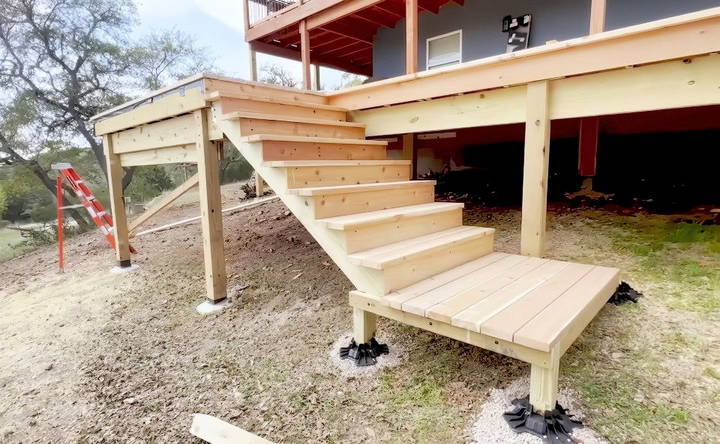
Building your own deck stairs doesn't have to be intimidating. With careful planning, the right materials, and attention to detail, you can build a set of stairs that not only look great but are safe and durable for years to come. Follow this guide step by step to avoid common mistakes, and don't forget to consult your local building codes to ensure compliance with safety standards. With a little patience and precision, you'll be able to transform your deck and enjoy a beautiful, functional outdoor space.
Now that you have your stairs, you're ready to move on to the next phase of your deck project, like adding a railing for safety or expanding your deck further. Happy building!
FAQs About DIY Deck Stairs
Explore frequently asked questions about DIY deck stairs. Learn tips, tools, and techniques for a successful deck project today.
Premade stringers are convenient, but you must ensure your deck's height is a multiple of the stringer’s rise. If the deck height doesn’t align with the premade stringer's dimensions, the steps might be uneven, leading to a tripping hazard. Consider cutting custom stringers if this is the case.
Joist tape helps protect the tops of the stair stringers from moisture, which can lead to wood rot. This simple step significantly increases the lifespan of your stairs by preventing water accumulation on the surface.
Nosing is the slight overhang on the tread. Building codes often require a nosing that extends at least ¾ inch but not more than 1¼ inches. This overhang prevents users from tripping by giving them more foot space when ascending.
Yes, most building codes require risers to prevent gaps greater than 4 inches. Open risers can build safety hazards, especially for children. Always ensure your stairs have appropriate risers for safety and code compliance.
Yes, sealing the ends of posts before embedding them in concrete is crucial to prevent water absorption. Unsealed ends can wick moisture, causing premature rot. Using post sleeves or sealants can help extend the life of in-ground posts.
Screws are better than nails for stair construction because wood expands and contracts with temperature changes. Nails can work loose over time, while screws provide a more secure and long-lasting hold.
For sloped or uneven ground, it's recommended to use adjustable footing pads like Tuffblocks. These allow you to set the base of your stairs without extensive digging or leveling, making installation easier and more stable on uneven surfaces.
Yes, a landing is required by most building codes. It provides stability and prevents the bottom step from settling into the ground. The landing should extend at least 36 inches beyond the bottom step.
No, you should use rot-resistant wood like Western Red Cedar or pressure-treated lumber, which are designed to withstand outdoor conditions. These materials naturally resist moisture and insects, making them ideal for outdoor stairs.
For posts on a steep grade, using rebar in the concrete can add extra strength. Placing rebar vertically inside the form before adding concrete helps reinforce the post and prevents shifting over time.


