Building stairs can seem daunting, but with the right guidance, you can successfully build sturdy and safe steps for your home. This practical guide from a professional carpenter provides clear instructions on how to build stairs. It covers essential tools, materials, and step-by-step procedures. Learning how to build steps will enhance your carpentry skills and improve your home's function and value.
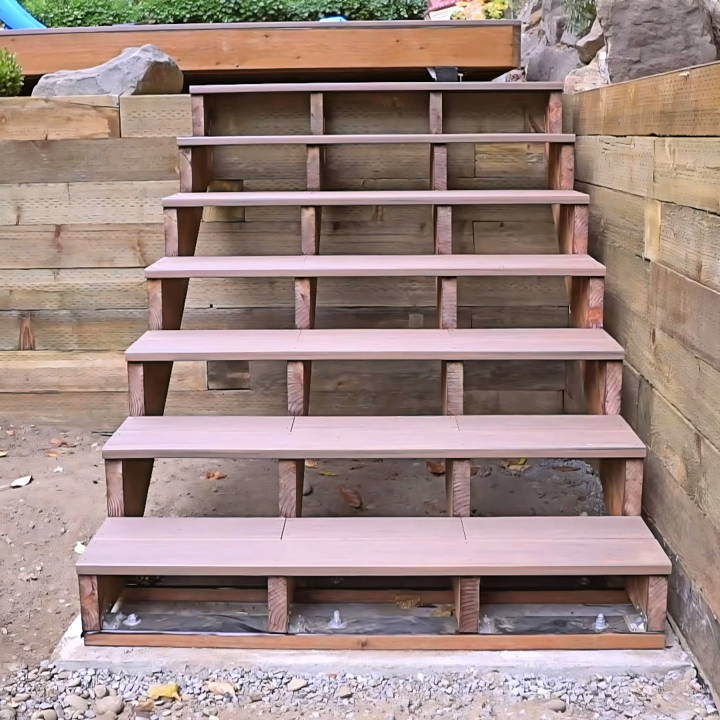
Whether you're constructing stairs for a new home or replacing old ones, this guide explains how to make stairs effectively. It ensures that each step is precise and aligned, enhancing safety and durability.
Ready to make your stair-building project a success? Dive into the next section to learn the detailed steps and expert tips for crafting perfect stairs.
Understanding the Basics
When embarking on the journey of building a wooden staircase, it's essential to grasp the foundational concepts. This will ensure your project is not only aesthetically pleasing but also structurally sound and safe.
Staircase Terminology
- Rise: The vertical distance between the floors in your home.
- Run: The horizontal distance from the front to the back of a single step.
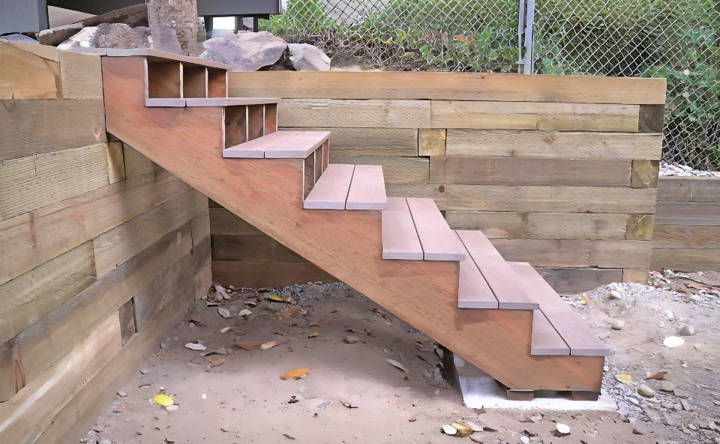
- Stringers: The sloped boards that support the weight of the stairs.
- Treads: The top part of the step that you walk on.
- Risers: The vertical boards between each tread.
Calculating Stair Dimensions
To ensure comfort and safety, there's a general rule of thumb for calculating the rise and run of your stairs, known as the “Rule of 25”. This rule states that the sum of one riser and one tread should be around 25 inches. Here's a simple formula:
\text{Riser height (in inches)} + \text{Tread depth (in inches)} \approx 25Riser height (in inches)+Tread depth (in inches)≈25
For example, if you choose a riser height of 7 inches, the tread depth should be about 18 inches for a comfortable step.
Measuring for Your Stairs
To start, measure the total rise from the lower floor to the upper floor. Divide this number by the height of each riser to determine the number of steps needed. It's crucial to get this right, as it affects the entire layout of your staircase.
Planning Your Staircase
Consider the space available and the design of your home. The staircase should be functional without obstructing the flow of your house. If space is limited, you might opt for a spiral staircase or a staircase with a landing.
Building a staircase connects floors but also ensures safety, comfort, and design harmony. Follow these basics to build a lasting, beautiful wooden staircase.
Materials Needed
- Laser Level: Essential for measuring the rise from your starting point to your endpoint accurately.
- Stair Calculator (online tool): Simplifies the calculation process for each step's dimensions.
- 2x12 Stringers: The backbone of your stairs, providing the necessary support.
- Circular Saw and Reciprocating Saw: This is used to cut the wood according to the stair measurements.
- Galvanized Steel Brackets: To secure the stringers in place and ensure durability.
- 2x4s (Pressure Treated): For the base plate and steps, offering resistance against rot.
- Concrete and Formwork Supplies: These are used to build a stable landing or base for your stairs.
- Screws (Exterior Grade): Ensures your structure holds together under various weather conditions.
Step by Step Instructions
Learn how to build stairs with ease. Follow these step-by-step instructions in a professional carpenter's guide for perfect results every time!
Preparing the Layout
Learn tips for preparing the layout, assessing the rise, crafting a template, and cutting the stringers in stair construction for perfect results.
Assessing the Rise
First, I set up my laser level at the proposed top of the stairs, measuring the distance down to where the stairs would end. This initial step is crucial as it dictates the overall layout of your staircase. After determining the total rise (47 1/4 inches in my case), I utilized an online stair calculator to get the exact measurements for each step.
Crafting a Template
Using a scrap piece of wood, I marked the rise and run based on the calculator's output. This template served as a guide for marking the stringers, ensuring each step would be uniform.
Cutting the Stringers
Striking lines on the 2x12s as per the template, I began the meticulous process of cutting. Careful not to rush; each cut was made deliberately to match the rise and run accurately. The circular saw was perfect for most of the job, but I switched to a reciprocating saw for precision in the corners.
Setting Up the Base
Learn efficient steps for setting up the base, pouring concrete, attaching and securing stringers, and adding treads. Streamline your project with ease.
Forming and Pouring Concrete
To anchor the stairs, I constructed a form for a concrete base, meticulously leveling the ground before pouring concrete. This base would not only support the stairs but also ensure they were anchored firmly. After pouring, I placed anchor bolts in the wet concrete, referencing a string line for precise alignment.
Attaching Stringers to Concrete
Once the concrete cured, I installed a pressure-treated 2x4 as a base plate, drilling holes to align with the anchor bolts. This method buildd a solid foundation for attaching the stringers.
Securing the Stringers
Each stringer was affixed to the base plate and then to the retaining wall or deck. Galvanized steel brackets enhanced the structure's stability, while screws ensured a robust attachment. This setup guaranteed that the stairs would withstand heavy use.
Adding the Treads
Opting for composite decking for the steps was both a practical and aesthetic decision. Composite materials offer durability and require less maintenance, a significant advantage over traditional wood.
Efficient Installation
By laying out all decking pieces and marking screw locations beforehand, I ensured uniform spacing and alignment. This pre-planning detailed the thought process behind each step, figuratively and literally.
The Finishing Touch
With all boards cut and positioned, I secured them with specific decking screws designed for composite materials. These screws provided a clean look without the need for pre-drilling, making the process smoother.
Advanced Techniques
Experienced builders can enhance wooden staircases with advanced techniques, adding intricate details and custom features.
Building Custom Handrails
Handrails aren't just safety features; they're also an opportunity to showcase craftsmanship. Consider these steps for custom handrails:
- Design: Sketch your handrail design, considering the style of your home. Whether it's sleek and modern or ornate and traditional, your design should complement the overall aesthetic.
- Material Selection: Choose high-quality wood that can be carved and shaped, such as oak or maple. Hardwoods are durable and offer a refined finish.
- Tools: Use a combination of power tools and hand tools. A router can help shape the edges, while chisels and files can add fine details.
- Finishing: Sand the handrail smoothly and apply a finish that enhances the wood's natural beauty and protects it from wear.
Incorporating Design Elements
Adding unique design elements can turn a staircase into a focal point. Here are some ideas:
- Built-in Lighting: Install LED strip lights beneath the treads for a modern look and improved visibility.
- Decorative Risers: Paint or tile the risers for a pop of color or pattern.
- Mixed Materials: Combine wood with glass or metal balusters for a contemporary feel.
Advanced Joinery Techniques
Strong joints are crucial for a durable staircase. Explore techniques like:
- Dovetail Joints: For connecting treads to stringers, dovetail joints offer strength and visual appeal.
- Mortise and Tenon: This classic joint is ideal for securely attaching newel posts.
Curved Staircases
Building a curved staircase is a challenging but rewarding task. It requires precise measurements and cuts. Use a flexible metal guide to outline the curve and cut stringers accordingly. Laminating thin layers of wood can build curved handrails that follow the staircase's shape.
Safety and Precision
Always prioritize safety when using tools and handling wood. Measure twice, cut once, and don't rush the process. Precision is key to a successful advanced staircase project.
Using these advanced techniques, you'll build a sturdy, functional, and artistic staircase that enhances your home.
Troubleshooting Common Staircase Issues
Building a staircase is a complex task, and even with careful planning, issues can arise. Here's a guide to troubleshooting some common problems you might encounter during and after your staircase construction.
Squeaky Steps
Squeaks are often caused by wood rubbing against wood or loose components. To fix this:
- Identify the Source: Step on each tread to locate where the squeak is coming from.
- Tighten Connections: If the noise is from a loose tread or riser, tighten any visible screws or nails.
- Lubricate Joints: Apply powdered graphite or talcum powder between the treads and risers to reduce friction.
Uneven Treads
Uneven steps can be a tripping hazard and must be addressed promptly.
- Measure and Adjust: Use a level to check each tread. If a step is uneven, you may need to add shims beneath it or sand it down.
- Secure Properly: Ensure that each tread is securely attached to the stringers.
Wobbly Handrails
A shaky handrail can compromise safety.
- Check the Brackets: Tighten any loose brackets that connect the handrail to the wall or posts.
- Inspect Newel Posts: If the newel post is wobbly, it may need to be re-secured to the floor or stair treads.
Cracks in Wood
Wood can crack over time due to weight, temperature changes, or moisture.
- Fill Small Cracks: Use wood filler that matches the color of your stairs to fill in small cracks.
- Replace Damaged Parts: For larger cracks, it may be necessary to replace the affected tread or riser.
Sticky Staircase Door
If your staircase has a door that sticks, it can be an annoyance.
- Adjust the Hinges: Tighten any loose hinge screws. If the door still sticks, you may need to chisel out the recesses slightly to allow for more space.
- Plane the Door: If the door is rubbing against the frame, use a hand plane to shave off a small amount from the sticking edge.
Loose Carpet or Runners
Carpet that moves underfoot is a hazard.
- Re-attach or Replace: Secure any loose carpeting or runners with double-sided tape or tacks. If the carpet is worn, consider replacing it.
Stains or Discoloration
Stains can detract from the beauty of your staircase.
- Clean Promptly: Remove any spills immediately to prevent staining.
- Refinish if Needed: For persistent stains, sand the area and reapply a matching stain or finish.
Regular inspections and quick repairs keep your staircase safe and beautiful, preventing small issues from escalating.
Safety Tips
When constructing a wooden staircase, safety is paramount—not just in the finished product but also during the building process. Here are some essential safety tips to keep in mind:
Personal Protective Equipment (PPE):
- Eye Protection: Always wear safety glasses or goggles to protect your eyes from sawdust and flying debris.
- Hearing Protection: Use earplugs or earmuffs when operating loud power tools.
- Gloves: Wear gloves to protect your hands from splinters and cuts, but ensure they don't impede your dexterity.
- Respiratory Protection: A dust mask or respirator is crucial when sanding wood or working in a dusty environment.
Tool Safety:
- Inspect Tools: Before use, check tools for damage. Do not use damaged or faulty equipment.
- Proper Use: Use each tool according to its intended purpose and follow the manufacturer's instructions.
- Secure Work Area: Clamp down wood pieces when sawing or drilling to prevent slipping.
Work Environment:
- Keep It Clean: Maintain a tidy workspace. Remove clutter and clean up spills to prevent tripping or slipping.
- Adequate Lighting: Ensure your work area is well-lit to avoid mistakes and injuries.
- Fire Safety: Keep a fire extinguisher handy, especially when working with flammable materials.
Ladder and Height Safety:
- Stable Ladder: Use a sturdy ladder that reaches the necessary height without overextending.
- Three Points of Contact: Always keep two hands and one foot, or two feet and one hand, on the ladder at all times.
- Don't Overreach: Move the ladder instead of stretching beyond a comfortable reach.
Construction Safety:
- Follow Codes: Adhere to local building codes and regulations to ensure the staircase is safe and legal.
- Load-Bearing Capacity: Design the staircase to support the expected weight and use.
- Railings and Guards: Install railings and guards where required to prevent falls.
First Aid:
- Kit Accessibility: Keep a first aid kit close by in case of minor injuries.
- Emergency Plan: Know the location of the nearest hospital and have emergency contact numbers at hand.
Following these tips will prevent accidents and ensure your staircase project is incident-free. Safety measures are an investment in everyone's well-being.
FAQs About Building a Wooden Staircase
Discover FAQs about building a wooden staircase: essential tips, materials, and expert insights for a successful and durable staircase project.
Before you begin, it's essential to understand the building codes in your area to ensure compliance. Safety is paramount, so equip yourself with safety glasses and other protective gear. You'll need various tools, including a measuring tape, saw, hammer, drill, and level. Plan your design carefully, considering the total rise (vertical height) and total run (horizontal depth) to determine the number of steps and their dimensions.
Stringers are the structural supports that hold the steps. To measure them, calculate the total rise and total run of your staircase. Divide the total rise by the desired rise of each step to find the number of steps. Use a framing square to mark the cut lines on your stringer board, ensuring each step is uniform in size. A circular saw is typically used for cutting, but finish the cuts with a handsaw to avoid overcutting.
Once your stringers are in place, start with the bottom riser, attaching it to the stringers with construction adhesive and finish nails or screws. Treads can then be laid on top of the risers and fixed similarly. Ensure that all treads and risers are cut to the same width for a consistent look and feel. The depth of the treads should be no less than 10 inches to provide ample foot space.
Yes, handrails are an important safety feature and can be added by installing newel posts at the top and bottom of your staircase. Measure and cut your handrail to length, then attach it to the newel posts and the wall, if necessary, using rail bolts or brackets. Ensure the handrail is at a comfortable height and securely fastened to support the weight of a person.
Regular maintenance is crucial to keep your wooden staircase safe and looking great. Sweep or vacuum regularly to remove debris. Check for any loose parts and tighten as needed. Apply a wood preservative or finish to protect against wear and moisture. Inspect your staircase annually for any signs of damage or wear and address any issues promptly to prevent accidents.
Conclusion
Wrapping up, building stairs can be straightforward when following detailed guidance. Our professional carpenter's guide on how to build stairs ensures you have the know-how to build safe and sturdy steps. From accurate measurements to essential materials, each step in the process has been covered. With these insights, you can confidently achieve excellent results in your construction project. Enjoy crafting your new stairs, and take pride in your work!


