One morning, I noticed my coffee didn't taste as good as before. I realized my Keurig coffee machine needed cleaning. Keeping it clean not only improves the flavor but also extends its lifespan.
Cleaning a Keurig coffee maker might seem daunting, but it's simpler than it appears. I've found easy steps to clean and descale it without any fuss. I'm excited to share how I do it so you can enjoy fresh coffee every day.
Understanding Your Keurig
Knowing your Keurig is key to a great cup of coffee. This popular single-cup system uses K-Cups for various hot drinks quickly. Here's how your Keurig works to brew your perfect cup:
- Water Reservoir: This is where you fill-up the water before brewing. It's important to use fresh water for the best taste and to refill it regularly to avoid running a brew cycle with an empty tank.
- K-Cup Holder: This compartment houses the K-Cup pod. It has a needle that punctures the pod during the brewing process, allowing hot water to flow through and extract the coffee.
- Drip Tray: Positioned under the beverage outlet, the drip tray catches any spills or drips. It's removable for easy cleaning.
- Control Panel: Depending on your Keurig model, this may include buttons for power, cup size selection, and special features like strong brew or iced coffee settings.
- Brewing Mechanism: Inside the machine, there's a heating element that warms the water to the optimal temperature for brewing coffee. The pump then forces the water through the K-Cup pod to brew your beverage.
- Maintenance Alerts: Some Keurig models have indicators or alerts to remind you when it's time to descale or add water, ensuring your machine stays in good working order.
Understanding these parts helps you maintain your Keurig and troubleshoot issues. Regular cleaning keeps your coffee tasty and your machine smooth. A well-kept Keurig ensures a delightful coffee experience.
Materials Needed and Their Importance
Before we dive into the cleaning process, let's gather our materials. You'll need:
- White vinegar: This is the key ingredient for descaling the coffee maker, removing mineral buildup inside.
- Dish soap: Helps to clean and remove oil residue from coffee beans.
- A toothbrush (I used an old one): Perfect for scrubbing away stubborn coffee grounds.
- All-purpose cleaner: For wiping down the exterior and making it shine.
- Microfiber cloth or paper towels: These are less abrasive than regular towels, perfect for cleaning without scratching.
Step by Step Instructions
Learn how to clean a Keurig with our step-by-step guide. From disassembly to descaling, keep your coffee maker in top shape with these easy instructions.
Step 1: Disassemble Your Keurig
Start by powering off your Keurig to ensure safety. Then, carefully remove the water reservoir, reservoir lid, drip tray, and its cover. If your model has a built-in water filter, remove that as well. Finally, take out the K-Cup holder and funnel. This will expose all the parts that frequently come into contact with water or coffee and potentially harbor bacteria or scale buildup.
Step 2: Clean Removable Parts
Place the removed parts (K-Cup holder, funnel, drip tray, and lid) in a sink filled with hot, soapy water. I left them to soak for about 30 minutes, which helped loosen the coffee oils and residue. An alternative is placing these parts in the dishwasher if they are dishwasher-safe. This step ensures that every component touching your coffee is as clean as possible.
Step 3: Brush Away Coffee Grounds
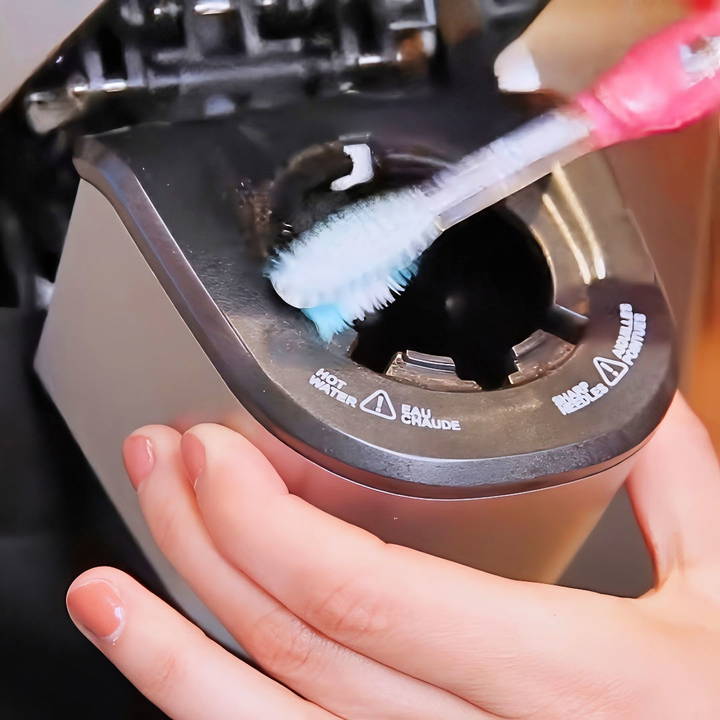
Once you open up your Keurig, you might find leftover coffee grounds in nooks and crannies. I used an old toothbrush to gently scrub these areas. It's amazing how much buildup can occur in these hidden spots, affecting the taste of your coffee.
Step 4: Wipe Down the Machine
Using a microfiber cloth or paper towels and some all-purpose cleaner, wipe down the exterior of your Keurig. Not only does this step help in maintaining the hygiene of your coffee maker, but it also keeps it looking new. Pay extra attention to areas where coffee or water may have spilled over time.
Step 5: Address Hard-Water Buildup
If you spot any hard-water buildup (white crusty deposits), dampen a towel with white vinegar and wrap it around the affected area. Let it sit for a while. In my case, I left it for about an hour. This helps in breaking down the buildup, making it easier to wipe away afterward.
Step 6: Descale and Sanitize the Inner Mechanism
Reassemble your Keurig without the K-Cup. Fill the reservoir halfway with white vinegar. Then, place a mug on the drip tray to catch the liquid. Run the brewing cycle. This process uses vinegar's natural acidity to break down limescale and residue inside the machine. Once finished, throw away the hot vinegar. Repeat the process with fresh water several times to remove any vinegar trace. Trust me, you don't want your next cup of coffee tasting like vinegar.
Final Steps and Ongoing Maintenance
After meticulously following the steps above, I noticed a significant improvement in the taste and performance of my Keurig. It felt as if I had extended its lifespan, saving me from investing in a new one prematurely.
To keep your Keurig in top condition, I recommend descaling every 3-6 months, depending on your usage and the hardness of your water. Regularly cleaning the removable parts and wiping down the machine can also prevent buildup and maintain the quality of your coffee.
Advanced Cleaning Techniques
Keurig owners can follow these advanced steps for a deep clean to keep every cup of coffee fresh and delicious. Here's a simple guide:
- Disassembling Your Keurig: Start by unplugging the machine and removing all removable parts, including the water reservoir, drip tray, and K-Cup holder. Consult your Keurig's manual for instructions on removing any additional parts that are safe to clean separately.
- Deep Cleaning the Water Reservoir: Fill the reservoir with a mixture of water and descaling solution or white vinegar. Let it soak for at least 30 minutes, then scrub gently with a non-abrasive sponge to remove any buildup. Rinse thoroughly with water until the vinegar smell is gone.
- Unclogging the Needles: Use a paperclip to gently clear out any coffee grounds or debris that may be clogging the needles. There are usually two needles – one where the water comes out and another where it enters the K-Cup. Be careful not to damage the needles.
- Cleaning the K-Cup Holder: Soak the holder in warm, soapy water for a few minutes. Use a soft brush to scrub away coffee residue and rinse well.
- Wiping Down the Machine: With a damp cloth, wipe the exterior of the machine, including the area around the coffee pod entrance and the control panel. Avoid getting water inside the machine.
- Reassembling and Running a Cleansing Brew: Once all parts are clean and dry, reassemble your Keurig. Run a few water-only brew cycles to flush out any residual cleaning solution.
- Sanitizing the Drip Tray: If your drip tray is dishwasher-safe, place it in the top rack of the dishwasher. Otherwise, wash it by hand with warm, soapy water.
- Inspecting Rubber Seals and Gaskets: Check for wear and tear on any rubber seals or gaskets. If they show signs of damage, consider replacing them to prevent leaks and maintain the efficiency of your machine.
Use these advanced cleaning techniques to extend your Keurig's life and ensure each coffee is made in a clean environment.
Health and Safety Considerations
Prioritize health and safety when cleaning your Keurig. A clean machine ensures a tasty, contamination-free cup. Follow this guide to maintain your Keurig.
- Use Food-Safe Products: Always use cleaning agents that are safe for food contact surfaces. White vinegar, a natural descaling agent, is a safe and effective option for removing mineral buildup.
- Regular Descaling: Over time, calcium deposits can accumulate in your Keurig, affecting its performance and potentially your health. Descaling every 3-6 months with a Keurig-approved descaling solution or white vinegar can prevent this.
- Avoid Harsh Chemicals: Steer clear of harsh chemicals that can leave harmful residues. If you wouldn't put it in your body, don't put it in your coffee maker.
- Clean After Illness: If someone in your household has been sick, it's a good idea to clean your Keurig to prevent the spread of germs. A thorough cleaning can help ensure that everyone's coffee is safe.
- Mind the Mold and Bacteria: Keurigs can harbor mold and bacteria in the water reservoir and hidden areas. Regular cleaning can prevent these from affecting your health.
- Check for Recalls: Stay informed about product recalls related to your Keurig. Manufacturers may issue recalls for parts that could impact your health, such as faulty heating elements or plastic components that could leach chemicals.
- Proper Storage: Store your Keurig in a dry, cool place to prevent mold and bacteria growth when not in use.
- Follow Manufacturer Instructions: Always refer to the Keurig manual for specific cleaning instructions. This ensures you're cleaning the machine correctly and not voiding the warranty.
Follow these safety tips to keep your Keurig clean and safe. A little care ensures your appliance lasts long and stays secure for daily use.
Troubleshooting Common Issues
Encountering issues with your Keurig can be frustrating, but many common problems have simple solutions. Here's a clear and straightforward guide to troubleshooting some of the most frequent issues Keurig users face:
Keurig Won't Brew
- Solution: Check if the water reservoir is seated properly. If it is, try unplugging the machine for a few minutes, then plug it back in and attempt another brew cycle.
Coffee Tastes Off
- Solution: Replace the water filter if it's been more than two months. Run a cleansing brew with just water to ensure no old coffee grounds are affecting the taste.
Keurig Leaks Water
- Solution: Ensure the water reservoir is properly aligned and the lid is securely fastened. If the issue persists, check for any cracks in the reservoir.
The Keurig Displays Descale Message
- Solution: Describe your Keurig using a descaling solution or white vinegar to remove calcium deposits that can interfere with performance.
Keurig Turns Off Unexpectedly
- Solution: This could be due to a short auto-off setting. Adjust the setting to a longer time or disable it if you prefer the machine to stay on.
The Keurig Is Noisy During Brew
- Solution: Some noise is normal, but excessive noise may indicate air in the pump. Try filling the reservoir to the max line and running a few cleansing brews without a K-Cup.
Keurig Doesn't Heat
- Solution: If the machine turns on but doesn't heat, contact Keurig customer service as this may indicate a faulty heating element.
Keurig Brews Slowly
- Solution: Clean the needles using a paperclip to remove any clogs. Also, descale the machine to clear any buildup inside.
Fix common issues to avoid professional repairs and quickly enjoy your coffee. Regular maintenance prevents these problems—keep your Keurig clean for optimal performance.
Keurig Model-Specific Cleaning Guides
Each Keurig model has its own unique features and cleaning requirements. To keep your Keurig brewing perfectly, it's important to follow the specific cleaning guide for your model. Here's a general overview of how you can approach cleaning different Keurig models:
Keurig Classic Series:
- Daily: Use a damp cloth to wipe the exterior. Rinse the drip tray and K-Cup holder under warm water.
- Weekly: Descale the machine using a Keurig descaling solution or white vinegar to prevent mineral buildup.
- Monthly: Clean the water reservoir with a non-abrasive cloth and soapy water.
The Keurig 2.0 Series:
- Daily: After each use, rinse the pod holder and the drip tray.
- Weekly: Check the needle for clogs and use a paperclip to gently remove any debris.
- Monthly: Change the water filter cartridge to maintain the quality of your coffee.
Keurig Rivo and Vue:
- Daily: Wipe down the machine's surface and clean the frothing pitcher after each use.
- Weekly: Run a water-only brew cycle to clean out any leftover coffee oils.
- Monthly: Use the descaling solution to thoroughly clean the internal components.
The Keurig K-Café and K-Latte:
- Daily: Clean the frother after each use and rinse the K-Cup holder.
- Weekly: Use a soft brush to clean any coffee grounds from the brew head.
- Monthly: Descale the machine to ensure optimal performance.
Keurig K-Elite and K-Select:
- Daily: Empty the drip tray and rinse the pod holder.
- Weekly: Clean the area around the pod holder to prevent coffee buildup.
- Monthly: Perform a deep clean of the water reservoir and descale as needed.
Refer to your machine's user manual or the Keurig website for cleaning instructions. Regular maintenance extends your coffee maker's lifespan and ensures consistently delicious coffee.
FAQs About How to Clean a Keurig
Discover easy steps to clean a keurig effectively. Get answers to FAQs about keurig maintenance for perfect coffee every time.
To ensure your Keurig continues to provide the perfect cup of coffee, it’s important to perform regular cleaning. Daily, remove the used K-Cup and wipe the cup holder. Weekly, clean the removable parts like the drip tray and water reservoir. For descaling, which removes mineral buildup, do it every 3 to 6 months or as indicated by your model’s descale reminder.
For daily cleaning, you’ll need a damp cloth to wipe the cup holder. For weekly cleaning, gather a large mug, non-abrasive cloth, dish soap, and access to a sink. If your model has a removable water reservoir and drip tray, these should be washed with warm, soapy water.
Descaling is crucial for removing mineral deposits that can affect your machine’s performance. Fill the water reservoir with a descaling solution or a 50-50 mix of white vinegar and water. Run the brew cycle until the reservoir is empty. Let the machine sit for 30 minutes, then flush with fresh water by running several brew cycles.
Yes, white vinegar is an effective and natural cleaning agent for your Keurig. It's especially useful for descaling. Just remember to thoroughly rinse the machine with fresh water afterward to remove any vinegar taste.
Yes, the K-Cup holder and the needle that pierces the cups can accumulate coffee grounds and residue. Use a soft brush or toothbrush to gently clean these areas. Also, ensure the water reservoir and drip tray are cleaned regularly to prevent mold and bacteria growth.
Conclusion
Taking a little time to clean and descale my Keurig has made a big difference in my daily coffee. I hope these tips help you keep your coffee maker in top shape and your coffee tasting great.


