Last month, I noticed my dryer was taking longer than usual to dry clothes. I suspected that the dryer vent might be clogged. Instead of calling a professional, I decided to tackle the problem myself. I wanted to learn how to clean a dryer vent on my own. With some research and patience, I gathered the necessary tools and got to work.
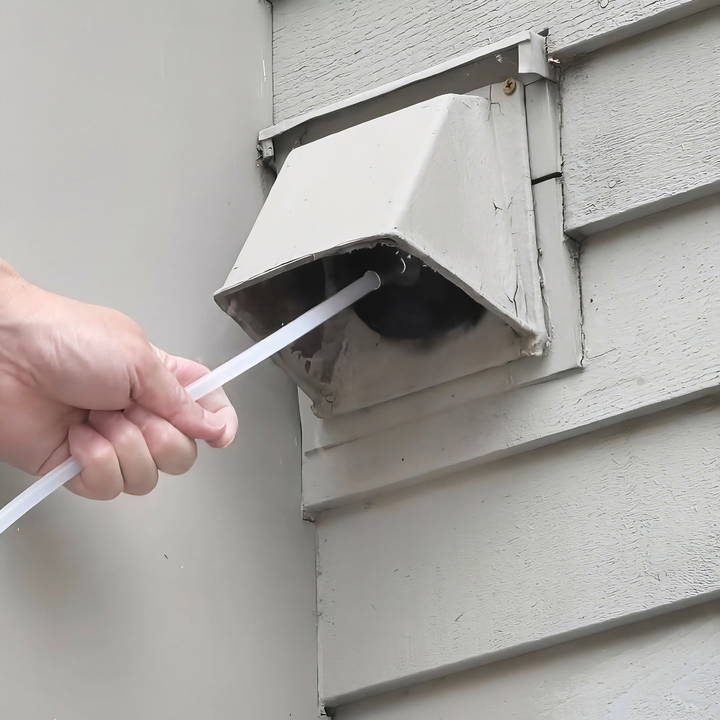
Cleaning the dryer vent turned out to be easier than I thought. I carefully disconnected the dryer, removed the vent cover, and used a brush to clear out the lint. The process was straightforward, and I felt confident doing it myself. Now, my dryer works efficiently again, and I saved money by not hiring a professional.
If I can do it, so can you. In the following guide, I'll share the steps I took to learn how to clean dryer vent without professional help. You'll find that it's simple and can improve your dryer's performance.
Understanding Your Dryer Vent System
A dryer vent system is more than just a tube running from your dryer to the outside of your house. It's a crucial part of your dryer that ensures clothes dry efficiently and safely. Let's break down what it is and how it works in simple terms.
What is a Dryer Vent?
A dryer vent is a duct that transports moisture and lint from your dryer to the outdoors. This helps to prevent humidity and lint from accumulating in your home, which can be a fire hazard.
Types of Dryer Vents:
- Rigid Metal Ducts: These are durable and recommended because they're less prone to crushing and lint buildup.
- Flexible Metal Ducts: These can be useful in tight spaces but should be handled carefully to avoid kinks.
- Plastic or Foil Ducts: These are less recommended because they can sag and are more susceptible to lint accumulation and blockages.
How Does it Work?
When you run your dryer, the vent carries hot, moist air away from the dryer. This air contains lint—tiny fibers that come off your clothes. The vent allows the air to escape and the lint to be expelled outside.
Why is Vent Configuration Important?
The path from your dryer to the outside vent should be as short and straight as possible. This helps to prevent lint from getting trapped and building up, which can lead to blockages and, in severe cases, fires.
Maintaining Your Vent:
- Regular Inspections: Check for lint buildup and clear any blockages.
- Proper Installation: Ensure the vent is installed according to manufacturer guidelines.
- Avoiding Crushes: Keep the vent duct from being crushed by the dryer or other objects.
Signs of a Poorly Working Vent:
- Clothes are damp after a normal drying cycle.
- The dryer is hot to the touch after use.
- There's a musty smell in the laundry room.
Knowing your dryer vent ensures safe, efficient operation. A clean vent prevents fires and reduces energy costs. Stay diligent, and your dryer will last.
Materials You'll Need
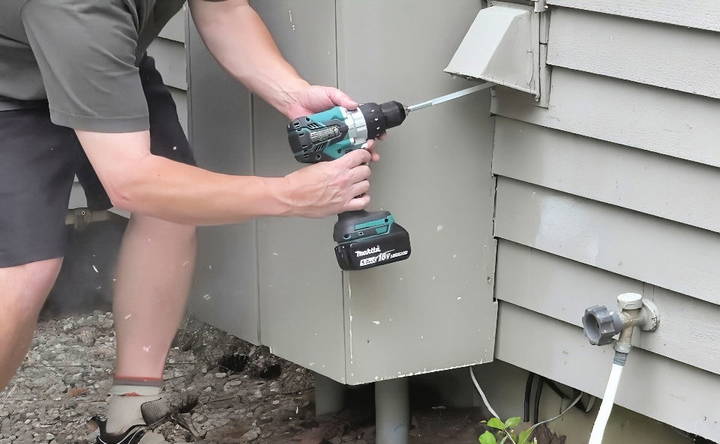
- Cordless Screwdriver: The convenience of a cordless screwdriver cannot be overstated for this task.
- Dryer Vent Cleaning Brush Kit: This kit, which usually costs around $20, is the game-changer. It comes with a brush and rod extensions, allowing you to clean vents up to 20 feet long.
The brush kit is crucial because it's designed specifically for this job. The extensions screw together easily, and the brush efficiently removes lint buildup when attached to your screwdriver.
Step by Step Instructions
Learn how to clean your dryer vent with our step-by-step guide to ensure safety and efficiency. Follow our instructions for a thorough and hassle-free cleaning.
Preparation
Before starting, locate your dryer vent outside your house. Once you've found it, you're ready to begin.
Step 1: Setup Your Cleaning Tool
Attach the brush to the rod, and then attach the rod to your cordless screwdriver. Depending on the length of your dryer vent, you might need to use multiple extensions.
Step 2: (Optional) Turn On Your Dryer
Turn your dryer on using an air cool setting. This step is optional but can significantly aid the cleaning process by pushing the lint out as you clean. However, ensure the heating element is off to prevent any heat-related issues.
Step 3: Begin Cleaning
With your dryer running, start by slowly inserting the spinning brush into the vent. Keep the brush moving and avoid high speeds; a steady, moderate pace is more than sufficient.
As the brush ventures further into the vent, lint and debris will begin to exit from the outside. The sight can be surprising, especially if it's your first cleanout. Depending on your vent's length, you might need to add more extensions to ensure the brush reaches the entire duct.
Caution
Be gentle if your ductwork is made of softer materials like foil. The goal is to clean, not puncture or damage the vent.
The Aftermath and Maintenance
Once your vent is thoroughly cleaned, and you've witnessed a significant amount of lint expulsion, it's important to inspect your work. Check the vent's exterior to ensure the exit flap closes properly—a secure flap keeps out pests and birds.
Additionally, check behind your dryer. Ensure that the cleaning process didn't disconnect the vent hose or cause any damage. If you find any disconnections, reattaching the hose is a simple fix.
Post-Cleaning Maintenance
After you've cleaned your dryer vent, it's important to keep it in good shape. This means being proactive and taking steps to ensure it stays clear and functions well. Here's a simple guide to post-cleaning maintenance.
- Regular Checks: Make it a habit to check your vent regularly. Look for any signs of lint buildup or blockages. If you find any, clear them out immediately.
- Lint Trap Cleaning: Every time you use your dryer, make sure to clean the lint trap. This is the easiest way to prevent lint from reaching the vent.
- Monitor Dryer Efficiency: Keep an eye on how well your dryer is working. If it starts taking longer to dry clothes, it might be a sign that your vent is getting clogged again.
- Exterior Vent Cover: Check the outside vent cover frequently. It should be free of debris and open easily when the dryer is on. If it's stuck, it could cause a blockage.
- Gentle Use: Be gentle with your vent. Avoid crushing the duct with heavy objects or pressing it against the wall.
- Professional Inspections: Consider having a professional inspect your vent system every few years, especially if you have a complex setup or long ducts.
- Educate Your Household: Make sure everyone in your home knows the importance of vent maintenance. Teach them how to clean the lint trap and what signs to look out for.
Follow these tips to keep your dryer vent clean and efficient. You'll save on energy bills and prevent fire hazards. A small effort ensures your dryer's performance and safety.
Troubleshooting Common Problems
When it comes to dryer vents, a few issues can crop up even with the best maintenance routine. Here's a straightforward guide to solving some of the most common dryer vent problems.
Dryer Takes Too Long to Dry Clothes
- Solution: Check for lint blockages in the vent. Ensure the outside vent flap opens when the dryer is on. If the problem persists, the vent line might be too long or have too many turns. Consider rerouting or shortening the vent.
Dryer is Overheating
- Solution: An overheating dryer is often due to restricted airflow. Turn off the dryer, check for obstructions in the lint trap, and clean the vent system thoroughly.
There's a Burning Smell
- Solution: A burning smell is a serious concern and could indicate a fire hazard. Stop using the dryer immediately, disconnect it from power, and inspect the vent for trapped lint. If you can't find the source, call a professional.
The Vent Hood Flap Doesn't Open
- Solution: The vent hood flap might be stuck due to lint buildup or debris. Clean the flap and the surrounding area. If the flap is damaged, it may need to be replaced.
Lint is Escaping from the Vent
- Solution: Lint escaping from the vent indicates a leak or hole in the vent duct. Inspect the ductwork for damage and seal any gaps with metal tape. Replace the duct if necessary.
Water is Dripping from the Vent
- Solution: Water dripping can occur if the exhaust air is cooling and condensing inside the vent. This might be due to excessive lengths of venting or cold external temperatures. Insulate the vent or consider a shorter path to the outside.
Always unplug your dryer before troubleshooting. If unsure or the problem is complex, consult a professional.
FAQs About How to Clean Dryer Vent
Discover essential tips on how to clean your dryer vent safely and efficiently in our comprehensive FAQs guide. Get expert advice and keep your dryer running smoothly.
Cleaning your dryer vent is crucial for several reasons. It helps prevent fires, as lint buildup can ignite from the heat of the dryer. Additionally, a clean vent allows your dryer to operate more efficiently, which can save on energy costs and prolong the life of your appliance.
It’s recommended to clean your dryer vent at least once a year. However, if you have a large family and use your dryer frequently, you might need to clean it more often. Signs that your vent needs cleaning include longer drying times and the dryer becoming unusually hot during operation.
You’ll need a vacuum with a hose attachment, a dryer vent brush, and a screwdriver. Some people also use a power drill to make the job easier, especially if the vent is long or has many turns.
Many people can clean their dryer vents themselves using a few simple tools. However, if you’re not comfortable doing it yourself, or if your vent system is complicated, it’s a good idea to hire a professional.
If you notice any damage to your dryer vent, such as cracks, gaps, or disconnections, it's important to address it immediately. Damaged vents can lead to inefficient drying and are a fire hazard. Here's what you can do:
Inspect the vent for visible signs of wear and tear.
Tape any small gaps with UL-listed metal foil tape.
Replace any damaged sections with new ductwork.
Avoid using duct tape, as it can deteriorate over time due to the heat.
Seek professional help if the damage is extensive or if you're unsure about how to proceed.
Conclusion:
Taking the time to clean your dryer vent yourself not only saves money but also keeps your home safer. I hope my experience inspires you to give it a try. It's a simple task that makes a big difference.


