Cleaning and filling grout lines in tile countertops can significantly improve the appearance and cleanliness of your kitchen or bathroom. Over time, grout can become dirty, uneven, or cracked, which not only affects the overall look but also makes cleaning more difficult. If you're struggling with deep, stained, or uneven grout lines on your tile countertops and want to refresh them, this guide on how to clean and fill grout lines in tile countertops will guide you through the entire process. We'll cover everything from gathering the necessary materials to effective cleaning techniques, filling gaps, and sealing the grout to ensure a lasting finish that looks great and is easy to maintain.
Understanding the Grout Problem
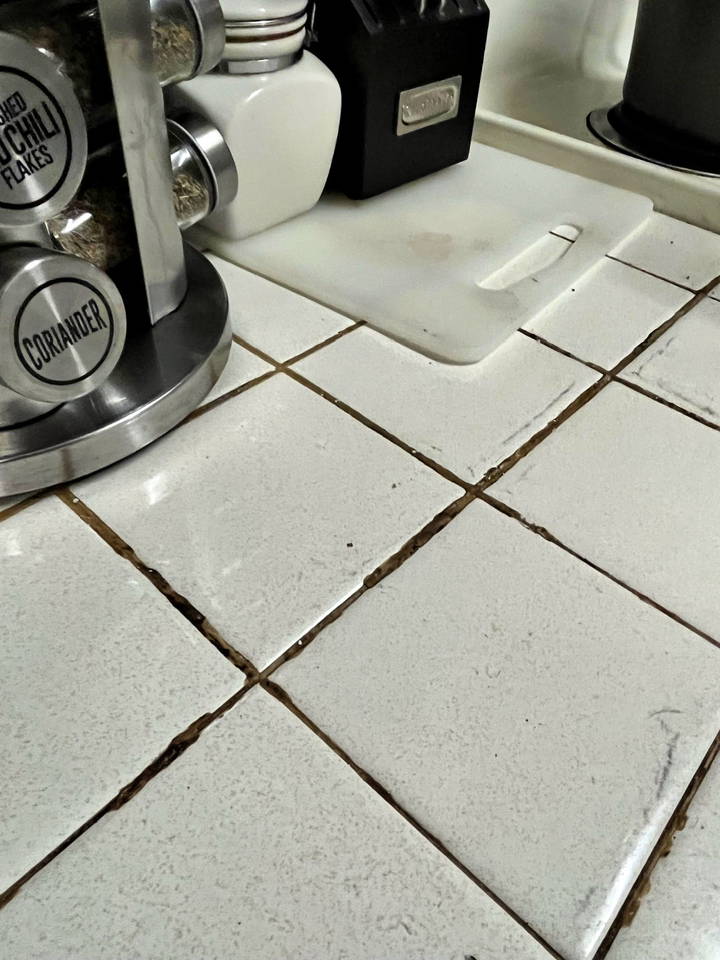
Grout lines are the spaces between your tiles that are filled with a porous material, often cement-based, which can easily absorb dirt, stains, and spills. When grout lines are neglected, they can become a breeding ground for mold and mildew, and a collection point for food crumbs and other debris.
Key Issues:
- Dirt and Stains: Grout is porous, making it prone to staining from everyday use in the kitchen.
- Uneven Grout Lines: Over time, grout can wear away or become uneven, leading to an unsightly and uneven surface.
- Potential for Mold and Mildew: Moisture in the grout lines can promote the growth of mold and mildew.
Materials and Tools You'll Need
To clean and fill your grout lines effectively, you will need a few essential tools and materials. Here's what I recommend based on my experience and research:
Tools:
- Grout Removal Tool: A manual or electric grout removal tool is essential for removing old grout. Options like a grout saw or an oscillating multi-tool with a grout removal blade work best.
- Vacuum Cleaner: For cleaning up dust and debris after removing grout.
- Brushes: A stiff brush for cleaning grout lines and a smaller brush for applying grout.
- Protective Gear: Safety glasses and a dust mask to protect yourself from dust and debris.
- Plastic Sheets and Tape: To cover surrounding areas and prevent dust spread.
Materials:
- Grout Cleaner: A strong grout cleaner or a mixture of vinegar and baking soda can help clean the existing grout lines.
- New Grout: Choose a non-porous, stain-resistant grout like epoxy grout or premixed grout that doesn't require sealing, such as Laticrete Spectralock.
- Grout Sealer (if using cementitious grout): To protect against future staining and water damage.
- Sponge and Bucket: For cleaning the tiles after grouting.
- Grout Float: For spreading grout evenly into the lines.
Step-by-Step Process
Learn the step-by-step process to clean and refill grout lines on your kitchen countertop for a fresh, durable finish.
Step 1: Remove the Old Grout
The first step to refreshing your grout lines is removing the old, dirty grout. This can be done manually with a grout saw or with an electric tool for faster and more efficient removal.
- Manual Grout Saw: This tool works well for small areas or thin grout lines. It's straightforward but can be labor-intensive.
- Oscillating Multi-Tool with Grout Blade: If you have a larger area to cover or thicker grout lines, a power tool like this can save a lot of time and effort. Make sure to use a carbide grout blade designed for this purpose.
Tip: You don't have to remove all the grout; removing about 1/8 to 1/4 inch deep is sufficient for applying new grout. Make sure the edges are clean and free of loose debris.
Step 2: Clean the Grout Lines
After removing the old grout, thoroughly clean the grout lines to remove any remaining dust, debris, or mold. A stiff brush and a grout cleaner (or a homemade mixture of vinegar and baking soda) work well for this step.
- Scrub the Grout Lines: Use the brush to scrub away any remaining debris and stains.
- Vacuum: After scrubbing, vacuum the lines to remove all the dust and debris.
Tip: Allow the cleaned grout lines to dry completely before applying new grout.
Step 3: Choose the Right Grout
Choosing the right type of grout is crucial for a durable and clean finish. Based on my experience, here are a few options:
- Epoxy Grout: Highly resistant to stains and doesn't require sealing. It's a bit more expensive but worth it for a lasting finish. Laticrete Spectralock is a popular choice.
- Premixed Grout: These are convenient and offer good stain resistance. They don't require sealing but can be more costly and typically come in larger quantities.
- Cementitious Grout: More affordable and easier to apply, but it requires sealing to prevent stains. It's a good choice for a quick fix if you plan to remodel later.
Step 4: Apply New Grout
Once the area is clean and dry, it's time to apply the new grout.
- Mix the Grout: If you're using a grout that requires mixing, follow the instructions on the package to get the right consistency.
- Apply the Grout: Use a grout float to push the grout into the lines, ensuring all gaps are filled. Hold the float at a 45-degree angle and spread the grout diagonally across the tiles to ensure even application.
- Clean Excess Grout: Use a damp sponge to wipe away excess grout from the tiles. Rinse the sponge often to avoid spreading grout over the tiles.
Tip: Work in small sections to prevent the grout from drying out before you can clean it off the tiles.
Step 5: Seal the Grout (if necessary)
If you've chosen cementitious grout, sealing is a crucial step. Allow the grout to cure for at least 48-72 hours, then apply a grout sealer to protect it from stains and moisture.
- Apply Grout Sealer: Use a small brush or applicator bottle to apply the sealer along the grout lines. Make sure to wipe off any excess from the tiles to prevent streaking.
- Drying Time: Allow the sealer to dry according to the manufacturer's instructions before using the countertop.
Step 6: Maintain Your Grout Lines
Keeping your grout clean and maintained can extend its life and keep your kitchen looking fresh.
- Regular Cleaning: Clean your grout lines regularly with a mild cleaner or a mixture of vinegar and water.
- Avoid Harsh Chemicals: Harsh cleaners can break down grout and sealers over time.
- Re-seal Periodically: If using cementitious grout, reseal it once a year to keep it protected.
Conclusion
Refreshing your tile countertops by cleaning and filling the grout lines can drastically improve the look and functionality of your space. By choosing the right tools and materials and following these steps, you can achieve a clean, professional-looking result that will last.
Whether you opt for the easy-to-use premixed grout or the durable epoxy grout, investing time and effort into this process will pay off by creating a cleaner, more hygienic kitchen environment. So roll up your sleeves and get started—your countertops will thank you!
Frequently Asked Questions:
Learn how to clean and fill grout lines in tile countertops with our expert FAQs. Discover effective techniques for maintaining pristine grout.
What is the Best Way to Remove Old Grout Without Damaging the Tiles?
To remove old grout without damaging your tiles, use a manual grout removal tool or an oscillating multi-tool with a carbide grout removal blade. Manual tools, like a grout saw, are good for small areas but require more effort. Oscillating multi-tools are more efficient and better suited for larger areas. When using power tools, work carefully to avoid scratching or chipping the tiles. Always wear safety glasses and a dust mask to protect yourself from debris.
Should I Remove All the Old Grout, or Just the Top Layer?
You don't need to remove all the old grout—removing about 1/8 to 1/4 inch is usually sufficient. The key is to ensure the grout lines are clean, dry, and free of loose debris. This allows the new grout to adhere properly. If the existing grout is particularly deep or uneven, you may need to remove a bit more to create a smooth, even surface for the new grout application.
What Are the Differences Between Epoxy Grout and Cementitious Grout?
Epoxy grout is more durable, stain-resistant, and water-resistant than cementitious grout. It does not require sealing and is ideal for areas prone to stains or heavy moisture exposure, like kitchen countertops. However, it is more expensive and can be harder to work with due to its quick-setting nature. Cementitious grout is easier to apply and more affordable but is porous and requires sealing to protect it from stains and moisture. It is a good option if you're looking for a cost-effective solution and don't mind regular maintenance.
Can I Apply New Grout Over the Old Grout?
Applying new grout over old grout is generally not recommended unless the existing grout is still in good condition and only needs a thin top layer. If the grout lines are low or the grout is crumbling, it is best to remove the old grout first. Applying new grout over old grout can lead to poor adhesion, resulting in cracks or chips over time.
How Can I Minimize Dust When Removing Grout?
To minimize dust while removing grout, use plastic sheets and tape to cover surrounding areas and create a barrier. Use a vacuum cleaner with a nozzle attachment to suck up dust as you work. If you are using a power tool, consider attaching a dust extraction hose to further reduce airborne dust. Wearing a dust mask and safety glasses is crucial to protect yourself from inhaling dust and debris.
What Can I Do If the Grout Starts to Crack After Application?
If you notice cracks in your grout after application, it could be due to several reasons, such as improper mixing, application, or curing. First, check that the grout was mixed to the correct consistency—too much water can weaken the grout. Ensure the grout lines were clean and dry before application. If the cracks are small, they can be patched with a thin layer of matching grout. For larger cracks, it may be necessary to remove the cracked grout and reapply. Always allow sufficient curing time as recommended by the grout manufacturer.
How Long Should I Wait Before Using My Countertop After Grouting?
The waiting period before using your countertop depends on the type of grout used. For most cementitious grouts, you should wait at least 48-72 hours for the grout to cure completely before using the surface. Epoxy grouts may cure faster, but it is still advisable to wait at least 24 hours. Always follow the manufacturer's instructions regarding curing times to ensure the grout sets properly and achieves maximum durability.
Is It Worth Investing in High-Quality Grout for a Temporary Fix?
If you are planning to remodel your kitchen in the near future, investing in high-quality grout may not be necessary. A standard cementitious grout, which is affordable and easy to apply, can serve as a good temporary fix. However, if you want a longer-lasting solution or want to avoid frequent maintenance, spending a bit more on high-quality epoxy grout could be beneficial. Consider your timeline, budget, and willingness to maintain the grout when making a decision.
Can I Use Sanded Grout for Countertops?
While sanded grout is commonly used for larger grout lines, it is not ideal for countertop applications where food and debris can easily collect. Unsanded or epoxy grout is a better choice for countertops because it creates a smoother surface that is easier to clean and less likely to harbor dirt. If you choose a sanded grout, ensure it is non-porous and sealed properly to prevent stains and make cleaning easier.
How Can I Ensure My Grout Stays Clean After Application?
To keep your grout lines clean after application, consider sealing them if you're using cementitious grout. Use a mild cleaner or a mixture of vinegar and water for regular cleaning, and avoid using harsh chemicals that can degrade the grout or sealant. Promptly clean up spills, especially those from acidic substances like wine or tomato sauce, to prevent staining. Regular maintenance and cleaning will help maintain the fresh look of your grout lines for years to come.


