Adding crown molding is an excellent way to give a room character and sophistication. While it can seem challenging at first, cutting crown molding becomes manageable once you understand the process. This guide provides all the information required to cut crown molding effectively, including the necessary tools, setup tips, and detailed instructions for making accurate cuts on inside and outside corners. Whether you're a beginner or a DIY enthusiast, this guide will help you get the precise, professional finish you want.
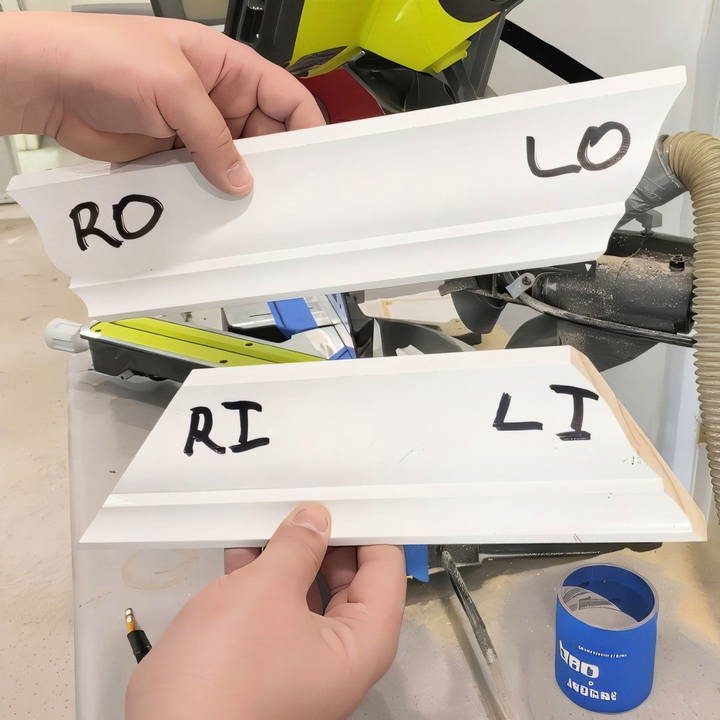
Tools You'll Need
Before you start, gather these tools for a smooth process:
- Miter saw: Essential for precise angled cuts.
- Painters tape: Helps with alignment on the saw.
- Measuring tape: Ensures accurate measurements.
- Pencil or marker: For marking reference lines.
- Sample crown molding piece: Useful for creating a guide as you work.
Understand Crown Molding Orientation
A critical step when cutting crown molding is placing it upside down on the miter saw. When mounted, the molding's top edge sits against the ceiling, while the bottom edge rests against the wall. This “flipped” position on the saw ensures the angles align correctly for seamless installation.
Both the top and bottom edges should sit flush against the fence and base of the saw, so each cut is precise. To make this setup easier, you can add painter's tape on the saw base as a guide.
Step by Step Instructions
Learn how to cut crown molding with ease. Follow our step-by-step guide for inside and outside corner cuts, setup tips, adjustments, and final installation.
Step 1: Set Up Your Saw for Accurate Cuts
- Apply Painter's Tape for Positioning: Apply a strip of painter's tape to the base of the saw, about an inch away from the fence. Cut around the tape along the saw's swivel base to allow full movement.
- Mark Reference Lines: Use a sample piece of molding to mark reference lines on the saw base for future cuts. Position the sample upside down, align it on both sides of the blade, and mark along its edges. This setup helps you align each piece accurately, even if the molding shifts during cutting.
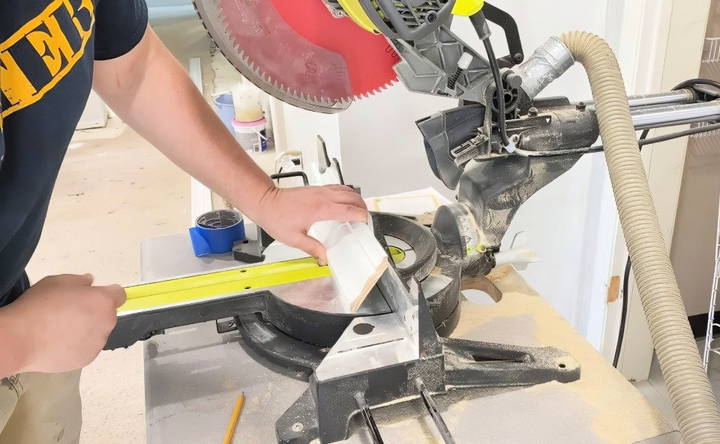
Step 2: Cutting Inside Corners
Inside corners are where two pieces of molding meet at a 90-degree angle within a room. Follow these instructions for a perfect fit:
Right Inside Corner Cut
- Position the Molding: Place it upside down on the left side of the saw blade.
- Swivel the Blade: Set it at a 45-degree angle to the left.
- Cut: This will create a right inside corner cut.
Left Inside Corner Cut
- Position the Molding: Place it upside down on the right side of the saw blade.
- Swivel the Blade: Set it at a 45-degree angle to the right.
- Cut: This produces a left inside corner cut.
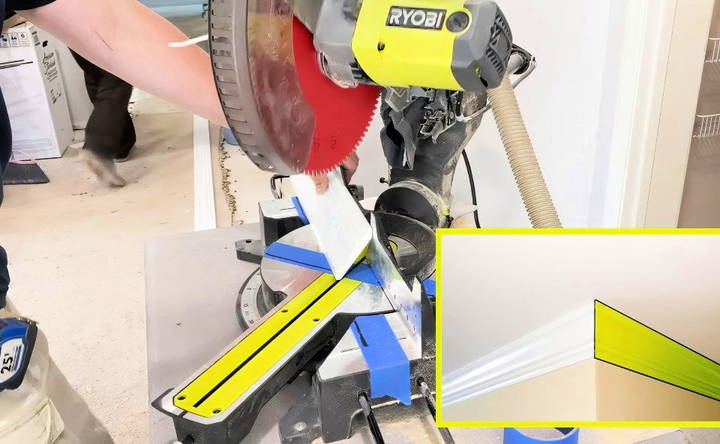
These cuts may feel counterintuitive at first, but keep in mind that the saw blade needs to go in the opposite direction of the corner side being cut. Using these methods ensures that the inside corners will align perfectly once installed.
Step 3: Cutting Outside Corners
Outside corners involve molding meeting at an outward corner, such as around a beam or decorative feature. Use the following method for accurate cuts:
Right Outside Corner Cut
- Position the Molding: Place it upside down on the left side of the saw blade.
- Swivel the Blade: Set it to a 45-degree angle to the right.
- Cut: This creates a right outside corner cut.
Left Outside Corner Cut
- Position the Molding: Place it upside down on the right side of the saw blade.
- Swivel the Blade: Set it to a 45-degree angle to the left.
- Cut: This produces a left outside corner cut.
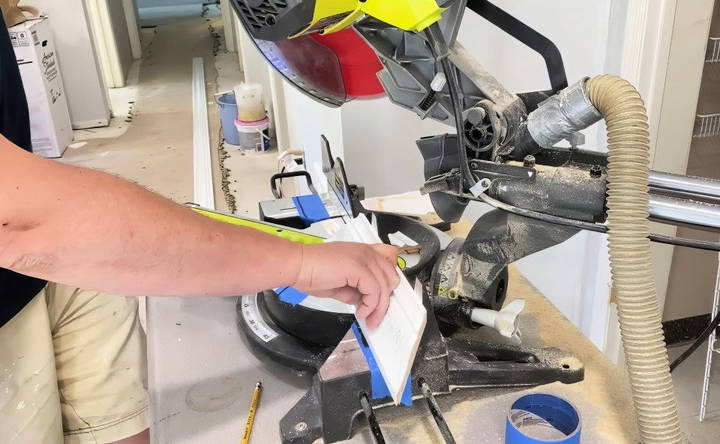
These outside cuts follow the opposite angle approach of inside corners, with the saw blade moving in the direction opposite of the side you're cutting.
Step 4: Test Fit and Adjustments
After making your cuts, use sample pieces to test the fit of the molding at each corner. This step ensures each piece aligns perfectly before you install it. It's a helpful way to catch any minor adjustments needed without impacting the final molding.
Tips to Avoid Common Mistakes
- Always Keep the Molding Upside Down: This orientation on the saw is crucial. Cutting it right-side-up can lead to incorrect angles and gaps.
- Double-Check Measurements: Accuracy is key, so measure twice, mark your lines clearly, and take time setting up each cut.
- Use Painter's Tape as a Guide: This tip helps with alignment and prevents slipping during cuts.
- Mark and Cut Sample Pieces: Having a few sample pieces allows you to check the fit before making final cuts, reducing the chance of mistakes.
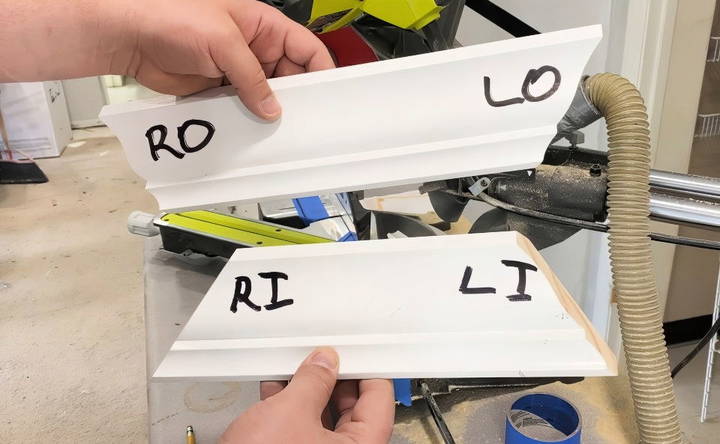
Final Installation
Once your crown molding pieces are cut, install them with care. Hold each piece up to its intended spot to check the alignment and fit. If you see any small gaps, you can make minor adjustments by sanding or cutting a slight angle on the ends. Using a strong adhesive or nails will secure each piece firmly against the wall and ceiling.
Quick Summary of Crown Molding Cuts
Unlock the secrets of perfect crown molding cuts with this quick summary. Achieve precision and elegance in your home projects.
Inside Corners:
- Right Inside: Place molding on the left, blade to the left at 45 degrees.
- Left Inside: Place molding on the right, blade to the right at 45 degrees.
Outside Corners:
- Right Outside: Place molding on the left, blade to the right at 45 degrees.
- Left Outside: Place molding on the right, blade to the left at 45 degrees.
By keeping these directions straight, you can make precise cuts that fit seamlessly in any room.
Conclusion:
Cutting crown molding can feel complex at first, but by following these steps and tips, you'll be able to handle both inside and outside corners with confidence. Just remember to always cut upside down, keep your measurements accurate, and take your time. With the right setup and attention to detail, your crown molding installation will look professional and elegant, adding a beautiful finishing touch to your room.
FAQs About How to Cut Crown Molding
Learn the essentials of cutting crown molding with our comprehensive FAQs. Tips, techniques, and tools to master this skill efficiently.
Crown molding has a top and bottom edge that correspond to the ceiling and wall. Placing it upside down on the saw mimics its installed position, making it easier to cut accurate angles.
Standard angles for most crown moldings are 45 degrees for both inside and outside corners. Some complex profiles may require slight adjustments, so consult the molding’s packaging or an expert if needed.
Always start with a small sample piece and test fit before cutting your main pieces. Mark your saw base with reference lines to make re-aligning easier.
Some people use a coping saw to trim the inside corners. While it’s not necessary with a miter saw, a coping saw can help achieve an even tighter fit for inside corners by removing a small bit of material from the edge.
For minor gaps, use caulk or wood filler, depending on your crown molding’s material. This not only fills gaps but gives the molding a smooth, polished look.
If your corners deviate from 90 degrees, measure the exact angle using an angle finder. Adjust your cuts slightly to match, but don’t worry about minor gaps; caulk can fill small inconsistencies to create a seamless look.
Always measure from the bottom edge, which aligns with the wall. This ensures each cut correctly fits within the corner, preventing issues with alignment.
To account for blade width, cut just outside your measurement line. It’s better to keep the piece a little longer and make minor trims as needed to avoid gaps.
Larger molding requires a miter saw with at least a 12-inch blade. If your saw is smaller, consider renting or borrowing a larger one to ensure smooth and accurate cuts.
Nailing into each stud is advisable for secure installation, especially for heavy or large crown molding. This minimizes the risk of gaps and ensures the molding stays flush against the wall.
If gaps are visible, trim thin slivers of molding to fill larger spaces, then apply caulk to blend the pieces together seamlessly. This works for both inside and outside corners.
No, a regular miter saw works well if you place the molding upside down on the saw. Adjusting the miter angle while keeping the bevel at 0° simplifies the cutting process without needing compound adjustments.
For moldings that don't have a 45° spring angle, adjust the saw's angle to match the specific angle of your molding, like 52° or 38°. Consulting the molding's documentation can help you find the right settings.


