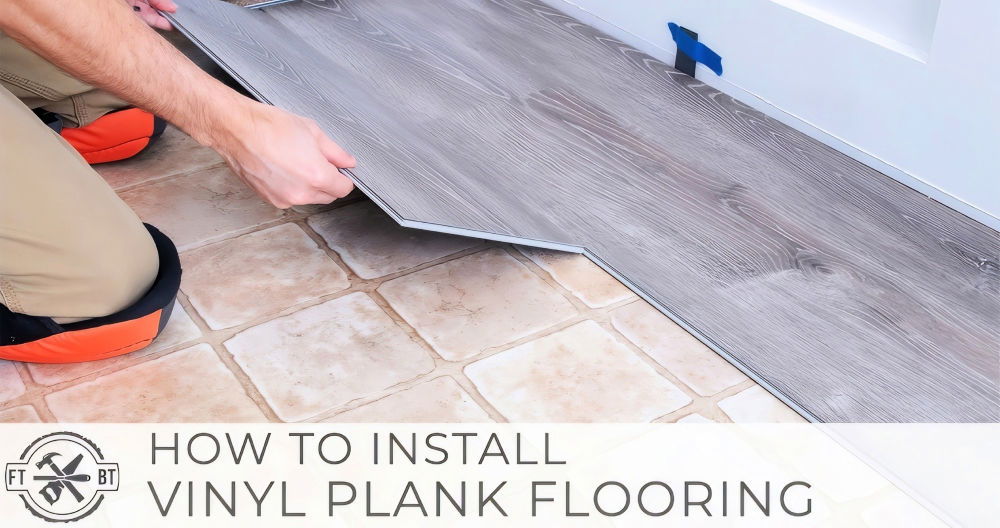
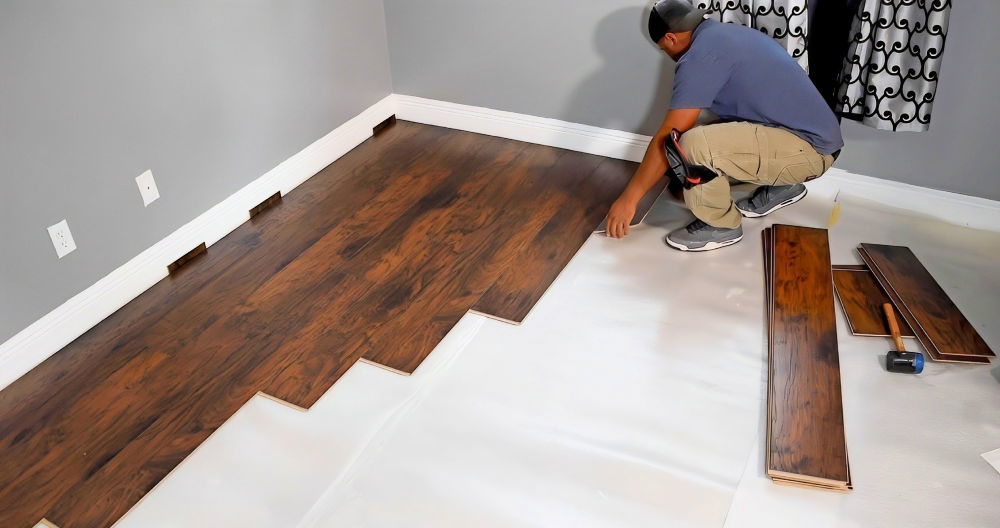
Installing vinyl plank flooring (LVP) can be a game-changer for your home. It provides a stylish, durable, and easy-to-maintain surface that's perfect for any room. Whether you're a seasoned DIYer or just starting, this guide will walk you through the process of installing LVP like a pro. I'll share insights from both my own experience and from the wisdom of other DIY enthusiasts who have tackled this project. Let's dive in and explore everything from selecting the right materials to executing a flawless installation.
Why Choose Vinyl Plank Flooring?
Vinyl plank flooring has become a popular choice among homeowners due to its versatility, affordability, and ease of installation. It’s an excellent option for high-traffic areas and rooms prone to moisture, such as kitchens, bathrooms, and basements. Here’s why vinyl plank flooring is a great choice:
- Durability: Resistant to scratches, stains, and dents.
- Water-Resistant or Waterproof Options: Ideal for moisture-prone areas.
- Comfort: Softer and warmer underfoot compared to tile or hardwood.
- Easy to Clean: Requires minimal maintenance.
- Aesthetic Variety: Available in various styles, colors, and textures to mimic wood, stone, or tile.
When I decided to replace my worn-out laminate flooring, vinyl plank was the obvious choice due to its durability and aesthetic appeal. Plus, I appreciated the fact that it can be installed over most existing floors, saving me the hassle of removing the old floor.
Choosing the Right Type of Vinyl Plank Flooring
Before you begin, it's essential to choose the right type of vinyl plank flooring that best suits your needs. Vinyl planks come in three main varieties based on their installation method:
1. GripStrip Vinyl Plank Flooring
GripStrip planks come with an adhesive layer that sticks the planks together, creating a floating floor. They are simple to install and can go over existing floors without the need for glue or nails. This type of flooring is slightly water-resistant, making it a suitable choice for rooms like kitchens or entryways.
2. Click-Lock Vinyl Plank Flooring
Click-lock vinyl planks interlock using tongue-and-groove joints, forming a secure floating floor. This type of flooring is easy to install, even for beginners, and offers full waterproof protection, making it ideal for bathrooms and basements.
3. Glue-Down Vinyl Plank Flooring
Glue-down vinyl planks require adhesive to be spread onto the subfloor. This method provides a very stable and secure floor, ideal for commercial spaces or high-traffic areas. There are two types of adhesives used: hard-set and pressure-sensitive. While both provide a strong bond, pressure-sensitive adhesives make replacing individual planks easier.
I chose click-lock vinyl planks because I wanted a fully waterproof solution for my kitchen and living room. Plus, I liked the idea of a floating floor that didn't require glue or nails, minimizing mess and hassle.
Gathering the Essential Tools and Materials
One of the keys to a successful DIY flooring project is having the right tools. Here's what you'll need to install vinyl plank flooring:
- Utility Knife: For scoring and snapping planks.
- Measuring Tape: To ensure accurate cuts and measurements.
- Straightedge and Chalk Line: To help mark straight lines.
- Rubber Mallet and Tapping Block: For clicking planks together securely.
- Pry Bar: To remove baseboards and trim.
- Jigsaw or Miter Saw: For more complex cuts around corners and obstacles.
- Vinyl Floor Cutter (Optional): For precise, easy cuts.
- Vacuum or Broom: To keep the area clean and free of debris.
- Knee Pads: To protect your knees during the installation process.
If you’re going with a glue-down option, you’ll also need vinyl floor adhesive and a notched trowel. Always wear safety goggles and work gloves to protect yourself during installation.
Preparing Your Subfloor for Installation
Proper preparation is crucial for a successful vinyl plank installation. Here's how to get your subfloor ready:
- Remove Old Flooring: If your existing floor is not flat or level, remove it. Vinyl plank flooring can be installed over most hard surfaces, but the surface must be clean, dry, and level.
- Clean and Level the Subfloor: Make sure the subfloor is free of debris, nails, or any imperfections. Use a self-leveling compound to fill low spots and sand down high spots. A flat subfloor is critical; otherwise, the vinyl planks will not sit properly and could lead to problems like bouncing or separating later on. As one DIYer mentioned, "The subfloor needs to be pretty flat; otherwise, the LVP will bounce in places as you walk and it will be very annoying"【6†source】.
- Measure the Room: Calculate the area of the room and add about 10-20% extra for cuts and waste. This ensures you have enough planks to complete the project.
- Acclimate the Planks: Leave your vinyl planks in the room for at least 48 hours to acclimate to the room's temperature and humidity. This helps prevent expansion or contraction after installation.
Planning the Layout
Before you start laying the planks, it's important to plan your layout:
- Calculate Plank Placement: Start by measuring the width of the room and dividing it by the width of the plank to determine how many rows you'll need. Make sure the planks along the walls are not too narrow—ideally, they should be at least half a plank wide.
- Create a Staggered Look: Stagger the joints of the planks by at least 6 inches to create a more natural look. Avoid creating a repeating pattern that can draw attention.
- Dry Lay the Planks: Lay out a few rows without securing them to see how the pattern looks and adjust as necessary. This step is essential to ensure a random, natural appearance and to avoid having the same patterns side-by-side.
One DIYer recommended, "Make sure you open several boxes at the same time and organize them by the wood grain patterns. When you install, pay attention to not have the same patterns next to each other or in sequence"【6†source】.
Step-by-Step Installation Guide
1. Installing Click-Lock Vinyl Plank Flooring
- Trim the First Row: Cut off the tongues on the first row of planks to ensure a snug fit against the wall.
- Lay the First Plank: Start in one corner, placing the first plank with its grooved side facing the wall. Use spacers to maintain an expansion gap of about 1/4 inch.
- Click and Lock: Connect the next plank by angling the tongue into the groove and pressing down until it clicks.
- Continue Row by Row: Repeat this process for each plank and row. Use a tapping block and rubber mallet to ensure tight seams.
- Trim and Fit the Last Row: Measure the final row and trim the planks to fit, leaving the expansion gap.
- Reinstall Baseboards: Replace any baseboards or trim to cover the expansion gap.
2. Installing GripStrip Vinyl Plank Flooring
- Start Along a Wall: Lay the first row with the adhesive side facing out, ensuring the cut edge is against the wall.
- Press Down Firmly: Overlap the adhesive strips and press down firmly to secure.
- Roll Over Seams: Use a hand roller to apply even pressure on the seams to secure the adhesive bond.
- Finish with a Floor Roller: Roll the entire floor with a 75-100 pound floor roller to ensure all planks are adhered evenly.
3. Installing Glue-Down Vinyl Plank Flooring
- Find the Center of the Room: Start in the center and work outward. This ensures a balanced layout.
- Apply Adhesive: Spread adhesive in small sections using a notched trowel.
- Lay the Planks: Press each plank firmly into the adhesive. Use a floor roller to secure the bond once all planks are in place.
Post-Installation Tips
After installing your new vinyl plank floor, it's important to finish up properly to ensure it looks great and lasts for years:
- Allow the Floor to Set: For glue-down installations, avoid heavy foot traffic for 24-48 hours to allow the adhesive to cure properly.
- Clean the Floor: Sweep and mop with a pH-neutral cleaner to remove any dust or residue from the installation process.
- Regular Maintenance: Protect your floor with high-traffic floor polish and use furniture pads to avoid scratches. Consider resealing every six to nine months for added protection.
Lessons Learned and Final Thoughts
Installing vinyl plank flooring can be a rewarding DIY project if you're prepared and have the right tools. Here are a few things I wish I knew before I started:
- Don’t Cheap Out on Materials: High-quality planks with a sturdy interlock system make a significant difference in durability and ease of installation.
- Preparation is Key: Spend time prepping your subfloor; a level base will save you headaches later on.
- Plan for Patience: Take breaks and don’t rush. A careful, deliberate approach will result in a better-looking floor that you’ll enjoy for years.
Whether you choose click-lock, GripStrip, or glue-down vinyl plank flooring, with careful planning and the right preparation, you can achieve a professional-looking result that enhances the beauty and value of your home. Happy DIYing!
Frequently Asked Questions About Installing Vinyl Plank Flooring
To help you further with your vinyl plank flooring installation, here are FAQs addressing common concerns, providing troubleshooting tips, and covering specific scenarios that you may encounter.
What should I do if my subfloor isn't perfectly flat?
A flat subfloor is crucial for a successful vinyl plank flooring installation. If your subfloor isn't flat, you may face issues like the planks bouncing or not locking properly. To fix this, use a self-leveling compound for low spots and sand down high spots. A long straight edge, such as a 6-foot level, is helpful to check the flatness of the floor before you start. If you are dealing with a wooden subfloor, ensure any warped or uneven joists are corrected before proceeding.
How do I handle irregular room shapes and obstacles like doorways?
Rooms with lots of doorways, closets, or irregular shapes can make installation more challenging. For doorways, use an oscillating multi-tool to undercut door jambs and allow the planks to slide underneath for a clean finish. For other irregular shapes, trace the shape onto a piece of paper, cut it out, and use it as a template when cutting your vinyl planks. This method helps ensure precision and reduces errors.
What are the best practices for staggered joints and pattern variation?
Staggering the joints between planks is essential for both aesthetics and stability. Aim to stagger the end joints by at least 6 inches between adjacent rows to create a more natural and professional appearance. Additionally, avoid having the same wood grain patterns next to each other. Open several boxes at once and mix planks to achieve a varied look. Planning a dry layout before installation can help visualize and adjust the pattern to your liking.
Can I install vinyl plank flooring over existing flooring?
Yes, you can install vinyl plank flooring over many types of existing floors, provided they are flat, level, and in good condition. It is possible to lay vinyl planks over concrete, tile, or even another layer of vinyl. However, avoid installing over soft surfaces like carpet. If the existing floor is not perfectly flat, remove it or use a leveling compound to prepare the surface.
How do I avoid damaging the planks during installation?
Vinyl planks can sometimes be prone to damage if not handled carefully. Avoid dropping heavy tools on the planks, and always use a tapping block and rubber mallet when clicking the planks together to prevent chipping the edges. Additionally, when scoring and snapping planks, be cautious, as the snapped edges can be sharp. Wearing gloves can help protect your hands from cuts during the installation process.
What should I do if the planks don’t lock together properly?
If the planks are not locking together securely, it could be due to debris on the subfloor or unevenness. Clean the area thoroughly and ensure that the subfloor is level. Sometimes, the locking mechanism on cheaper planks can be flimsy or prone to breaking. Choosing a high-quality vinyl plank with a sturdy locking system is crucial to avoid these issues. If a plank gets damaged or doesn't lock properly, consider replacing it with a new one from your extra supply.
How much expansion space should I leave around the edges?
Vinyl plank flooring needs room to expand and contract with changes in temperature and humidity. It's recommended to leave a gap of about 1/4 inch between the planks and the walls or any fixed objects. Use spacers to maintain this gap during installation, and cover it later with baseboards or trim. Not leaving enough expansion space can cause the floor to buckle or warp over time.
Can I install vinyl plank flooring in bathrooms or basements?
Yes, vinyl plank flooring is an excellent choice for moisture-prone areas like bathrooms and basements. Click-lock and glue-down options provide full waterproofing, making them ideal for these environments. However, be sure to properly seal the edges and any gaps to prevent water from seeping underneath the floor. Also, consider using a moisture barrier underneath the planks for additional protection.
What should I consider when choosing between floating and glue-down installations?
The choice between floating (GripStrip or Click-Lock) and glue-down vinyl plank flooring depends on your specific needs. Floating floors are easier and quicker to install and are more forgiving if you need to make changes later. They are ideal for rooms where you might want to remove or replace the flooring in the future. Glue-down floors provide a more permanent solution and are highly stable, making them suitable for high-traffic areas or commercial spaces. However, they require more preparation and time to install.
How do I maintain and care for my new vinyl plank floor?
After installation, allow the floor to settle for 24-48 hours before heavy foot traffic. Regularly sweep or vacuum the floor to remove dirt and debris. Use a damp mop with a pH-neutral cleaner to maintain the floor’s appearance and prevent damage. Avoid using abrasive cleaners or steam mops, as these can harm the surface of the planks. To protect high-traffic areas, consider applying a high-traffic floor polish periodically.
Are there any additional tips for first-time DIYers installing vinyl plank flooring?
Yes, here are some extra tips for first-time DIYers:
- Take Your Time: Rushing through the process can lead to mistakes. Be patient and ensure each plank is securely locked before moving on.
- Watch Instructional Videos: Visual learning can be very helpful. Watching a few videos specific to your chosen installation method can provide valuable insights.
- Have Extra Planks on Hand: Always purchase 10-20% more planks than you think you’ll need. This will account for mistakes, cuts, or future repairs.
By following these tips and best practices, you'll be well-equipped to install vinyl plank flooring like a pro and enjoy a beautiful, durable floor for years to come.


