Making a balloon arch can add a festive touch to any event. This step-by-step guide on how to make a balloon arch will walk you through the process with ease. First, you need to gather supplies such as balloons, a balloon pump, fishing line, and a frame. Inflate your balloons and tie them together in clusters of four. This basic preparation sets the foundation for your stunning DIY balloon arch.
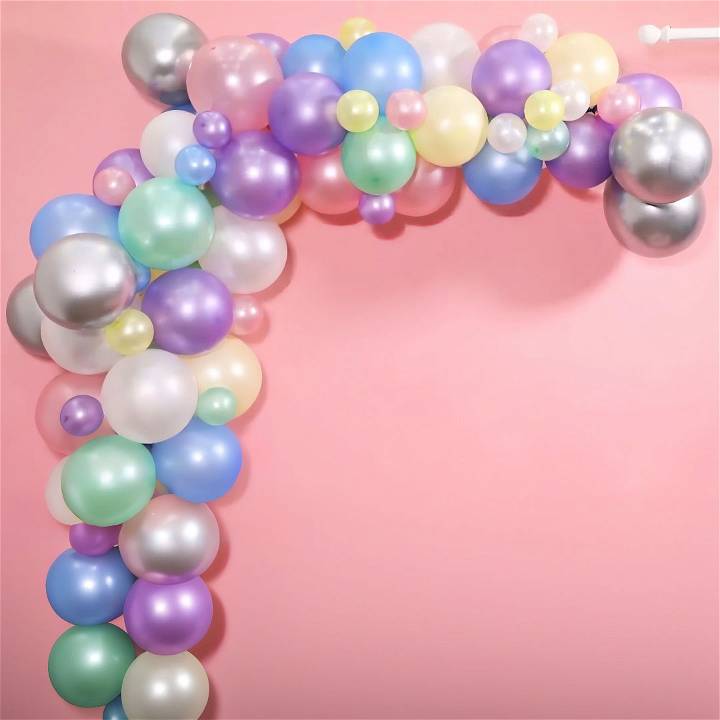
Once the balloon clusters are ready, attach them to the frame using fishing line or a strong adhesive. Space the clusters evenly to ensure a balanced look. Adjust the spacing and fullness of the balloons to your liking. Learning how to do a balloon arch is simple and can be a fun DIY project. Keep reading to learn detailed tips and tricks for making the perfect balloon arch.
Introduction to Balloon Arches
Balloon arches are a popular and eye-catching way to add a splash of color and excitement to any celebration. They serve as a vibrant backdrop for photos, a welcoming entrance to an event, or a dynamic centerpiece. But what exactly is a balloon arch, and how did it become such a beloved decoration?
What is a Balloon Arch?
A balloon arch is a structure composed of interconnected balloons that form an arch shape. These arches can vary in size, color, and complexity, ranging from simple, single-color designs to elaborate, multi-hued displays. They are often used to mark significant areas at events, like the entrance, stage, or photo booth.
The Origin of Balloon Arches
The concept of decorating with balloons dates back to their invention in the 19th century. However, the idea of shaping them into arches for decorative purposes has gained popularity over the past few decades. Balloon arches have become a staple at various events, including weddings, birthday parties, corporate events, and school functions.
Why Use a Balloon Arch?
Balloon arches are more than just decorations; they create an atmosphere of festivity and celebration. They can transform a space, making it more inviting and memorable for guests. Additionally, balloon arches are versatile and can be customized to fit any theme or color scheme, making them suitable for a wide range of occasions.
Materials You’ll Need and Why
Creating a balloon arch is simple, but you’ll need some specific materials to get started. Here's a list of what you'll need and why each item is important:
- DIY Balloon Arch Kit: These kits are a lifesaver. They usually come with a variety of balloons in different colors and sizes. The variety adds depth and texture to your arch, making it look professionally done.
- Balloon Garland Tape: This tape is essential. It has holes in it where you’ll pull the knots of inflated balloons through to create the arch shape.
- Balloon Pump: Save your breath and time with a balloon pump. It makes inflating balloons a breeze and prevents any lightheadedness!
- Fishing Wire: The fishing wire is strong yet nearly invisible, perfect for securing your balloon arch in place without being noticeable.
- Scissors: You’ll need scissors for cutting the balloon tape to your desired length and the fishing wire when you're setting up the arch.
Step by Step Instructions
Create stunning balloon arches with our step-by-step guide. Inflate balloons, use garland tape, secure them with fishing wire, and hang them effortlessly.
Step 1: Inflate Your Balloons
Start by inflating your balloons. I recommend doing this the night before your event to save time on the day. Use your balloon pump to inflate balloons of various sizes to give your arch some dimension. Once inflated, tie them off and set them aside. Remember, you don't need helium, as your arch will be supported by the balloon garland tape and fishing wire.
Step 2: Assemble the Arch Using Balloon Garland Tape
Take your strip of balloon garland tape and decide how long you want your arch to be. Cut a piece of the tape accordingly. Begin pulling the knots of the inflated balloons through the holes in the tape. Alternate colors and sizes as you go to create a visually appealing pattern. It's surprisingly soothing to see the arch take shape!
Step 3: Secure the Arch with Fishing Wire
Once your balloon garland tape is filled with balloons, reinforce the structure with fishing wire. This step is crucial for adding extra support, especially if your arch is particularly long or heavy. It will also help you shape the arch with more precision. Tie the fishing wire around the garland in several spots, keeping it tight enough to hold but not so tight that it pops the balloons.
Step 4: Hanging Your Balloon Arch
Identifying where to hang your balloon arch is key. Look for spots where it can be the focal point of your party decor. I chose to hang ours across the main wall of our living room, accentuating the party area. Use more fishing wire to tie your balloon arch to small hooks or nails on the wall. If you're worried about leaving marks, consider using removable wall hooks rated for the weight of your balloon arch.
Pro Tips for a Perfect Balloon Arch
- Mix metallic balloons with mattes for a luxe look.
- If your arch feels unstable, use more fishing wire at various points to secure it better.
- Add accessories like flowers or foliage for an even more impressive design.
Creative Variations for Balloon Arches
When it comes to balloon arches, the possibilities for creativity are as vast as your imagination. Whether you’re planning a small gathering or a grand event, adding your personal touch to a balloon arch can make it truly unique. Here’s how you can infuse creativity into your balloon arch designs:
- Personalize with Themes Think about the theme of your event. Is it a birthday party with a superhero theme? Or perhaps a wedding with a rustic vibe? Choose balloon colors and patterns that match your theme to create a cohesive look.
- Incorporate Different Balloon Types Mix and match different types of balloons. Combine standard latex balloons with foil balloons for a touch of shine. Use clear balloons filled with confetti or glitter for an extra sparkle.
- Play with Sizes and Shapes Create depth and texture by using balloons of various sizes and shapes. Add large balloons to form the base of the arch and sprinkle in smaller ones to fill gaps. Don’t be afraid to use unconventional shapes like hearts or stars.
- Add Elements from Nature For an outdoor event, consider intertwining natural elements like flowers, vines, or leaves with your balloon arch. This can give it an organic, earthy feel that complements the surroundings.
- Light It Up String lights can transform your balloon arch from day to night. Wrap the lights around the arch or place them inside transparent balloons for a magical glow.
- Hang Charms and Trinkets: Attach small charms, photos, or trinkets that mean something special to you or your guests. This personalizes the arch and can serve as a conversation starter.
- Use Patterns and Textures: Create patterns with balloons by alternating colors or using balloons with different textures. Metallic, matte or even LED balloons can add a unique touch.
- Think Beyond the Arch: Who says a balloon arch has to be an arch? Experiment with different shapes like spirals, waves, or even a full circle to frame a table or doorway.
- Eco-Friendly Options Be mindful of the environment by choosing biodegradable balloons or reusable decorations like fabric ribbons and paper flowers to accent your arch.
Embrace creative twists to turn your balloon arch into art, capturing your event's essence and impressing guests. Success lies in its beauty, joy, and creativity.
Troubleshooting Common Issues
Creating a balloon arch can be a fun project, but sometimes you might run into a few hiccups along the way. Don’t worry; most issues have simple solutions. Here’s a guide to troubleshooting common problems you might encounter when making a balloon arch.
Balloons Keep Popping
- Solution: Balloons may pop if they’re overinflated or exposed to sharp objects. Inflate balloons carefully to about 90% of their capacity to allow for some expansion. Also, ensure the area where you’re assembling the arch is free from sharp edges and pointed objects.
Balloons Deflating Too Quickly
- Solution: If balloons start deflating sooner than expected, it could be due to temperature changes or a poor-quality batch of balloons. Try to keep the arch away from direct sunlight and heat sources. Consider investing in higher-quality balloons for better durability.
Arch Isn’t Holding Its Shape
- Solution: This usually happens if the structure isn’t secured properly. Make sure the base of your arch is weighted down and that the frame (if you’re using one) is sturdy. Check that all connections are tight and reinforce them if necessary.
Difficulty Tying Balloons Together
- Solution: Tying balloons can be tricky and tiring for your fingers. Use a balloon-tying tool to make the process easier and quicker. You can also tie balloons in pairs before constructing the arch to save time.
Arch Looks Sparse or Uneven
- Solution: Fill in gaps with additional balloons. Use double-sided tape or glue dots to attach extra balloons to the arch without needing to tie them. For an uneven arch, adjust the placement of balloons by size to create a more balanced look.
Balloons Are Not Sticking to the Frame
- Solution: If you’re using a frame and the balloons aren’t sticking, try using fishing line or clear string to tie them securely to the frame. You can also use specialized balloon clips designed for arches.
Color Scheme Doesn’t Look Right
- Solution: Sometimes colors don’t turn out as expected when inflated. Test inflate a few balloons before the event to ensure they match your vision. If the colors are off, adjust your palette with complementary shades.
Arch is Too Small or Too Large
- Solution: Measure your space before starting and plan the size of your arch accordingly. If it’s too small, add more balloons or extend the frame. If it’s too large, remove some sections or reposition the arch to fit the space better.
Be patient when making a balloon arch. Take your time and ask for help if needed. These tips will help you build a stunning and sturdy arch that will impress your guests.
Maintenance and Safety Tips
Maintaining your balloon arch and ensuring safety are crucial for a successful event. Here are some straightforward tips to help you keep your balloon arch looking great and your guests safe.
Keep Your Balloon Arch Fresh
- Inflate balloons closer to the event time to ensure they stay full and vibrant.
- Avoid direct sunlight as it can cause balloons to pop or lose their color.
- Use high-quality balloons that are less likely to deflate quickly.
Safety First
- Secure the arch properly to prevent it from tipping over. Use weights or sturdy bases.
- Keep away from heat sources like candles or lights that could cause the balloons to burst.
- Be mindful of allergies. Some people are allergic to latex, so consider using foil balloons or latex-free options.
During the Event
- Check the arch periodically for any signs of deflation or damage.
- Have a repair kit handy with extra balloons, tape, and a pump for quick fixes.
- Keep children supervised around the arch to prevent them from popping balloons or swallowing pieces.
After the Event
- Dispose of balloons responsibly. Pop them and place them in the trash.
- Consider the environment by choosing biodegradable balloons or reusing decorations.
By following these maintenance and safety tips, you’ll ensure that your balloon arch remains a stunning feature throughout your event and that everyone enjoys it without any worries.
FAQs About How to Make a Balloon Arch
Discover the faqs about how to make a balloon arch, including step-by-step instructions, materials needed, and expert tips for stunning results.
You don’t need a stand to hang your balloon arch. Instead, use Command Hooks placed at strategic points along the wall where you want the arch to go. Use string or ribbon to attach the balloon tape to the hooks. If you’re using a curtain rail or similar structure, you can tie the arch directly to it.
Yes, you can make a balloon arch without helium. The balloon tape method allows you to create a self-supporting structure that doesn’t require helium. The balloons will stay in place once attached to the tape and hung up.
For additional flair, consider incorporating themed balloons or using balloons in different colors and sizes to create patterns or gradients. You can also add flowers, foliage, or other decorations to the arch with glue dots to enhance the overall design.
A balloon arch made with air-filled balloons typically lasts 5 to 7 days before the balloons start to deflate. However, the longevity can vary based on the environment and the quality of the balloons used. To extend the life of your arch, keep it away from direct sunlight, sharp objects, and extreme temperatures.
When creating a balloon arch, try to avoid these common pitfalls:
Overinflating the balloons: This can cause them to pop easily or lose their shape. Inflate the balloons to about 90% of their capacity to allow for some expansion.
Ignoring the balloon sizes: Using balloons of various sizes adds depth and interest to your arch. Stick to a pattern for a cohesive look.
Rushing the process: Take your time to ensure that the balloons are securely attached to the tape and that the structure is balanced.
Skimping on materials: Don’t hesitate to use plenty of Command Hooks and glue dots to ensure your arch is stable and stays in place.
Final Thoughts
In conclusion, learning how to make a balloon arch is a fun and rewarding DIY project. By following this step-by-step guide, you'll create a stunning balloon arch for any event. From selecting balloons to assembling the arch, each step is straightforward and enjoyable. With a little creativity and effort, your DIY balloon arch will impress your guests and elevate your celebrations.


