Making a blacksmith forge doesn't have to be complicated. This guide will walk you through the basic steps of how to make a forge at home. A forge is essential for any blacksmith, and building your own can be a rewarding experience. You can use readily available materials and simple tools to construct a DIY forge that meets your needs.
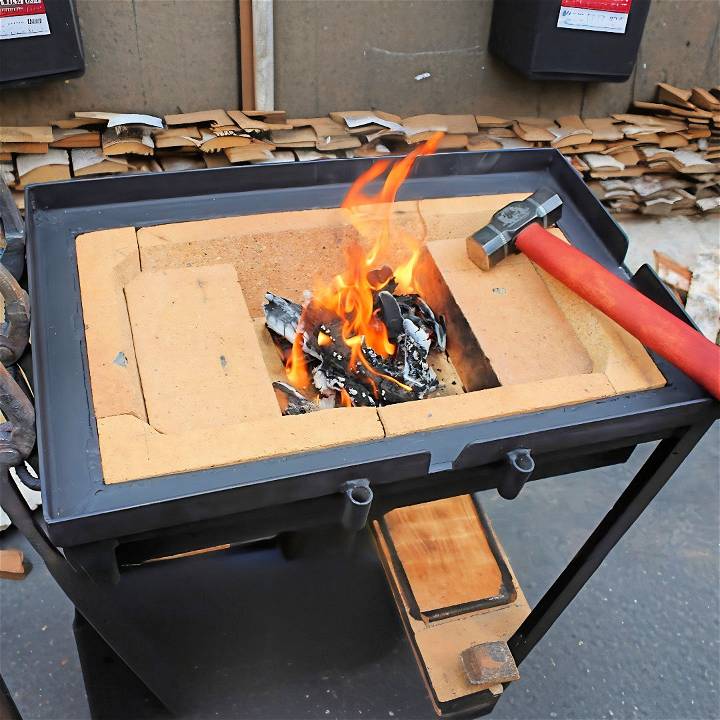
You'll start by gathering materials, including fire bricks, a steel pipe, and a hair dryer. Follow the steps to assemble these parts into a functional forge. The process is straightforward and designed to ensure safety and efficiency.
Continue to the next section to learn more detailed instructions and tips for effectively building and using your own DIY forge.
Introduction to Blacksmithing and Forging
Blacksmithing is an ancient craft that has shaped human history through the creation of tools, weapons, and art. It involves heating metal, primarily iron or steel until it’s malleable and then using tools to shape it into desired forms. This process is known as forging.
The Essence of Forging
Forging is the heart of blacksmithing. It’s a method where you apply force to heated metal to change its shape. The metal is heated in a forge, which is a specialized fireplace that produces intense heat, often through burning coal, charcoal, or propane.
Why Blacksmithing Matters Today
In our modern DIY era, blacksmithing has seen a resurgence. It’s not just about making objects; it’s about connecting with a tradition that requires patience, skill, and creativity. It’s a fulfilling hobby that allows you to make functional pieces or artistic works while also providing a sense of accomplishment.
Getting Started
To begin blacksmithing, you need a few basic tools:
- Anvil: A heavy block of metal on which you shape heated metal.
- Hammer: Used to strike and shape the metal on the anvil.
- Tongs: Pliers-like tools to hold and manipulate hot metal.
- Forge: The heat source for warming the metal.
The Forging Process
Here’s a simplified overview of the forging process:
- Heat the Metal: Place the metal in the forge until it reaches a red or orange color, indicating it’s ready to shape.
- Shape the Metal: Using the hammer and anvil, start shaping the metal by applying controlled blows.
- Refine the Shape: Continue heating and hammering until you achieve the desired shape.
- Cool Down: Once shaped, the metal needs to be cooled slowly or quenched in water or oil to harden it.
Learning and Mastery
Blacksmithing is both an art and a science. It takes time to learn the techniques and develop the skill to make beautiful and functional items. Start with simple projects and gradually move to more complex ones as you gain confidence and experience.
Blacksmithing is about transformation—of metal and of oneself. It’s a journey of continuous learning and improvement. So, grab your hammer, light your forge, and start shaping your own path in the world of blacksmithing.
Gathering Materials: The What and The Why
Learn the what and why of gathering materials like old metal, heat-resistant bricks, paint, welding machines, and blowers for your next project.
Old Metal
I had some old metal lying around in my shed. This wasn’t just scrap waiting to be disposed of; it was the skeleton of my future forge. The choice to use old metal was driven by both necessity and environmental consciousness—why buy new when you could repurpose?
Heat-Resistant Bricks
Initially, I considered using regular bricks, a cost-effective and easily accessible material. However, the longevity and efficiency of the forge hinged on its ability to handle extreme temperatures without deteriorating rapidly. Thus, I invested in heat-resistant bricks. These bricks would form the core of the forge, ensuring it could withstand the heat required for blacksmithing and cooking, making it a worthy investment.
Heat-Resistant Paint
To protect the metal from inevitable wear and tear and to enhance its durability, I opted for heat-resistant paint. This not only served a functional purpose but also added a professional finish to the forge, making it look sleek and well-crafted.
Welding Machine
The welding machine was critical for assembling the metal parts. It ensured strong, durable joints that would withstand the stress and strains of blacksmithing operations.
Blower
A vital component of the forge, the blower or any device capable of making airflow, would supply the necessary oxygen to fuel the fire within the forge, making it hotter and more efficient.
Step by Step Instructions
Learn how to make a blacksmith forge step by step, from preparing the metal to setting up the blower. Clear, concise, and easy-to-follow instructions.
1. Preparing the Metal
The first step involved cleaning the old metal to remove any rust and debris. This was essential to ensure strong welding joints and a clean surface for painting.
2. Cutting and Assembling
I measured and cut the metal into the necessary lengths according to the size requirements of my forge. Assembling these pieces with the welding machine followed a specific sequence to ensure stability and functionality. This process was both challenging and rewarding, as it began giving shape to my vision.
3. Laying Out the Bricks
Following the initial assembly, I laid out a square of heat-resistant bricks to form the base of the forge. My needs required a longer forge for hardening long products, prompting me to extend the base by two more bricks. The arrangement was crucial for defining the working area of the forge.
4. Painting and Final Touches
After assembling the metal frame, I painted it with heat-resistant paint for protection against high temperatures and rust. The bricks were cut at an angle for easier coal management and to prevent the metal plate at the bottom from overheating.
5. Setting Up the Blower
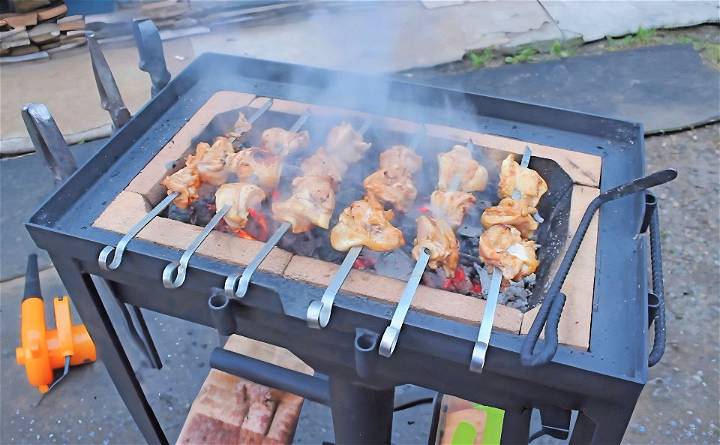
The final step involved setting up a blower to supply air to the forge. This was key to reaching the desired temperatures for both blacksmithing and cooking.
Advanced Techniques in Blacksmithing
As you progress in your blacksmithing journey, mastering advanced techniques can elevate your craft to new heights. These methods require practice and precision, but they reward you with the ability to make intricate and robust items. Here’s a guide to some advanced blacksmithing techniques:
Forge Welding
Forge welding is a process of joining two pieces of metal together at high temperatures without the use of fillers or fluxes. It’s a skill that demands timing, temperature control, and pressure application. To forge weld:
- Heat both pieces to a white-hot temperature.
- Clean any scale from the surfaces to be joined.
- Join the pieces by firmly hammering them together.
Damascus Steel Creation
Damascus steel is known for its strength, resilience, and distinctive patterns. It’s made by layering different types of steel and forge welding them together. The process involves:
- Stacking alternating layers of high and low carbon steels.
- Forge welding the stack into a solid billet.
- Folding and re-welding the billet multiple times to make layers.
- Acid etching the finished product to reveal the pattern.
Scrollwork
Scrollwork involves bending metal into spirals or volutes. This decorative technique adds elegance to any piece. To make scrollwork:
- Plan your design and mark the start point on the metal.
- Heat the metal to a red-hot state.
- Bend the metal around a scrolling jig or by freehand to form the scroll.
Repoussé and Chasing
Repoussé and chasing are techniques used to make raised or indented designs on metal. Repoussé involves hammering the metal from the back to form a raised design, while chasing is done from the front to refine the details. The steps include:
- Sketching the design onto the metal.
- Annealing the metal to make it malleable.
- Shaping the design using various punches and hammers.
Mokume-Gane
Mokume-gane is a Japanese technique that produces a wood grain effect on metal. It’s similar to Damascus steel but uses non-ferrous metals. The process includes:
- Layering different colored metals like copper, silver, and gold.
- Forge welding the stack to bond the layers.
- Twisting or compressing the billet to make patterns.
- Slicing the billet to reveal the design.
Using these advanced techniques, your work will be functional and artistic. Success in blacksmithing comes from patience and practice. Keep honing your skills and experimenting. In time, you'll develop a unique style.
Troubleshooting Common Issues in Blacksmithing
Even the most skilled blacksmiths can encounter issues in their work. Here’s a guide to troubleshooting some common problems, ensuring your blacksmithing remains a rewarding and productive experience.
Metal Not Heating Evenly
If you find that your metal isn’t heating evenly, it could be due to improper placement in the forge. Make sure the metal is centered in the hottest part of the fire and turn it regularly for uniform heat distribution.
Difficulty in Hammering
When the metal doesn’t shape as expected, it might not be at the right temperature. Remember, different colors indicate different temperatures: dark red is cooler, bright orange is ideal. Also, check if you’re using the right type of hammer for the task.
Excessive Scale Formation
Scale can interfere with forging and finishing. To minimize scale, avoid overheating the metal and brush it off regularly during the heating process.
Forge Welding Challenges
Forge welding is complex and requires precise conditions. If your welds aren’t holding, ensure the pieces are clean and at the right welding temperature. A light coating of flux can also help.
Joint Pain from Hammering
Incorrect hammering techniques can lead to joint pain or injury. Hold the hammer near the end of the handle and let the weight of the hammer do the work rather than using your arm strength.
Anvil Issues
If your anvil is bouncing or not providing a solid surface, check its foundation. It should be securely mounted on a stable base. Rubber mats underneath can reduce bounce and noise.
Tongs Losing Grip
If your tongs keep slipping, they may not be the right shape for the workpiece. Adjust the jaws to fit snugly around the metal, or consider getting or making tongs better suited for the job.
By addressing these common issues, you can improve your blacksmithing technique and enjoy a smoother forging process. Patience and practice are key to overcoming challenges in this craft.
Maintenance and Upkeep of Your Blacksmith Forge
Keeping your blacksmith forge in top condition is crucial for ensuring the safety, efficiency, and longevity of your equipment. Here’s a straightforward guide to maintaining your forge:
Regular Cleaning
After each forging session, clean out the forge to remove clinker, ash, and debris. This prevents airflow blockages and maintains consistent heating.
Inspect and Repair
Regularly inspect your forge for any signs of wear or damage. Check the refractory lining for cracks and repair them with refractory cement to prevent heat loss and structural issues.
Lubrication
If your forge has moving parts, such as a blower, lubricate them periodically to ensure smooth operation and prevent rusting.
Monitor Fuel Consumption
Keep an eye on how much fuel you’re using. If you notice a sudden increase, it could indicate an issue with your forge’s efficiency.
Airflow Adjustment
Adjust the airflow to match the type of metal you’re working with. Proper airflow is essential for reaching and maintaining the correct temperatures.
Safety Equipment Check
Always check your safety equipment, including gloves, goggles, and aprons, for any damage or wear. Replace them as needed to ensure maximum protection.
By following these simple maintenance steps, you can keep your blacksmith forge running smoothly and extend its service life. A well-maintained forge is a safe and productive one.
Safety in Blacksmithing
When it comes to blacksmithing, safety is paramount. This craft involves high temperatures and heavy materials, so taking the right precautions is essential to prevent accidents and injuries. Here’s a comprehensive guide to staying safe while forging:
Personal Protective Equipment (PPE)
- Safety Glasses: Protect your eyes from sparks, metal shards, and debris.
- Face Shield: Use it when grinding or cutting metal to shield your face.
- Ear Protection: Wear earplugs or earmuffs to guard against the noise from hammering and machinery.
- Gloves: Heat-resistant gloves can protect your hands, but be mindful of when it’s safer not to wear them, such as when operating machinery where they could get caught.
- Apron: A leather apron can shield you from sparks and hot metal.
- Boots: Wear sturdy boots to protect your feet from falling objects and hot metal.
Forge Safety
- Fire Extinguisher: Always have a fire extinguisher or bucket of water nearby in case of fire.
- Proper Ventilation: Ensure your workspace is well-ventilated to avoid inhaling harmful fumes, especially when working with materials like galvanized steel.
- Regular Inspection: Check your forge and tools for wear and tear and make repairs as needed.
Working Smart
- Stay Focused: Distractions can lead to accidents, so keep your attention on the task at hand.
- Learn Proper Techniques: Proper hammering and lifting techniques can prevent musculoskeletal injuries.
- Take Breaks: Regular breaks can help you stay alert and reduce fatigue.
- Keep Workspace Clean: A tidy workspace can prevent trips and falls.
Emergency Preparedness
- First Aid Kit: Keep a well-stocked first aid kit in your workshop for immediate response to cuts, burns, or other injuries.
- Know Your Equipment: Familiarize yourself with the operation and emergency stops of all equipment.
- Training: Consider taking a course in first aid and fire safety.
By adhering to these safety guidelines, you can enjoy blacksmithing while minimizing the risk of injury. No piece of forged metal is worth compromising your well-being.
FAQs About DIY Blacksmith Forge
Get answers to faqs about DIY blacksmith forge and start your own forging projects today. Learn about tools, techniques, and safety tips.
A DIY blacksmith forge is a setup that you can build at home to heat and shape metal for blacksmithing projects. It’s a space where you can make tools, art, and more by manipulating metal using heat and tools like hammers and anvils.
Yes, a well-constructed DIY forge can be used for professional blacksmithing. However, it’s important to ensure that it reaches the necessary temperatures and is built to last. Professional blacksmiths often start with DIY forges before investing in commercial ones.
Building and using a DIY forge can be safe if you follow safety protocols. This includes using materials that are designed to withstand high temperatures, ensuring proper ventilation, and wearing protective gear. Always be cautious and informed about the risks involved.
The most common fuels for a DIY forge are propane and coal. Propane is clean-burning and easy to control, making it a popular choice for beginners. Coal, on the other hand, burns hotter and is preferred for larger projects or when welding is required. Always source your fuel from reliable suppliers and ensure it’s suitable for forge use.
Regular maintenance is key to the longevity of your forge. This includes cleaning out clinker and debris, checking for any damage or wear in the refractory lining, and ensuring all connections and hoses are secure. It’s also important to inspect your ventilation system regularly to prevent any blockages that could lead to dangerous fumes accumulating.
First Ignition and Reflection
Wrapping up, making your own forge can be rewarding and practical. With our guide on how to make a blacksmith forge like a pro, you’ll be equipped with the knowledge to build a functional and efficient DIY forge. Follow the clear and detailed steps, and you’ll find that making your forge is not only achievable but also a great way to dive into the world of blacksmithing. Happy forging!


