One day, I felt the urge to try something creative and hands-on. I remembered seeing braided bracelets in shops and thought, why not make one myself? I gathered some colorful threads from my sewing kit. As I began to braid, I realized how relaxing and enjoyable the process was.
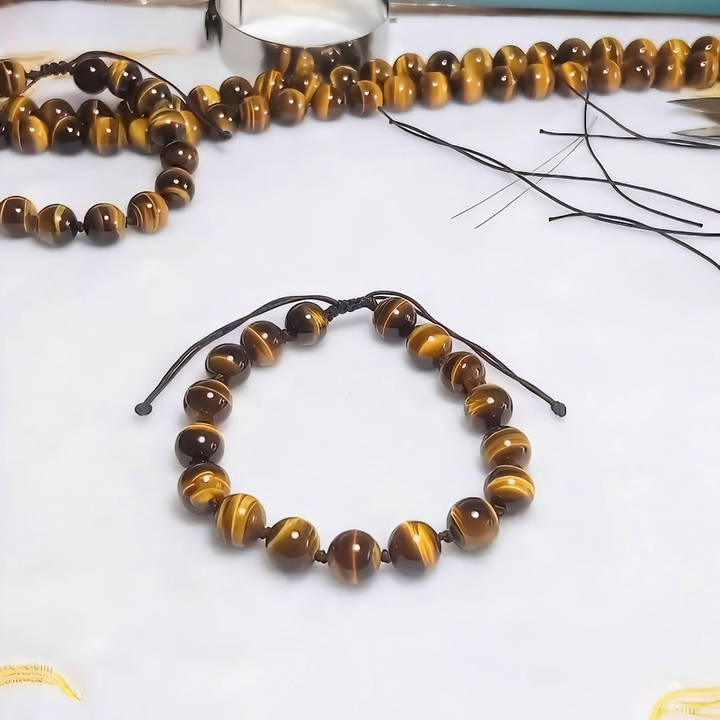
Completing my first DIY braided bracelet filled me with pride. It was amazing to see what I could make with just a few simple materials. Now, I want to help you experience the joy of making your own bracelet. Follow along, and you'll have your own handmade accessory in no time.
Materials Needed
Before we start, let's gather our materials. Each item serves a crucial purpose in our bracelet-making adventure:
- 17 Beads (10 mm Top Grade Brown Thai Guy Beads): These beads will be the focal point of our bracelet, providing elegance and charm.
- 0.8 mm Brown Braided Cord: This will form the base and structure of your bracelet, ensuring durability and flexibility.
- Opening Needle: This tool will help thread the beads and make neat knots.
Why Each Material is Important
- Beads: The 10 mm beads are perfect for adding a touch of sophistication without being too bulky.
- Braided Cord: A 0.8 mm cord strikes a balance between sturdiness and pliability, making the bracelet comfortable to wear while ensuring it stays intact.
- Opening Needle: Makes threading beads easier, especially when working with fine cords.
Step by Step Instructions
Learn how to make a braided bracelet step by step, from cutting the cord and threading beads to securing ends and making adjustable slide knots.
Step 1: Cut Your Cord
First, cut a piece of your braided cord approximately 50 cm long. This length ensures that you have enough cord to make the knots and finish off your bracelet.
- Tip: Having extra cord is always better than cutting it too short.
Step 2: Thread the Beads
Using the opening needle, thread 17 beads onto the cord. Place each bead carefully to ensure even spacing. You may want to do a quick count to confirm you have all 17 beads before proceeding.
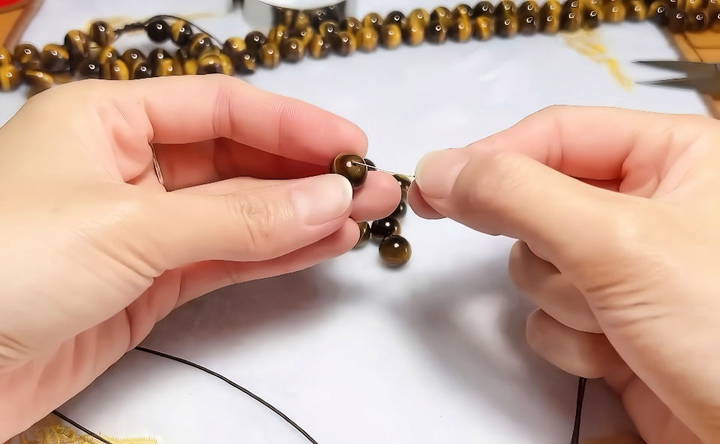
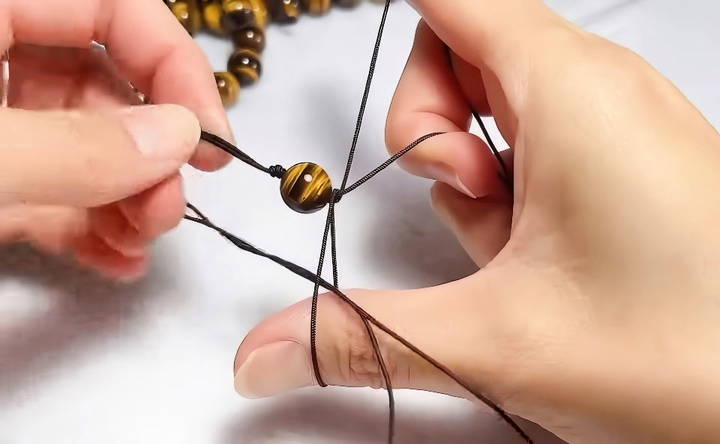
Step 3: Make the Pearl Knot
Learn how to make the pearl knot. Understand the knot with our comprehensive guide for jewelry-making enthusiasts. Perfect your technique today!
Understanding the Knot
The pearl knot is both functional and decorative. It secures the beads while adding a beautiful pattern to your bracelet. Let's break it down:
- Positioning: Slide the first bead to the center of the cord.
- Cross the Cords: Hold the cord ends in each hand and cross them over each other, forming an X shape.
- Make the Loop: With the bead and cords crossed, make a loop with one end of the cord.
- Tighten the Knot: Thread the other end through the loop and pull both ends tight, securing the bead in place.
Repeat this process for each bead. The beauty of this knot is in its uniformity, so try to keep each knot consistent for a professional finish.
Step 4: Secure the Ends
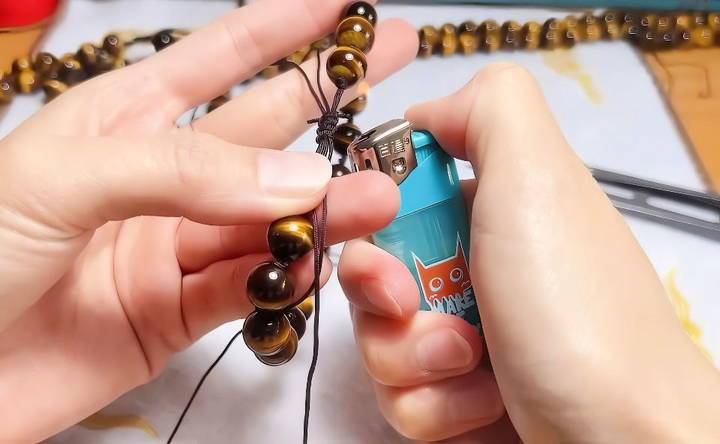
Once all the beads are knotted in place, it's time to secure the ends of the bracelet. Here's how:
- Make the Final Knot: After placing the last bead, make a firm double knot to ensure stability.
- Trim Excess Cord: Use a pair of scissors to carefully trim any excess cord, leaving about 1-2 cm for further adjustment.
Step 5: Make it Adjustable
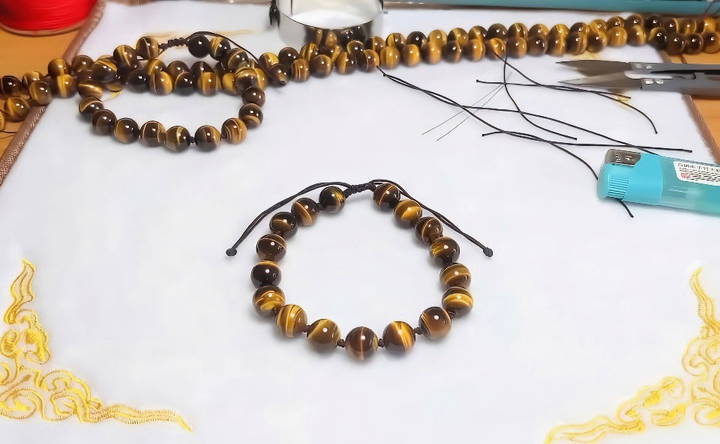
An adjustable bracelet is handy and universally appealing. To make it adjustable:
- Overlap the Ends: Lay the bracelet flat and overlap the two ends.
- Slide Knot: Using a small piece of cord (about 10 cm), tie a sliding knot where the ends overlap. This allows you to adjust the bracelet's size.
Making the Slide Knot
- Wrap: Take the small piece of cord and wrap it around the overlapped ends 4-5 times.
- Thread and Tighten: Thread the ends through the wrap and pull tight, forming a secure knot.
Step 6: Final Adjustments
Now that your bracelet is almost complete, make any final adjustments:
- Ensure that the knots are tight and the beads are evenly spaced.
- Adjust the sliding knot to fit your wrist comfortably.
- Enjoy your new, handmade piece of jewelry!
Additional Tips for Bracelet Making
- Experiment with Colors: Try using different colored cords and beads to match your style preferences.
- Add Charms: Incorporate small charms or pendants to give your bracelet a personalized touch.
- Practice Makes Perfect: If your first attempt isn't perfect, don't worry! Bracelets are a great way to practice knotting and beading skills.
Customization Ideas
Discover unique customization ideas like adding charms, experimenting with materials, personal touches, color combos, and tailored lengths and sizes.
Adding Charms and Beads
One of the easiest ways to customize your braided bracelets is by adding charms and beads. These small additions can make a big difference in the overall look of your bracelet. Here's how you can do it:
- Choose Your Charms and Beads: Select charms and beads that match the style and color of your bracelet. You can find a variety of options at craft stores or online.
- Plan the Placement: Decide where you want to place the charms and beads. You can add them at regular intervals or just at the ends.
- Attach the Charms: Use small jump rings to attach the charms to the bracelet. Open the jump ring with pliers, slide the charm on, and then close the ring around the braid.
- Thread the Beads: If you're using beads, thread them onto the strands before you start braiding. Make sure the beads have holes large enough to fit the strands.
Color Combinations
Choosing the right color combinations can make your bracelet stand out. Here are some tips for selecting colors:
- Complementary Colors: Use colors that are opposite each other on the color wheel, like blue and orange, for a vibrant look.
- Monochromatic Scheme: Stick to different shades of the same color for a more subtle and elegant bracelet.
- Seasonal Themes: Choose colors that match the season. For example, use pastels for spring, bright colors for summer, warm tones for autumn, and cool shades for winter.
- Personal Preferences: Ultimately, choose colors that you or the recipient love. Personal preference always trumps trends.
Adding Personal Touches
Personalizing your bracelet makes it unique and special. Here are some ideas:
- Initials and Names: Use letter beads to spell out initials or names.
- Birthstones: Incorporate birthstone beads to add a personal touch.
- Symbols and Motifs: Add charms or beads that represent something meaningful, like a heart for love or a star for guidance.
Experiment with Different Materials
Don't limit yourself to just one type of material. Mixing different materials can make interesting textures and designs:
- Leather and Fabric: Combine leather cords with fabric strips for a rustic look.
- Metal and Thread: Use metal chains alongside braided threads for a modern, edgy bracelet.
- Natural Elements: Incorporate natural elements like wooden beads or shells for a bohemian vibe.
Custom Lengths and Sizes
Make sure your bracelet fits perfectly by customizing the length and size:
- Measure Your Wrist: Use a measuring tape to find the circumference of your wrist. Add a little extra length for comfort.
- Adjustable Closures: Use adjustable closures like sliding knots or lobster clasps to make the bracelet easy to put on and take off.
- Multiple Strands: Make multi-strand bracelets for a fuller look. You can braid several strands together or layer multiple single-strand bracelets.
By following these customization ideas, you can make braided bracelets that are not only beautiful but also uniquely yours.
Troubleshooting Common Issues
Discover expert tips for troubleshooting common issues in braiding: uneven braids, loose ends, beads not staying, and more for perfect hair every time!
Uneven Braids
- Problem: Your braid looks uneven or lumpy.
- Solution: Ensure you are maintaining consistent tension while braiding. Pull each strand with the same amount of force. Practice makes perfect, so don't get discouraged if it takes a few tries to get it right.
Loose Ends
- Problem: The ends of your bracelet are coming undone.
- Solution: Secure the ends with a strong knot. You can also use a dab of clear nail polish or fabric glue to keep the knots in place. For added security, consider using crimp beads or end caps.
Beads Not Staying in Place
- Problem: Beads are sliding around or falling off.
- Solution: Make sure the beads fit snugly on the strands. If they are too loose, use smaller beads or add a small knot before and after each bead to keep them in place.
Tips for Consistency
Learn essential tips for consistency in your projects, including maintaining consistent tension and ensuring even strand lengths for flawless results.
Consistent Tension
Maintaining consistent tension is key to a neat braid. Here are some tips:
- Practice: The more you practice, the better you will get at keeping the tension even.
- Use a Clipboard: Secure one end of the bracelet to a clipboard or tape it to a flat surface. This will help keep the strands in place while you braid.
- Check Regularly: Periodically check your braid for consistency. If you notice any uneven sections, gently adjust the strands to even them out.
Even Strand Lengths
- Problem: Strands are different lengths, causing an uneven braid.
- Solution: Measure and cut your strands to the same length before you start braiding. If you notice a strand getting shorter as you braid, adjust your technique to ensure all strands are used evenly.
Fixing Mistakes
Fixing mistakes with undoing knots and rebraiding sections. Learn effective techniques for hair repair and maintenance. Boost your skills today!
Undoing Knots
- Problem: You made a mistake and need to undo a knot.
- Solution: Use a pin or needle to carefully loosen the knot. Be patient and gentle to avoid damaging the strands.
Rebraiding Sections
- Problem: A section of your braid looks messy.
- Solution: Undo the braid up to the messy section and rebraid it. This might take some time, but it will result in a cleaner, more professional-looking bracelet.
Preventing Wear and Tear
Learn top tips for preventing wear and tear, fraying ends, and stretching in your fabrics to keep them looking new and lasting longer.
Fraying Ends
- Problem: The ends of your strands are fraying.
- Solution: Use a lighter to carefully melt the ends of synthetic strands. For natural fibers, apply a small amount of clear nail polish or fabric glue to prevent fraying.
Stretching
- Problem: Your bracelet is stretching out over time.
- Solution: Use materials that have minimal stretch, like leather or waxed cord. Avoid pulling too tightly when braiding, as this can cause the bracelet to stretch.
By addressing these common issues and following these tips, you can make beautiful, durable braided bracelets.
FAQs About DIY Braided Bracelets
Discover the FAQs about DIY braided bracelets and learn everything you need to know about materials, techniques, and customization tips.
Yes, you can add beads or charms to your braided bracelet for extra flair. To do this:
Thread the beads: Before you start braiding, thread the beads onto the strands.
Incorporate the beads: As you braid, slide a bead into place before crossing the strands.
Secure the beads: Make sure the beads are evenly spaced and secure within the braid.
Uneven tension: Keep the tension consistent while braiding to avoid a lopsided bracelet.
Twisted strands: Ensure the strands lie flat and untwisted for a neat braid.
Incorrect measurements: Measure the cords accurately to ensure the bracelet fits your wrist.
Loose knots: Tie secure knots at the beginning and end to prevent the bracelet from unraveling.
You can customize your braided bracelet in many ways:
Use different colors: Mix and match colors to make unique patterns.
Add charms or beads: Incorporate decorative elements to personalize your bracelet.
Experiment with braiding techniques: Try different braiding styles, such as fishtail or four-strand braids.
Use various materials: Combine different types of cords, like leather and embroidery floss, for a textured look.
To keep your braided bracelet looking its best:
Avoid water: Remove the bracelet before swimming or showering to prevent damage.
Store properly: Keep the bracelet in a dry, cool place when not in use.
Clean gently: If the bracelet gets dirty, gently wipe it with a damp cloth. Avoid using harsh chemicals or soaking it in water.
Check for wear: Regularly inspect the bracelet for any signs of wear or fraying and repair as needed.
Yes, you can use various types of cords to make braided bracelets, including:
Embroidery floss: Available in many colors and easy to work with.
Leather cord: Adds a rustic, durable touch to your bracelet.
Paracord: Strong and versatile, ideal for outdoor or survival-themed bracelets.
Hemp cord: Eco-friendly and gives a natural look.
Satin cord: Smooth and shiny, perfect for a more elegant bracelet.
Conclusion
I hope my experience inspires you to try making a DIY braided bracelet yourself. It's a fun and rewarding project that anyone can do. Give it a try, and you might discover a new hobby you love.


