Making my own DIY crossbow at home was really exciting. I always had an interest in crafting and building. One day, I decided to try making a homemade crossbow. With some basic tools and materials, I set out on my project. It turned out to be a great challenge and a fun experience. This guide will help you get started safely and easily.
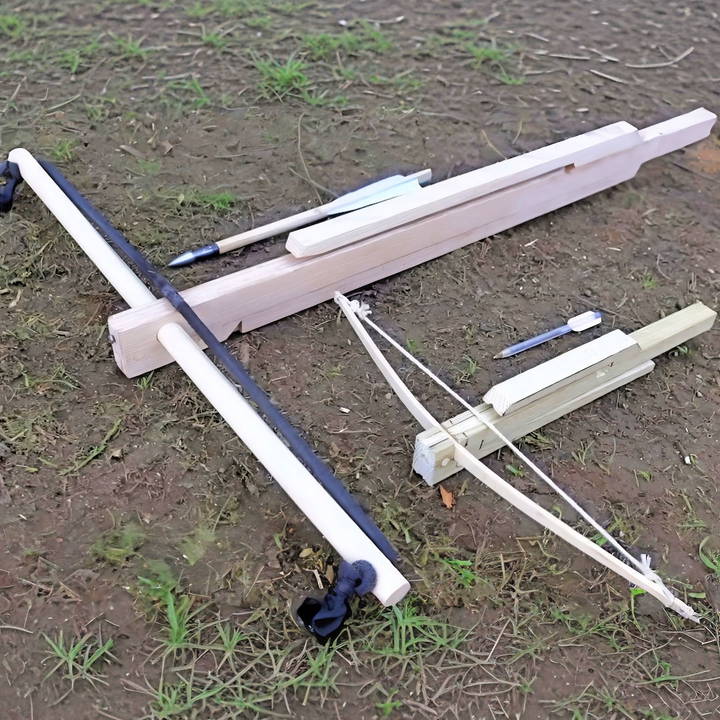
Making a DIY crossbow at home doesn't need to be hard. I took it step by step, following detailed instructions and ensuring safety at each stage. I learned a lot about mechanics and craftsmanship. By the end, I felt a sense of achievement. If you're ready to start your own project, these steps will definitely help you build your first crossbow.
Understanding Crossbow Mechanics
When it comes to understanding how a crossbow works, it's all about the transfer of energy. A crossbow is a weapon that consists of a horizontal bow-like assembly mounted on a frame, which is handheld in a similar fashion to the stock of a long gun.
The Basics
At its core, a crossbow uses elastic potential energy stored in the limbs of the bow, which is converted into kinetic energy as the string propels the bolt forward. Here's a simple breakdown of the process:
- Cocking the Crossbow: You pull back the string, which bends the limbs of the bow, storing energy.
- Locking the String: The string catches in the trigger mechanism, holding the energy in place.
- Releasing the Bolt: When you pull the trigger, the string is released, and the stored energy is transferred to the bolt, sending it flying towards the target.
The Energy Transfer
The amount of energy transferred to the bolt depends on several factors:
- Draw Weight: This is the amount of force required to pull back the crossbow string. Higher draw weight means more energy is stored, resulting in a faster bolt.
- Power Stroke: The distance over which the string propels the bolt. A longer power stroke also contributes to a faster and more powerful shot.
- Efficiency of the Bow: Not all the energy stored in the bow limbs is transferred to the bolt. Some energy is lost due to friction and other factors. The design of the crossbow can affect this efficiency.
The Materials
Modern crossbows are made with advanced materials:
- Limbs: Often made from high-strength composite materials that can store a lot of energy without breaking.
- String: Usually made from strong synthetic fibers that can withstand the forces of being drawn and released repeatedly.
Safety Mechanisms
Crossbows also have built-in safety mechanisms to prevent accidental firing:
- Safety Catch: A device that locks the trigger until you're ready to shoot.
- Anti-Dry Fire: Prevents the crossbow from firing when there is no bolt in place, which could damage the crossbow.
Knowing these mechanics is key for using or making a crossbow. It's about forming a system that efficiently converts energy into motion. Always handle your crossbow carefully and prioritize safety.
Materials Needed and Their Purpose
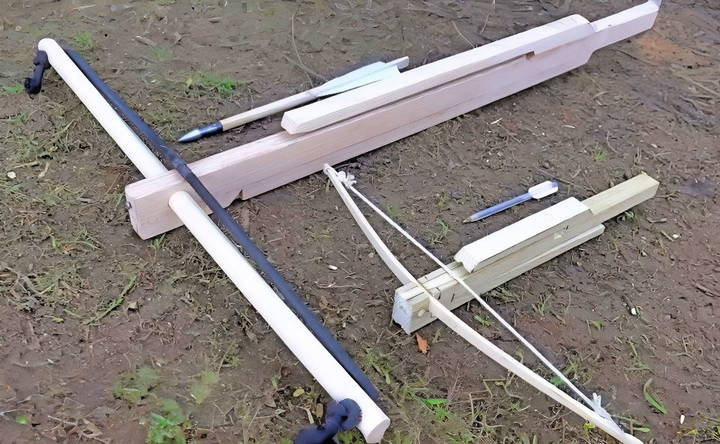
- Old Garden Boarding: This serves as the primary stock of the crossbow. I chose a worn piece to honor the original Skane bow's aesthetic, designed for functionality over appearance.
- Garden Cane/Bamboo/Fiberglass Post/U PVC Piping: For the bow itself. Each material offers flexibility and durability, crucial for launching projectiles.
- Elastic Bands/Bungee Cords: If traditional materials for the bow are unavailable, these provide a modern alternative, ensuring that the crossbow can still function.
- Saw, Chisel, Stanley Knife (or Craft Knife): These tools are necessary for shaping the crossbow's stock and cutting precise grooves for the trigger mechanism and bow placement.
- Drill and Dowel: For making pivot points that allow the trigger mechanism to function smoothly.
- String: To connect the ends of the bow, enabling it to launch projectiles.
- Sandpaper: For smoothing out grooves and ensuring the crossbow's bolt glides smoothly.
Step by Step Instructions
Learn how to make a crossbow with our step-by-step instructions. From crafting the stock to fine-tuning, we've got you covered. Follow our guide now!
Step 1: Crafting the Crossbow's Stock
The process began with marking and cutting the old garden boarding to shape the stock of my crossbow. A critical dimension here includes making the stock about four centimeters wide, ensuring it fits comfortably in hand while providing enough surface area for the trigger mechanism and bow.
Step 2: Creating the Trigger Mechanism
The trigger mechanism was surprisingly simple to construct. I cut a smaller piece from the garden boarding, then carefully carved out a notch and a pivot point where the trigger would meet the stock. The precise measurement wasn't as crucial as ensuring the trigger could rotate freely, providing the mechanism necessary to launch the bolt.
Step 3: Assembling the Bow
Depending on the chosen material—bamboo in my case—I shaped the bow to fit snugly onto the stock. I then strung it tightly, leaving a slight curve to provide the tension needed for launching projectiles. The bow's flexibility was key; it needed to bend without breaking under pressure.
Step 4: Fitting the Bow and Trigger Together
The next challenge was fitting the bow into a groove cut into the stock, ensuring it was secure yet easy to remove or replace if needed. Similarly, I meticulously connected the trigger to the stock, using a dowel as a pivot point. This connection was crucial for the crossbow's functionality, as it allowed the mechanism to hold and release the string efficiently.
Step 5: Fine-tuning for Functionality
Final adjustments included ensuring the trigger mechanism released smoothly and that the bow's string aligned correctly with the bolt notch. This step required patience and minor modifications, such as sanding down rough edges or adjusting the tension in the bowstring.
Real-World Testing
With the construction complete, it was time to test the crossbow. I set up a makeshift target in my backyard, stepping back with both excitement and a bit of apprehension. Drawing back the string and placing a pencil in the groove, I aimed and pressed the trigger. The pencil shot forward, striking the target with a satisfying thunk.
Customization Ideas
Customizing your crossbow can be a fun and rewarding process. It allows you to tailor the weapon to your specific needs and preferences. Here are some ideas to get you started:
Personalize the Appearance
- Paint Job: Give your crossbow a new look with a custom paint job. Use colors and patterns that reflect your style.
- Wraps and Decals: Apply vinyl wraps or decals to the stock for a personal touch.
Enhance Performance
- Upgrade the Scope: A high-quality scope can improve your accuracy and range.
- String Silencers: Reduce noise and vibration by adding string silencers.
Improve Comfort and Usability
- Adjustable Stock: Install an adjustable stock to ensure a comfortable fit for any user.
- Custom Grip: A grip that fits your hand well can make a big difference in control and comfort.
Increase Functionality
- Bolt Holder: Add a bolt holder for easy access to your ammunition.
- Quiver Attachment: A quiver attachment can make carrying bolts more convenient.
Safety Features
- Finger Guards: Install finger guards to protect your fingers while shooting.
- Anti-Dry Fire Mechanism: If your crossbow doesn't have one, consider adding an anti-dry fire mechanism to prevent damage.
Maintenance Upgrades
- Limb Dampeners: These can extend the life of your crossbow by reducing stress on the limbs.
- Better String: Upgrade to a higher quality string for longer life and better performance.
While customization can enhance your experience, it's important to ensure that any modifications do not compromise the safety or legality of your crossbow. Always consult with a professional if you're unsure about making changes to your crossbow.
Troubleshooting Common Issues
Crossbows are robust tools, but like any mechanical device, they can encounter issues. Here's a guide to troubleshooting some common problems you might face with your crossbow.
String Not Locking Into Place
- Solution: Check the trigger mechanism for debris or damage. Ensure the string is properly seated in the latch.
Inaccurate Shots
- Solution: Verify that the scope is correctly mounted and sighted in. Check the bolt's fletching for damage, and make sure you're using the right type of bolts for your crossbow.
Crossbow Feels Stiff When Cocking
- Solution: Lubricate the rail and check for any obstructions. Inspect the limbs for cracks or warping.
Excessive Vibration or Noise
- Solution: Tighten all fasteners and add dampening materials to the limbs and stirrup. Consider using string silencers.
Bolt Drops Immediately After Shooting
- Solution: This could be due to a weak spring in the trigger mechanism or an issue with the limb's tension. Have these components checked by a professional.
Crossbow Won't Cock
- Solution: Ensure the safety is off when attempting to cock the crossbow. If the problem persists, inspect the cocking mechanism for faults.
Dry Firing
- Solution: Never dry fire a crossbow. If it happens accidentally, inspect the limbs and string for damage. Replace any damaged parts before using again.
Limbs Cracking
- Solution: Stop using the crossbow immediately. Cracked limbs can lead to dangerous malfunctions. Replace the limbs with manufacturer-approved parts.
Understand common issues and solutions to maintain your crossbow's longevity. Refer to the manufacturer's manual for maintenance and troubleshooting steps.
Safety First
When it comes to making and using a crossbow, safety is the most important consideration. Here's how you can ensure that your crossbow crafting and usage are as safe as possible:
Understand the Tool
- Know Your Crossbow: Familiarize yourself with all parts of the crossbow and how they work together.
- Read the Manual: If you're using a kit or following a guide, read the instructions thoroughly before starting.
Use the Right Equipment
- Protective Gear: Always wear safety glasses when assembling or adjusting the crossbow.
- Proper Tools: Use the correct tools for assembly to avoid damaging parts or injuring yourself.
Assembly Safety
- Secure Components: Make sure all parts are securely fastened during assembly to prevent accidents.
- Check Mechanisms: Test the safety mechanisms to ensure they are functioning correctly before use.
Safe Handling
- Mind the Direction: Always point the crossbow in a safe direction, even when unloaded.
- Finger Position: Keep your fingers away from the rail and string path to avoid injury.
Shooting Safely
- Clear Area: Ensure the area is clear of people and obstacles before shooting.
- Never Dry Fire: Firing without a bolt can damage the crossbow and cause injury.
Maintenance and Storage
- Regular Checks: Inspect your crossbow regularly for signs of wear or damage.
- Safe Storage: Store the crossbow unloaded and out of reach of children and pets.
Educate Others
- Share Knowledge: If others are using your crossbow, make sure they understand these safety tips.
- Supervise New Users: Always supervise inexperienced users when they are handling the crossbow.
By adhering to these safety guidelines, you can enjoy the process of making and using your crossbow while minimizing the risk of accidents.
FAQs About How to Make a Crossbow
Discover the FAQs about how to make a crossbow, including materials, tools, and step-by-step instructions for a DIY project.
Cut your hardwood to a length that feels comfortable, typically around 38 inches.
Shape the wood to fit comfortably against your shoulder and in your hands.
Carve a groove for the bowstring and a notch for the trigger mechanism.
Sand the stock smooth.
Install a metal rod across the stock where the bow will rest.
Build a trigger mechanism by inserting a metal nail or bolt in the stock.
Ensure the trigger can hold the string when pulled back and release it smoothly when pressed.
Always check for any loose parts before using.
Test the tension of the bowstring; it should be tight but not overstretched.
Inspect the bow for any cracks or signs of wear.
Practice firing in a safe direction, away from people or animals.
Choosing the right string is crucial for the performance and safety of your crossbow. Here’s what you need to consider:
Material: Modern crossbow strings are made from durable synthetic materials like Dacron or Dyneema.
Length: The string should be the correct length for your bow’s limb span. Measure the distance between the limb tips and subtract about 3-4 inches to find the right size.
Strength: Ensure the string can handle the draw weight of your bow. It should be rated for at least as much weight as your bow can exert.
Yes, you can enhance your crossbow's accuracy with a few customizations:
Sights: Attach a red dot sight or a scope to improve your aim.
Stirrup: Add a foot stirrup to the front of your crossbow to make cocking easier and more consistent.
Bolts: Use bolts that are the recommended weight and length for your crossbow model. Consistency in bolt selection can greatly improve accuracy.
Conclusion: A Rewarding DIY Experience
I'm sure you will enjoy making your own homemade DIY crossbow, just like I did. Get your tools ready and start with confidence!


