Starting a DIY diaper cake for a baby shower is quite fun and simple. I first gathered my materials: diapers, rubber bands, a cake base, and some decorations. Then, I rolled each diaper and secured it with a rubber band. As I arranged the rolls into tiers, the cake started to take shape. Adding personal touches made it even more special.
Making this diaper cake was not just an enjoyable activity but also a heartfelt gift. Each step, from rolling diapers to decorating, brought me joy. I loved seeing the final product and knowing it would delight any new parent. Give it a try with these easy steps; it's a special way to show your care and creativity!
With these steps, you'll find making a DIY diaper cake an enjoyable and rewarding experience. It's a perfect blend of creativity and practicality that will surely impress.
Materials Needed and Their Purpose
- Cake Pans (7.5-inch, 9-inch, 10-inch): These are the molds for the cake layers, ensuring uniformity and ease of assembling.
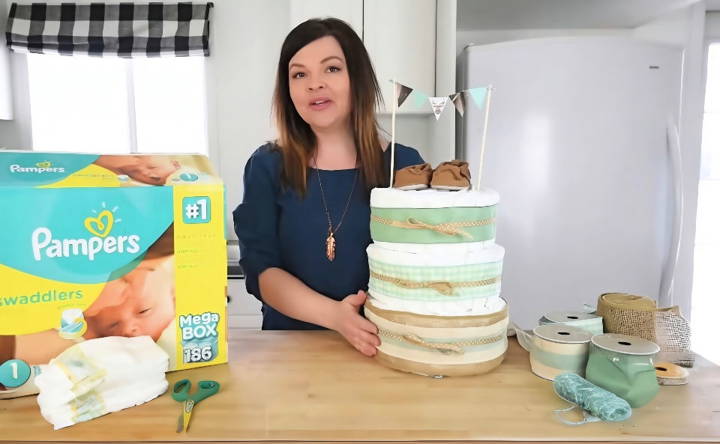
- Diapers: I chose Pampers Size 1, as they are a trusted brand and the perfect size for the cake's structure.
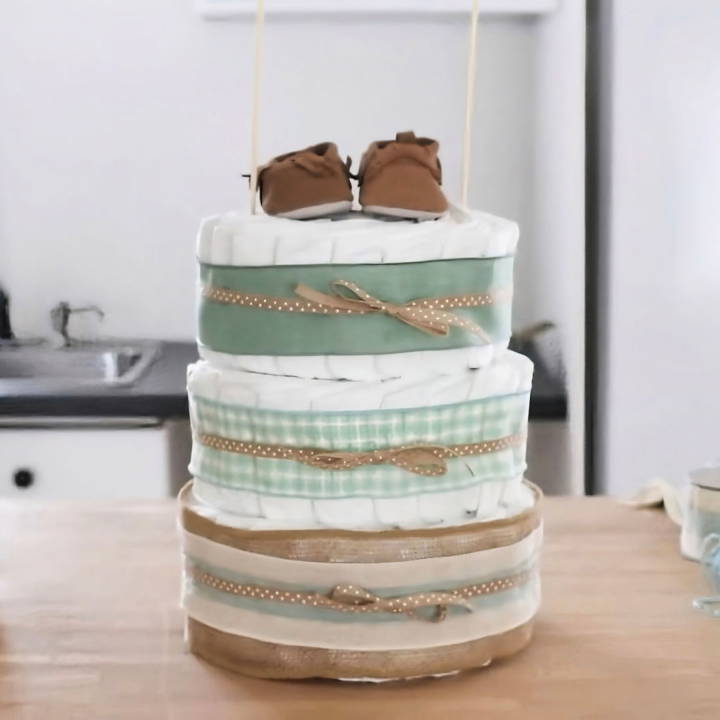
- Ribbon: To beautify the cake and hold the diapers in place. I picked ribbons in mint colors to match my woodland theme.
- Large Elastic Bands: Essential for securing each diaper layer before decoration.
- Cake Topper: I used adorable little moccasins, which double as a gift for the baby.
- Twine and Safety Pins: For attaching decorations and ensuring everything stays in place.
- Scrapbook Paper: To make decorations that match the cake's theme.
- Recycled Wrapping Paper Tube: Acts as the cake's spine and supports the layers.
- Scissors, Bamboo Skewers: Tools needed for cutting and securing decorations.
Step by Step Instructions
Learn how to make a diaper cake with our easy, step-by-step instructions. Perfect for baby showers, this guide simplifies the process for you.
Step 1: Prepare the Base Layer
I started with the largest pan and began placing diapers around its edge, slightly fanning them for coverage, and ensuring the patterned side was facing out for a uniform look. Filling from the exterior to the center ensured no gaps. Once the base was populated, I used one of the large elastic bands to securely wrap around the diapers, then gently removed them from the pan to maintain their circular shape.
Step 2: Repeat for Additional Layers
Using the medium and then small pans, I repeated the process, adjusting the number of diapers to suit the pan size. Each layer eventually sat perfectly on top of the other, making a beautiful tiered effect. The recycled wrapping paper tube, cut to size, was placed in the center of the base layer and served to guide the placement of the subsequent layers, ensuring stability.
Step 3: Decorate with Ribbons
After stacking the layers, I wrapped each with ribbons in varying widths and colors to hide the elastic bands and add a decorative touch. I used safety pins to secure the ends of the ribbons, being careful to only pin through the outermost diapers to avoid damage.
Step 4: Add the Topper and Other Decorations
For the cake topper, the baby moccasins were a cute and thematic choice, resting atop the smallest layer. Additionally, I crafted a bunting using scrapbook paper cut into triangles, attached to twine, and secured it with bamboo skewers inserted into the cake, adding a whimsical touch that tied the whole theme together.
Step 5: Personal Touches
To personalize the cake further, I added small decorations around each layer, such as tiny woodland animal figures and more ribbons, ensuring each element was safely attached and wouldn't pose a hazard.
Tips for Personalization
Making a personalized diaper cake can turn a practical gift into a heartfelt and memorable centerpiece for any baby shower. Here's how you can add a personal touch to your diaper cake:
- Choose a Theme: Start by selecting a theme that resonates with the parents-to-be. It could be based on the nursery decor, a favorite children's book, or a beloved cartoon character. This will guide your choice of colors and decorations.
- Incorporate Interests: If the parents have specific hobbies or interests, such as sports or music, use related miniatures or toys as toppers or around the tiers to reflect these passions.
- Use Monograms: Add a monogram of the baby's initials using cardboard letters or a banner. This adds a unique and classy touch to your diaper cake.
- Color Coordination: Match the ribbon and embellishments with the baby shower's color scheme. If it's a surprise, opt for neutral colors like yellow, green, or grey.
- Add Practical Items: Decorate with useful items like small baby toiletries, pacifiers, or teething rings. These not only serve as decorations but also as gifts for the baby.
- Include Memorable Quotes: Attach tags with meaningful quotes or messages from books or songs. This adds an emotional element to the gift.
- Top It Off: Choose a special item for the top tier, such as a stuffed animal or a pair of baby shoes, which can become a keepsake for the baby.
The key to personalization is thoughtfulness. It's the little details that show you care and make your diaper cake stand out. Keep it simple, sweet, and from the heart.
Gift-Giving Guide
When presenting a diaper cake as a gift, it's important to consider both the presentation and the accompanying items. Here are some tips to ensure your gift stands out:
- Presentation is Key: Wrap your diaper cake in clear cellophane or a soft blanket. This not only protects the cake but also adds an element of surprise. Tie it with a ribbon and attach a card with a personal message.
- Accompanying Gifts: Pair the diaper cake with gifts that complement it. For example, if your cake includes newborn diapers, consider adding a set of baby onesies. If you've decorated the cake with teething rings, include a baby-safe teether gel.
- Consider the Parents: Think about what the parents might need. A book on parenting, a coffee shop gift card for those sleepless nights, or a spa voucher for relaxation can be thoughtful additions.
- Delivery: If you're not able to give the diaper cake in person, choose a reliable delivery service. Make sure it's well-packaged to avoid any damage during transport.
- Safety First: Ensure all items used in the diaper cake and the accompanying gifts are safe for babies. Avoid small items that could be a choking hazard, and ensure all materials are non-toxic.
By following these tips, you'll not only provide a beautiful and practical gift but also show a deep level of care and consideration for the family's needs.
Troubleshooting Common Issues
When crafting a diaper cake, you might encounter a few hiccups along the way. Here's how to solve some common issues with simple, practical solutions:
Unstable Tiers
- Solution: Ensure each tier has a strong base. Use a cardboard round between layers and secure them with dowels or thick straws. Make sure the diapers are tightly rolled and evenly distributed.
Decorations Falling Off
- Solution: Use double-sided tape or ribbon to secure decorations. For heavier items, tie them down with clear fishing line or attach them to a stick that you can insert into the cake.
Diapers Getting Damaged
- Solution: Handle the diapers gently. If you're using rubber bands, don't pull them too tight. Consider using ribbon or string as an alternative to avoid leaving marks.
Cake Doesn't Look Full
- Solution: Fill in gaps with small items like washcloths, socks, or bibs. This not only completes the look but also adds value to your gift.
Running Out of Diapers
- Solution: Plan ahead by calculating the number of diapers you'll need. If you do run short, make a ‘half cake' with an open back or add more layers with other baby essentials.
By anticipating these issues and knowing how to address them, you'll be able to make a beautiful diaper cake with confidence.
FAQs About DIY Diaper Cake
Discover answers to common questions about DIY diaper cakes, including materials, steps, and creative tips for making the perfect baby shower gift.
A diaper cake is a creative and practical gift for expectant parents, resembling a multi-tiered cake made entirely of diapers. It’s not edible but serves as a decorative centerpiece for baby showers or as a thoughtful gift that parents can use once the baby arrives.
Making a diaper cake is a heartfelt way to celebrate the upcoming arrival of a baby. It's not only a charming decoration for a baby shower but also provides the new parents with a stockpile of diapers, which are essential for newborn care.
The number of diapers needed depends on the size and tiers of the cake. For a standard three-tier cake, you might need between 38 to 64 diapers. It’s best to decide the width of the base tier and calculate upwards from there, halving the number of diapers for each subsequent tier.
Yes, you can use various sizes of diapers to make a diaper cake. Using size 1 or size 2 diapers is often recommended because many newborns quickly outgrow the newborn size. This ensures that the parents have time to disassemble and use the diapers before the baby moves on to the next size.
Personalizing a diaper cake is all about the decorations. Consider the theme of the baby shower or the parents' interests when choosing embellishments. You can add items like baby toys, teething rings, bibs, or baby care products. Some people also choose to incorporate the baby's name using letter blocks or other decorative elements.
Final Thoughts
Wrapping up, learning how to make a diaper cake can be a creative and thoughtful gift for a baby shower. Following these step-by-step instructions ensures a polished and beautiful result that impresses everyone at the event. Experiment with different decorations and themes to match the celebration perfectly. Enjoy the process and watch your diaper cake for the baby shower become a memorable centerpiece.


