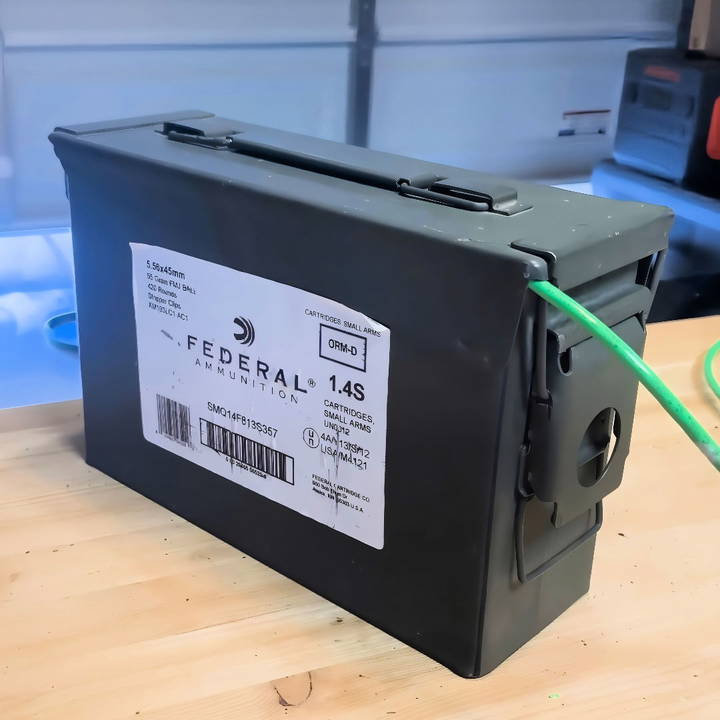
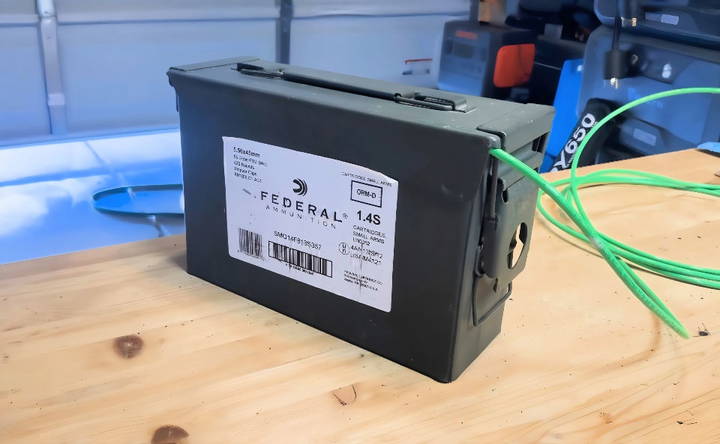
Making a DIY Faraday Cage might sound technical, but it's genuinely simple and worthwhile. One day, I realized the importance of protecting my electronic devices. I started researching how to make a Faraday Cage on a tight budget. It's incredible how such a basic shield can block unwanted signals and protect gadgets from electromagnetic interference.

When it came to actually building it, I found household items can do the job. For instance, using aluminum foil and a metal container worked well. In a few hours, I had my DIY Faraday Cage ready and tested.
So, why not give it a try? It's quite satisfying and rewarding. I'm here to guide you through the simple process, and I'm confident this will safeguard your electronics effectively.
Introduction to Faraday Cages
A Faraday cage is a simple yet fascinating invention that shields its contents from electromagnetic fields. Imagine it as a protective cocoon, similar to how an umbrella shields you from rain. This enclosure can be made from a mesh of conductive materials, such as metal, which blocks external static and non-static electric fields by channeling electricity along and around the mesh, providing constant voltage on all sides of the enclosure.
Why is it called a Faraday Cage?
It's named after Michael Faraday, a pioneering scientist in electromagnetism. In 1836, he discovered that an enclosure made of conductive material could block electric charges and fields from affecting whatever's inside.
How does it work?
The principle is straightforward: an electric charge on a conductor stays on the exterior and doesn't affect the interior. This means that external electric fields cause the electric charges within the cage's conducting material to be distributed in such a way that they cancel the field's effect in the cage's interior.
What are they used for?
Faraday cages safeguard sensitive electronic equipment from lightning strikes and electromagnetic interference (EMI). They're also used in MRI rooms to prevent radio frequency (RF) noise from affecting the images and in various electronic testing environments to ensure a clean signal.
Can I make one at home?
Yes, you can! With some common materials and household tools, you can build a basic Faraday cage. People often make them to protect their electronic devices from EMI or potential solar flares that could disrupt the electrical grid.
Faraday cage effectiveness hinges on its material, design, and construction. Finer mesh and better conductivity enhance performance. Pay attention to these for best results.
Understanding the Need for a Faraday Cage
First off, let's establish what a Faraday cage is. In simple terms, it's a shield; an enclosure made from conductive materials that blocks electromagnetic fields. This concept became relevant to me when learning about EMPs—a burst of electromagnetic energy that can fry electronic devices. Whether from a natural event like a solar storm or something as extreme as a nuclear explosion, the threat seemed significant enough to warrant protection for my gadgets.
Materials Needed and Their Purpose
Building a Faraday cage needed careful selection of materials. Here's what I gathered and why:
- Metal Ammo Can (~$20): The primary container offering the conductive enclosure.
- Pliers and Sandpaper (~$2 to $10): Essential for adjusting and preparing the can.
- Aluminum Foil (~$5): Acts as a gasket replacement to ensure a tight electromagnetic seal.
- Cardboard Box (Free - $1): Serves as insulation inside the can to prevent direct contact of the devices with the metal.
- Tape (~$5): Used to secure the cardboard in place.
- Grounding Wire (~$10 to $15): Important for discharging any accumulated energy from the cage to the earth.
- N95 Mask ($4): Safety equipment to prevent inhalation of dust or metal particles.
- Scissors or a Knife (~$5): For cutting materials to fit.
Totaling around $60 to $85, except for items I already had at hand, this setup was both affordable and straightforward.
Step by Step Instructions
Learn how to build a DIY Faraday cage with step-by-step instructions to protect your electronic devices from EMF. easy to follow with practical tips.
Preparing the Ammo Can
Removing the rubber gasket from the ammo can's lid was my first step, crucial because EMPs can pass through non-conductive materials like rubber. I replaced this gasket with aluminum foil, which involved some trial and error to ensure a snug fit without hindering the lid's closure.
Insulating the Interior
Next came the insulation. I measured and cut cardboard to line the inside of the can, ensuring electronics would not touch the can's metal interior, which could potentially cause damage.
Grounding the Cage
Grounding was a step I initially underestimated. Connecting a grounding wire from the can to a metal pipe in my garage ensured any potential electrical charge could be safely diverted to the earth, enhancing the protection offered by the cage.
Testing the Faraday Cage
Testing was the most nerve-wracking yet exciting part. Placing a radio inside the cage, I cranked up the volume and closed the lid. Silence from the radio confirmed the cage's effectiveness, a moment of true success and relief.
Choosing What to Protect
Deciding what to store in the Faraday cage involved serious thought. Critical devices like a ham radio, a solar-powered charger, and USB drives with backed-up personal and essential data made the cut. This selection ensured I was not just protecting gadgets but safeguarding access to information crucial for emergencies.
Lessons Learned and Tips for Newbies
- Safety First: Don't underestimate the importance of protective gear, especially gloves and masks.
- Patience is Key: Fitting the aluminum foil gasket took several attempts. Be prepared for some back and forth.
- Research: Understanding grounding options and ensuring you have a reliable one nearby is critical.
Advanced Modifications for DIY Faraday Cages
When you've mastered the basics of building a Faraday cage, you might want to enhance its functionality. Advanced modifications can tailor your cage to specific needs, whether it's for larger items or stronger protection. Here's how you can take your DIY Faraday cage to the next level:
- Improving the Mesh: The effectiveness of a Faraday cage largely depends on the mesh size. A finer mesh can block higher frequencies. For advanced protection, consider using a copper mesh with smaller gaps.
- Double Layering: For added security, especially against powerful electromagnetic pulses (EMPs), double-layer your cage. Place one Faraday cage inside another, ensuring they don't touch. The gap between them adds extra insulation.
- Sealing Gaps: Ensure there are no gaps or holes in your cage. Even a small opening can compromise its integrity. Use conductive tape to seal any potential breaches.
- Grounding Your Cage: While not always necessary, grounding can enhance protection. Connect your cage to a grounding rod or the ground port of an electrical outlet using a wire.
- Incorporating Insulation: Place non-conductive material, like foam or cardboard, inside your cage. This prevents stored items from touching the conductive material, which could cause damage during an EMP event.
- Testing for Weaknesses: Regularly test your cage with a radio frequency (RF) detector or by checking if a cell phone receives signals inside the cage. Identify and reinforce any weak spots.
- Custom Sizing: Build your cage to fit specific items. Electronics like laptops or tablets may need custom-sized cages. Measure your items and build accordingly, allowing for extra space for insulation.
- Portable Designs: Consider making a portable Faraday bag using conductive fabrics. These are easier to transport and can protect your electronics on the go.
Enhance your Faraday cage's EMI resistance with advanced modifications. Plan well to ensure each step bolsters interference protection for your electronics.

Safety Precautions
When making a DIY Faraday cage, safety is paramount. Here are key precautions to ensure your project is not only effective but also safe:
- Choose the Right Materials: Select materials that are easy to handle and non-hazardous. Avoid using materials with sharp edges that could cause injury.
- Wear Protective Gear: Always wear gloves to protect your hands from cuts. Safety goggles are also recommended to shield your eyes from any flying debris while cutting metal sheets or mesh.
- Work in a Ventilated Area: If you're soldering any parts of the cage, ensure you're in a well-ventilated space to avoid inhaling fumes.
- Electrical Safety: If you decide to ground your Faraday cage, be cautious. Consult with an electrician if you're unsure about how to safely ground the cage to avoid any electrical hazards.
- Secure Loose Ends: Make sure all wires or metal pieces are securely fastened. Loose ends can be dangerous and may also compromise the effectiveness of the cage.
- Keep Electronics Away: While constructing your cage, keep your electronic devices away from the workspace to prevent accidental damage from tools or materials.
- Test Safely: When testing the effectiveness of your cage, do not use high-voltage equipment. Start with low-power devices like a radio to ensure safety.
- Store Safely: Once your Faraday cage is built, store it in a safe location where it won't be a tripping hazard or get damaged.
- Child and Pet Safety: Keep children and pets away from your workspace and the finished cage. Small parts and metal can be hazardous if swallowed.
- Regular Checks: Periodically inspect your Faraday cage for wear and tear or potential risks, especially if you move or alter it frequently.
By following these safety precautions, you'll build a secure environment for yourself and others while building a Faraday cage. Safety should always come first in any DIY project.
FAQs About DIY Faraday Cage
Discover essential FAQs about DIY faraday cage, covering materials, construction tips, and effectiveness. Learn to protect your devices now.
A Faraday cage is a protective enclosure that blocks electromagnetic fields. It’s made from conductive materials like metal and is used to shield electronic devices from external electric interference.
The cage works by using conductive material to redistribute external electric charges around the outside of the cage, which cancels out electric fields inside the cage. This keeps the contents safe from electromagnetic interference.
Yes, you can make a simple Faraday cage at home. You'll need a few household items like aluminum foil, a box, and some insulating material. Wrap the box in layers of foil and insulate your items inside the box.
You should put any electronic devices that you want to protect from electromagnetic interference. This includes cell phones, radios, USB drives, and even spare electronic parts.
Grounding a Faraday cage is not always necessary, especially for small DIY projects. However, for larger cages or more sensitive equipment, grounding can provide additional protection.
Wrapping Up
In conclusion, learning how to make a DIY Faraday cage can be a valuable skill for protecting your electronics. The effectiveness of a Faraday cage depends on its material, design, and construction. The finer the mesh and the better the conductivity, the more effective the cage. So, if you're planning to build one, pay close attention to these details for the best results.


