Making a DIY ribbon wreath is a joyful and satisfying craft that anyone can enjoy. I remember the first time I crafted one, I felt a great sense of accomplishment. The materials are simple, and the steps are easy to follow. This guide will help you make a beautiful wreath that is perfect for any occasion.
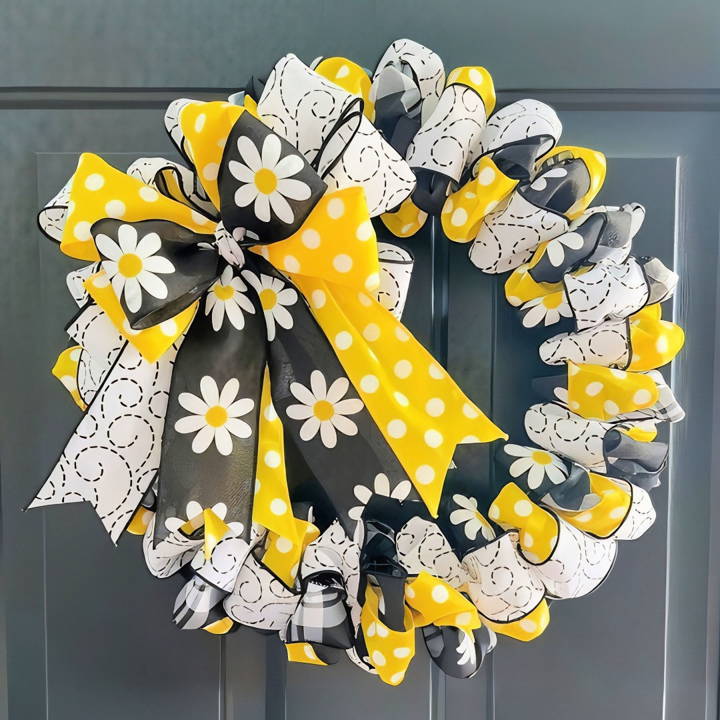
Starting this hobby not only added a cozy touch to my home but also became a perfect gift option. It's an exciting way to spend your free time creatively. I'm sharing this to help you start making your own, beautiful DIY ribbon wreath. These steps will guide you, making it an enjoyable process.
Materials You'll Need:
- Dollar Tree Wreath Frame: This will serve as the base of our wreath. I prefer using it because it's affordable and readily available.
- Ribbon: Four kinds of coordinating ribbon (at least 10 yards each). Variety in patterns and textures adds character to the wreath.
- Zip Ties: These are my go-to for securing the ribbon onto the wreath frame because they are strong and easy to handle.
- Scissors: For cutting the ribbon and trimming the zip ties.
- Wire Cutters: If you need to adjust the wreath frame size.
- Measuring Tape or Ruler: Essential for measuring ribbon lengths accurately.
Step by Step Instructions
Make your own pretty DIY ribbon wreath with our step-by-step instructions. From prepping materials to adding finishing touches, perfect for any occasion!
Prepping Your Materials:
- Select Your Ribbon: Opt for a mix of colors and patterns that complement each other. I chose ribbons with summery themes and colors.
- Prepare the Wreath Frame: If you're using a Dollar Tree frame but prefer a smaller size, use the wire cutters to adjust its diameter.
Why These Materials?
Choosing the right materials is crucial for any craft project. Here's why I selected these specific items:
- Dollar Tree Wreath Frame: It's affordable and provides a sturdy base for attaching ribbon.
- Ribbon: The variety in texture and color adds interest and appeal to the finished wreath.
- Zip Ties: They offer a secure way to attach the ribbon without the mess of glue.
- Scissors and Wire Cutters: Essential tools for cutting materials to the right size.
- Measuring Tape: Ensures uniformity in ribbon size, which is vital for a cohesive look.
Making the Wreath:
Learn how to make a beautiful wreath with expert tips on layering, attaching, and adjusting ribbon, plus adding perfect finishing touches.
1. Layering the Ribbon:
- Start by layering your chosen ribbons on top of each other. This mix will add depth and texture to your wreath.
- Cut the ribbons into strips of about 20 inches each (this can vary depending on the size of your wreath).
2. Attaching the Ribbon to the Frame:
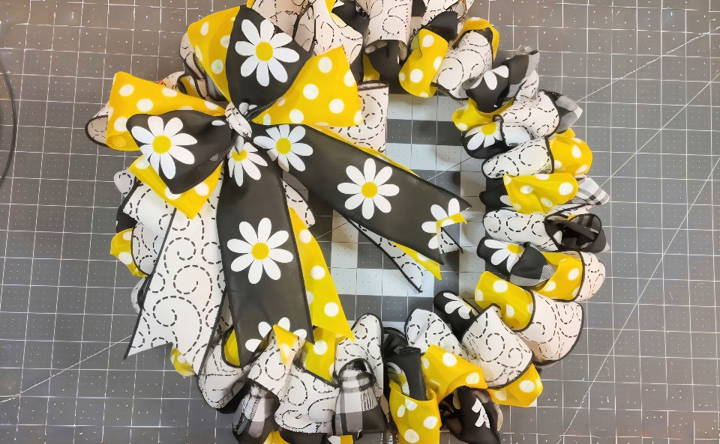
- Take a strip of layered ribbons, pinch one end to make a 'tail,' and secure it to the wreath frame using a zip tie. I start on the innermost ring for a fuller look.
- Repeat this process, attaching ribbons around the entire frame. Ensure each ‘tail' is fluffed out for volume.
3. Adjusting Ribbon Placement:
- Once all ribbons are attached, go around the wreath and adjust the placements to cover any gaps. The goal is for the ribbons to look full and evenly distributed.
4. Adding Finishing Touches:
- If desired, make a simple bow out of your favorite ribbon and attach it to your wreath for an extra touch of charm.
- Trim any excessively long zip ties and ensure your wreath looks neat from all angles.
Customization Ideas for Your DIY Ribbon Wreath
Making a DIY ribbon wreath is not just about crafting a decorative item; it's an opportunity to express your personality and creativity. Here are some customization ideas to make your ribbon wreath uniquely yours:
Choose a Theme
Start by deciding on a theme. It could be seasonal, like spring flowers or autumn leaves, or based on a special occasion such as a wedding, baby shower, or holiday. Your theme will guide your choice of colors, types of ribbons, and additional decorations.
Color Coordination
Select a color palette that reflects your theme. For a harmonious look, choose colors that are next to each other on the color wheel. For something more vibrant, pick complementary colors that are opposite each other on the wheel.
Mix and Match Ribbons
Combine various ribbon types to add depth and texture. Use satin, lace, burlap, or grosgrain ribbons. Play with different widths and patterns to make visual interest.
Add Embellishments
Enhance your wreath with embellishments. Attach flowers, beads, baubles, or charms that complement your theme. You can also use buttons, fabric scraps, or old jewelry for a personal touch.
Personalize with Letters
Incorporate letters to spell out a name, initial, or special message. You can purchase wooden or cardboard letters from a craft store, or make your own from felt or fabric.
Incorporate Natural Elements
For a rustic look, add natural elements like pine cones, dried flowers, or twigs. These can be gathered from your garden or a nature walk, adding a personal and eco-friendly touch.
Light It Up
For a wreath that shines, weave in a string of LED lights. This is especially effective for evening events or as a festive decoration during the holiday season.
Interactive Elements
Make your wreath interactive by attaching small pockets or clips. These can hold seasonal greetings, daily affirmations, or even advent calendar gifts.
Use these tips to craft a beautiful ribbon wreath that reflects your style. Remember, there's no right or wrong in art, so enjoy and experiment!
Advanced Techniques for Crafting a Ribbon Wreath
For those who have mastered the basics of ribbon wreath creation, exploring advanced techniques can add sophistication and flair to your designs. Here are some intricate methods to elevate your ribbon wreath crafting skills:
Layering and Texturing
Experiment with layering different types and textures of ribbons. Use sheer ribbons over solid ones to make depth, or layer patterned ribbons for a complex look. Consider pleating or ruching your ribbons for added texture.
Incorporating Different Materials
Beyond ribbons, you can incorporate other materials like tulle, yarn, or fabric strips. Mix these with ribbons to make a varied and rich texture. You can also use unconventional materials like metal wire or paper for a unique twist.
Making Ribbon Flowers
Learn to make ribbon flowers to add as focal points on your wreath. There are various techniques, such as the loopy bow method, rosettes, or the use of a flower loom. These flowers can be made from ribbons of different widths and fabrics for a diverse effect.
Weaving Techniques
Weave ribbons through the wreath frame for an intricate design. You can make patterns like herringbone or basketweave. This technique requires patience and precision but results in a stunning and durable wreath.
Advanced Knotting
Explore advanced knotting techniques such as the sailor's knot, love knot, or the carrick bend. These knots can be used to attach ribbons or as decorative elements themselves.
Use of Embroidery
Incorporate embroidery into your ribbon wreath for a handcrafted touch. Embroider initials, patterns, or small motifs onto ribbon strips before attaching them to the wreath.
Integrating Beading
Add beads between ribbon loops or make beaded chains to drape across the wreath. This technique adds sparkle and can be color-coordinated with your ribbons.
Adding Dimensional Elements
Make three-dimensional effects by folding ribbons into shapes like butterflies or birds. Attach these to the wreath so they stand out, giving the illusion of movement.
Enhance your ribbon wreath using these techniques for craftsmanship and artistry. Take your time; they need skill and patience. The outcome will be a stunning, professional wreath you'll be proud to show or gift.
Troubleshooting Common Issues
When crafting a DIY ribbon wreath, you might encounter a few hiccups along the way. Here's how to solve some of the most common issues with simple, clear solutions:
Ribbons Keep Slipping
If your ribbons are slipping off the wreath frame, it's likely due to the type of ribbon or the way it's secured.
- Solution: Use a dab of hot glue to fix the ribbon ends to the frame. For a non-permanent fix, use floral wire or zip ties that match the ribbon color.
Uneven Loops
Uneven loops can make your wreath look lopsided.
- Solution: Measure and cut all your ribbon strips to the same length before tying them on. Use a template or cardboard cutout as a guide for consistent size.
Color Fading
Direct sunlight can cause your ribbon colors to fade.
- Solution: Opt for UV-resistant ribbons if your wreath will be exposed to sunlight. Alternatively, spray a UV-resistant sealant over the finished wreath.
Wreath Looks Sparse
A sparse wreath lacks fullness and can appear unfinished.
- Solution: Add more ribbon loops to fill in gaps, or use wider ribbons for a fuller appearance.
Ribbons Fraying
Fraying can occur with certain types of ribbon when cut.
- Solution: Seal the edges of your ribbons with a clear nail polish or use a heat-sealing tool to prevent fraying.
Difficulty Tying Bows
Tying bows can be tricky and may not always turn out perfect.
- Solution: Use a bow-making tool or fork to help make uniform bows. Practice makes perfect!
Decorations Falling Off
If your additional decorations keep falling off, they may not be secured properly.
- Solution: Ensure you're using the right adhesive for the material. Hot glue works well for most decorations, but heavier items may need wire or strong double-sided tape.
Solve these common issues to ensure a beautiful ribbon wreath. Crafting is a learning journey, with each challenge improving your skills.
FAQs About DIY Ribbon Wreath
Discover answers to common questions about DIY ribbon wreaths, including materials, techniques, and tips for making perfect wreaths at home.
Begin by cutting your ribbon into strips—usually about 6 inches long. Fold the strips in half and cut the ends at a diagonal to create a ‘mermaid tail’ effect. Attach the ribbon to the wire frame using zip ties or floral wire, fluffing each piece to make it full and voluminous. You can add layers of ribbon for a fuller look.
Yes, you can mix and match different types of ribbon to make texture and depth. Consider using ribbons of various widths and materials. However, ensure at least some of your ribbons are wired, as they are easier to shape and will give your wreath a consistent form.
The amount of ribbon needed depends on the size of your wreath frame and how full you want your wreath to be. For a standard 12-inch wreath frame, you might use around 15 yards of ribbon. It’s always better to have a little extra than to run out before you finish.
To achieve a professional look, keep your ribbon lengths consistent and fluff out each piece to cover the wire frame completely. If you're adding decorations, space them evenly. Lastly, step back occasionally to check the overall balance and symmetry of your wreath.
To maintain your ribbon wreath, follow these tips:
Store your wreath in a cool, dry place when not in use to prevent the ribbons from drooping.
If storing for long periods, consider using a wreath storage bag or a large plastic bag to keep dust and moisture away.
For wired ribbons, you can reshape them by gently bending the wires if they get out of shape.
Avoid hanging your wreath in direct sunlight for extended periods, as this can cause the colors to fade.
If your wreath gets dusty, use a hairdryer on a cool setting or a soft brush to gently clean it.
Final Thoughts:
Take the first step towards crafting your unique DIY ribbon wreath today. This guide will help you make something special for any occasion.


