Making homemade stamps can be a fun and useful hobby. I remember my first time making a DIY stamp in my kitchen. I gathered a few materials like an eraser, a small knife, and some ink. Carefully, I carved out a simple heart shape on the eraser. It was surprisingly easy and satisfying to see the design come to life.
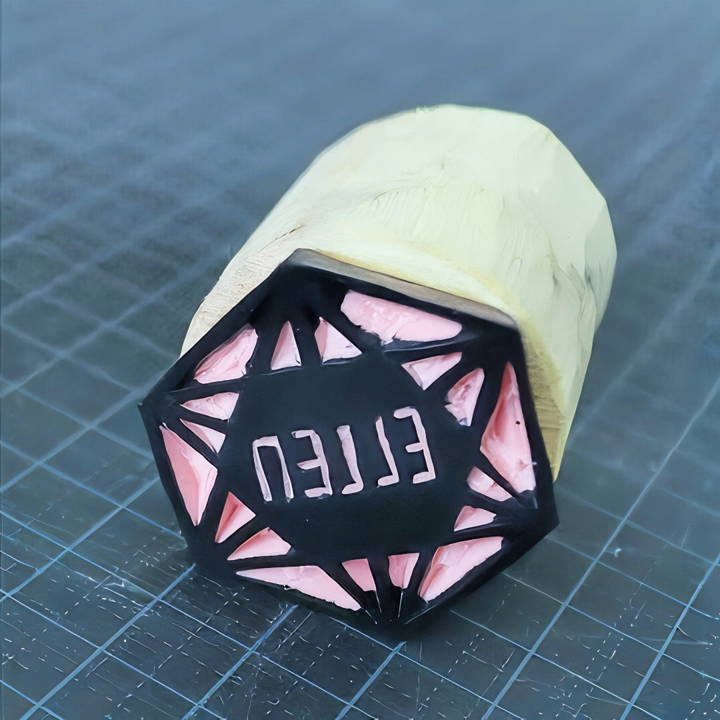
Once I finished carving, I dipped the stamp in ink and pressed it onto paper. The heart imprint looked great, and I was proud of my work. If you want to personalize cards, tags, or scrapbooks, this simple DIY stamp method can help. Just follow these steps, and you'll have your own unique stamp ready in no time.
Choosing the Right Materials
I started with a special carving block, chosen for its soft texture and ease of carving. The materials you'll need for this project include:
- Carving block: Ideal for beginners due to its ease of cut and ability to hold detail.
- Lino cutter: Comes with different blades; I used U-shaped and V-shaped ones.
- X-acto knife: Essential for precise cuts.
- Cutting mat: To protect your work surface.
- Pencil: For sketching your designs.
- Ink pad: To test your stamps.
- Paper or fabric: Depending on where you want to stamp.
Each material plays its role. The carving block acts as your canvas, while the lino cutter and X-acto knife are your tools for bringing the design to life. The cutting mat protects your table or work surface from scratches or cuts.
Step by Step Instructions
Learn how to make a stamp with our step-by-step guide. From drafting your design to adding personal touches, make a custom stamp easily.
Step 1: Drafting Your Design
I started by sketching a simple design directly onto my carving block. A tip here is to choose a design that's not overly complicated for your first attempt. It gives you the feel of carving and how the materials interact with each other.
Step 2: Carving Your Stamp
With my design outlined, I began the carving process using both blades to see which felt more comfortable. The U-shaped blade removed larger areas, while the V-shaped one was perfect for intricate details. Taking it slow is key here; ensure you carve away from yourself to avoid any accidents.
Step 3: Testing and Perfecting
After my initial carving, I made test prints to see how the design transferred. This is a crucial step as it shows what adjustments are needed. It could be deepening your cuts or cleaning up edges. Remember, the beauty of stamp making is in the details.
Alternative Materials: Exploring Cheaper Options
Though I chose a carving block, I was curious about alternative materials that might be more accessible or cost-effective. I experimented with:
- Erasers: Slightly harder to carve but works wonderfully for smaller designs.
- Wine corks: Offer a rustic look, though they can crumble easily, limiting the detail of your design.
Both alternatives proved viable but came with their size and texture constraints. The erasers, albeit a bit tougher to slice, were excellent for finer details. Wine corks, while not suitable for intricate designs, added a unique texture I found appealing for simpler stamps.
Adding a Personal Touch: The Finishing Touches
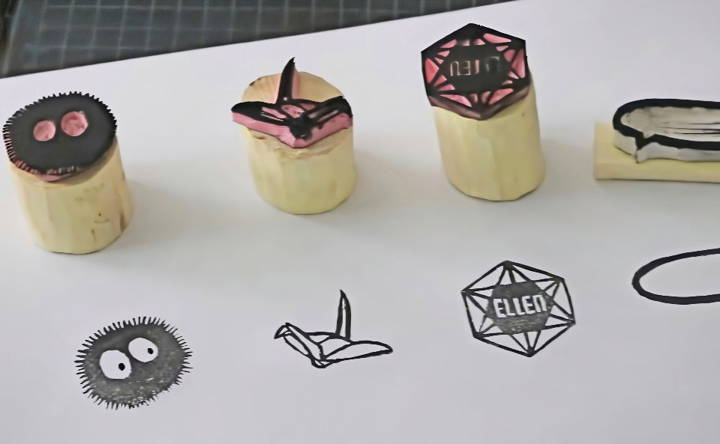
To give my stamps a more professional and easy-to-use finish, I added handles. Searching through the forest, I found a stick that would work. After cutting it into smaller pieces and smoothing them out, I glued the carved stamps onto these makeshift handles. The natural look and feel added an extra special touch to my already personalized stamps.
Advanced Techniques for Stamp Making
When you're ready to take your stamp-making skills to the next level, these advanced techniques will help you make intricate and professional-looking stamps. Here's how to refine your craft:
Multi-Layer Stamping
Multi-layer stamping allows you to make stamps with a sense of depth and complexity. Start by designing a base layer with the main shape of your image. Then, make additional layers with finer details or shading. When you stamp, apply the base layer first, let it dry, and then carefully align and apply the subsequent layers.
Carving with Precision
For those who carve their own stamps, precision is key. Use a linoleum cutter with various blades to achieve different line widths and depths. Always carve away from your body, and keep your non-dominant hand behind the cutter to avoid accidents. Practice on scrap material first to get a feel for the tool and the pressure required.
Gradient Inking
Gradient inking adds a beautiful, multi-tonal effect to your stamps. To achieve this, use an ink blending tool or sponge to apply two or more colors to your stamp, blending where they meet. Experiment with color combinations and blending techniques to make unique effects.
Heat Embossing
Heat embossing gives your stamped images a raised, glossy finish. After stamping your image with embossing ink, sprinkle embossing powder over it, tap off the excess, and then use a heat gun to melt the powder. This technique works best on heavier paper or cardstock to prevent warping.
Masking for Complex Designs
Masking lets you make layered images without overlap. Stamp your foreground image first, then cover it with a mask (a paper cut-out of the image). Stamp your background image over the mask, and when you remove it, your foreground image will be crisp and clear, with no background ink on it.
Using Photopolymer Stamps
Photopolymer stamps are clear stamps that allow for precise placement. They're ideal for complex designs where alignment is crucial. Since they're transparent, you can see exactly where you're stamping, which is perfect for multi-layered images.
Use these advanced techniques to make functional and artistic stamps. Practice each technique and prioritize safety, especially with sharp tools or heat.
Maintenance and Care for Your Stamps
Taking care of your stamps is crucial for ensuring they last a long time and continue to make clean, crisp impressions. Here's a guide to maintaining your stamps with simple, easy-to-follow steps:
Cleaning After Use
After each use, wipe your stamp with a damp cloth to remove any ink residue. For detailed stamps, use a soft-bristled toothbrush to gently clean the crevices. Avoid using harsh chemicals that can damage the rubber or polymer material.
Proper Storage
Store your stamps in a cool, dry place away from direct sunlight, which can cause the stamp material to degrade over time. If you have clear stamps, keep them on their backing sheet and in a protective sleeve to prevent them from losing their stickiness.
Refreshing Ink Pads
Ink pads can dry out or become unevenly inked with use. To refresh them, add a few drops of ink refill to the pad and use a plastic knife or spatula to spread the ink evenly. This will help maintain the quality of your stamped images.
Handling with Care
Be gentle when using your stamps. Press evenly and avoid rocking the stamp back and forth, as this can cause blurred images and uneven wear on the stamp.
Regular Check-Ups
Periodically inspect your stamps for signs of wear or damage. If you notice any tears or cracks, it may be time to replace the stamp to ensure the best quality impressions.
Follow these tips to keep your stamps ready for your next project. A little care preserves your collection's life and quality.
FAQs About How to Make a Stamp
Get answers to faqs about how to make a stamp, from materials required to step-by-step instructions. Learn everything you need to make custom stamps!
Start by sketching your design on paper. Keep it simple, especially if you’re a beginner. Once you’re happy with the sketch, transfer it onto your carving block or eraser by drawing the mirror image of your design. This is important for the design to stamp correctly.
Use your lino cutter or X-acto knife to carefully carve out the negative space around your design on the carving block or eraser. The parts you leave raised will form the stamp’s design. Remember to cut away from your body and keep your fingers clear of the blade’s path for safety.
Yes, you can make stamps using materials like potatoes or sponges for a less permanent option. For a potato stamp, cut the potato in half, draw your design on the cut surface, and then cut around the design to make a raised pattern. With a sponge, simply cut it into the shape you desire.
Once your stamp is carved, apply ink or paint to the raised design. Test it on scrap paper first to ensure it stamps clearly. When you’re ready, press it firmly onto the surface you want to stamp. Be sure to clean your stamp after use to keep it in good condition.
For a clear and detailed stamp design, start with a high-contrast sketch. Use fine tools like a small V-gouge for intricate details. After carving, test your stamp on different surfaces and with various ink densities. If the design isn't clear, refine the carving. Protect the design by applying a thin layer of lacquer or clear nail polish, which can also help to transfer ink more cleanly. Remember, practice makes perfect, so don't hesitate to try multiple drafts of your design!
Wrapping It Up: The Final Verdict
With a bit of practice and patience, making your own DIY stamps can be a rewarding activity. Give it a go, and you'll be surprised at what you can make. These simple steps will help you get started and inspire your creativity.


